Difference between revisions of "BCX Manager Settings"
m |
m |
||
| Line 33: | Line 33: | ||
==Disk Quotas== | ==Disk Quotas== | ||
| + | |||
| + | When using the File Server Connector on the servers that hold user's home folders, the BCX Server can manage quota information. | ||
| + | This can then be used within the Manager and configured to show users their quota upon login with a small notification. | ||
| + | |||
| + | |||
| + | [[File:bcx settings isk quota notification.png|link=]] Image of disk quoto info on station notification | ||
| + | |||
| + | |||
| + | ===NTFS Disk Quota=== | ||
| + | |||
| + | |||
| + | When the BCX File Server Connector service starts, it checks to see if NTFS quota settings are enabled on each disk. | ||
| + | If NTFS disk quotas are enabled, these quotas will be used for all user home folders located on this disk. | ||
| + | |||
| + | If using NTFS disk quotas, you can Enable Legacy NTFS Quota Management from within BCX Manager - Settings, | ||
| + | and manage individual users and user template quotas from within BCX Manager. | ||
| + | |||
| + | |||
| + | ===File Server Resource Manager (FSRM Quotas)=== | ||
| + | |||
| + | |||
| + | File Server Resource Manager is the preferred method and offers much more flexibility | ||
| + | with options to set multiple limits and different actions for each limit. | ||
| + | Quotas can be assigned at a top folder level and automatically propagated to all sub folders. | ||
| + | |||
| + | First disable NTFS disk quotas if enabled and restart the BCX File Server Connector on that server. | ||
| + | If NTFS disk quota management is disabled, BCX will assume home folders located on this disk are using FSRM quota management. | ||
| + | |||
| + | When using this method BCX simply reads quota values from FSRM. We recommend using the Microsoft tool under | ||
| + | Administrative Tools - File Server Resource Manager on your file servers to manage your quota settings. | ||
| + | |||
| + | You can mix NTFS quotas and FSRM quotas on different disks on the same server. For example, you can have NTFS quotas enabled on D:, | ||
| + | and File Server Resource Manager quotas on E:. | ||
| + | |||
| + | |||
| + | ===Configure Settings=== | ||
| + | |||
| + | |||
| + | [[File:bcx settings disk quotas.png|link=]] Image of settings disk quotas | ||
| + | |||
| + | |||
| + | '''Disk Quota Mode:''' Here you can set the disk quota mode to disabled, ADS Home Directory or Documents Path. | ||
| + | ADS Home Directory uses the users home folder directory location to check quota information, as specified in the users Active Directory properties. | ||
| + | Documents Path will use the users Documents path for when using redirected folders in Group Policy. | ||
| + | |||
| + | '''Popup on logon:''' Use this value to specify how long the popup remains on screen for, | ||
| + | or set to 0 to disable automatic popup. | ||
| + | |||
| + | '''Auto refresh quota:''' Use this value to specify how often the client should refresh it's quota information. | ||
| + | |||
| + | '''Only enable if member of group:''' Use this dropdown list to select the user Organisational Unit or Security Group that these settings apply to. | ||
| + | |||
| + | '''Enable Legacy NTFS Quota Management from within BCX Manager:''' Allows the use of NTFS disk based quota system which can be edited | ||
| + | from within user properties in BCX Manager. | ||
| + | |||
==Email Server== | ==Email Server== | ||
Revision as of 11:23, 23 July 2020
Accessible from the File Menu, the Settings screen can be used to modify various sections of the BCX Manager.
Contents
- 1 Advanced
- 2 AV Information
- 3 AV Reporting Services
- 4 BCX Portal Logon
- 5 Connector Services
- 6 Default Assignments
- 7 Disk Quotas
- 8 Email Server
- 9 Logon History
- 10 MIS Connections
- 11 MIS settings
- 12 Package Types
- 13 Package Tasks
- 14 Printer Tasks
- 15 Scheduled Tasks
- 16 Station Information
- 17 Users and Computers
- 18 Web Tools
- 19 Settings.XML
Advanced
AV Information
AV Reporting Services
BCX Portal Logon
The BCX Customer Portal gives you access to our Knowledge base along with all your customer details, site visit reports, support cases, previous orders and invoices so we have now made it even easier to access these by incorporating auto logon through the BCX Manager.
You can save your login username and password by open the settings screen from the File menu. Choose BCX Portal Logon and simply set your details.
File:bcx settings portal.png Image of settings portal
You can then use the BCX Customer Portal button on the File - Web menu to seamlessly logon.
File:bcx file web.png Image of file - web
Connector Services
Default Assignments
Disk Quotas
When using the File Server Connector on the servers that hold user's home folders, the BCX Server can manage quota information. This can then be used within the Manager and configured to show users their quota upon login with a small notification.
File:bcx settings isk quota notification.png Image of disk quoto info on station notification
NTFS Disk Quota
When the BCX File Server Connector service starts, it checks to see if NTFS quota settings are enabled on each disk. If NTFS disk quotas are enabled, these quotas will be used for all user home folders located on this disk.
If using NTFS disk quotas, you can Enable Legacy NTFS Quota Management from within BCX Manager - Settings, and manage individual users and user template quotas from within BCX Manager.
File Server Resource Manager (FSRM Quotas)
File Server Resource Manager is the preferred method and offers much more flexibility with options to set multiple limits and different actions for each limit. Quotas can be assigned at a top folder level and automatically propagated to all sub folders.
First disable NTFS disk quotas if enabled and restart the BCX File Server Connector on that server. If NTFS disk quota management is disabled, BCX will assume home folders located on this disk are using FSRM quota management.
When using this method BCX simply reads quota values from FSRM. We recommend using the Microsoft tool under Administrative Tools - File Server Resource Manager on your file servers to manage your quota settings.
You can mix NTFS quotas and FSRM quotas on different disks on the same server. For example, you can have NTFS quotas enabled on D:, and File Server Resource Manager quotas on E:.
Configure Settings
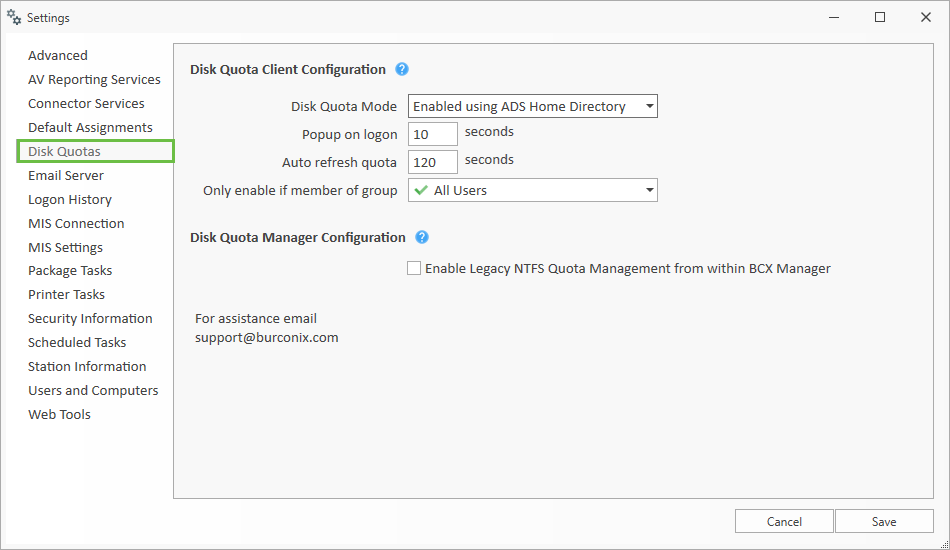 Image of settings disk quotas
Disk Quota Mode: Here you can set the disk quota mode to disabled, ADS Home Directory or Documents Path.
ADS Home Directory uses the users home folder directory location to check quota information, as specified in the users Active Directory properties.
Documents Path will use the users Documents path for when using redirected folders in Group Policy.
Popup on logon: Use this value to specify how long the popup remains on screen for, or set to 0 to disable automatic popup.
Auto refresh quota: Use this value to specify how often the client should refresh it's quota information.
Only enable if member of group: Use this dropdown list to select the user Organisational Unit or Security Group that these settings apply to.
Enable Legacy NTFS Quota Management from within BCX Manager: Allows the use of NTFS disk based quota system which can be edited from within user properties in BCX Manager.
Email Server
Logon History
MIS Connections
The settings for SIMS can normally be found in your S:\Sims\Connect.ini file and will have been configured by Burconix. Please contact support if you require any changes to be made here.
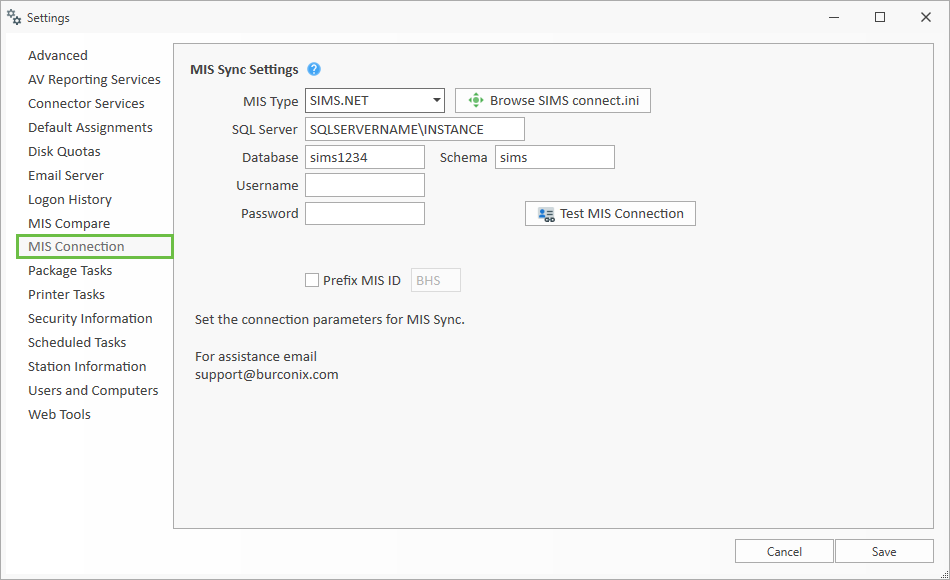 Image of mis connection SIMs
The settings for Facility CMIS and will have been configured by Burconix.
Please contact support if you require any changes to be made here.
Additional setup is required for Photo support in BCX Manager. An IIS application
must be set up on the ePortal to retrieve the Photos from MIS for use by BCX Manager.
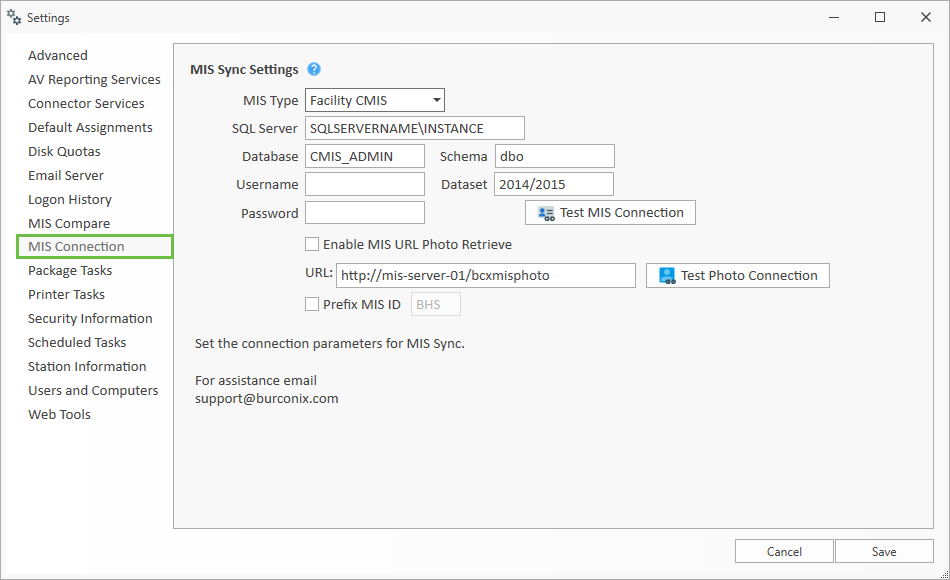 Image of mis connection CMIS
MIS settings
Settings on this tab will become the defaults for all OU's The Default settings can be edited on individual OU's if required.
 Image of mis connection SIMs
'MIS Attribute' – You can specify which AD field you would like the MISID to be stored in.
By default this would normally be the 'employeeID' field but if this is already being used for other software,
(such as Cashless catering or access control) you can select another AD field to write the value to.
'Additional Attribute' – If you would like to copy an additional MIS attribute to AD then tick this box,
and select the MIS attribute and the field in AD you would like it written to.
'Default User Password' – When a user is created via the MIS Sync tool, you can assign a default password selectable from the drop down list. To choose your own custom static password, chose the second option in the list "Custom", and manually type the password you want to use.
'Import Photo on User Creation' – Tick this box to import photos from the MIS dataset into Active Directory when creating a new user.
'Allow MIS Attribute Link Override ' – Ticking this box allows you to change the MIS Attribute from MISID to one available from a generated drop down list. This however, is not advised as you will not be able to use the 'Group' functions in 'MIS Compare'
For information on the Bulk Change OU Datasets option go to Bulk Change Datasets.
Package Types
From here you can change the default package location for each package type, as well as the run command for certain types of package task. You may need this if there are revisions to some of the software used to install packages.
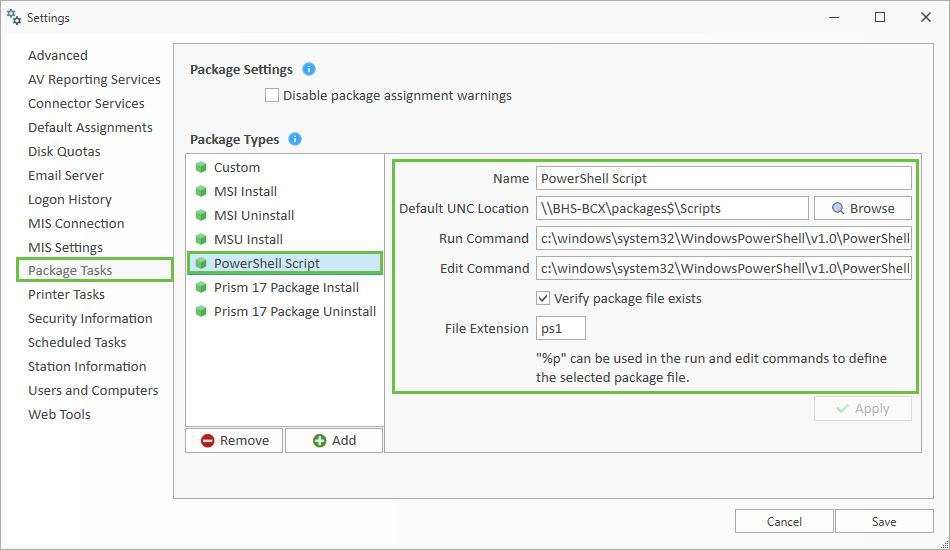
Package Tasks
This is a duplicate of above section with new look controls
To adjust add / adjust later
Printer Tasks
Scheduled Tasks
Station Information
Users and Computers
This screen allows you to modify up to three custom attributes to be displayed in the User Details screen when opened from Users and Computers. If you wish to change a custom attirbute, just type the label you would like to appear the the Display Name box, and the required AD field name into the Attribute box. You can also add additional attributes by enabling the "Show Additional Custom User Tab".
The Exchange Advanced Configuration options will usually be completed by a BCX engineer if required.
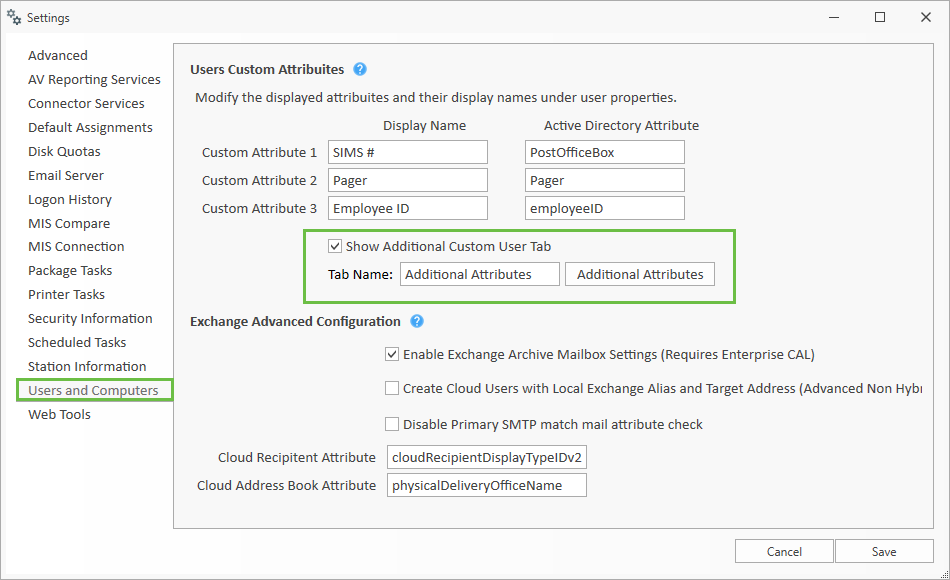 Image showing settings UaC
Attributes on the Additional Custom User Tab can also be utilised in the import of new users if selected here.
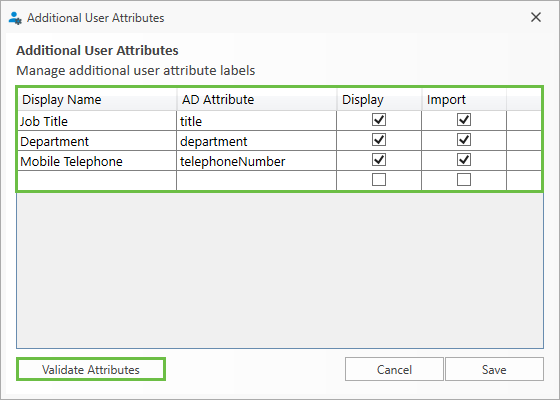 Image showing additional attributes
Once selected to display the attributes will be available in a user's details as shown below.
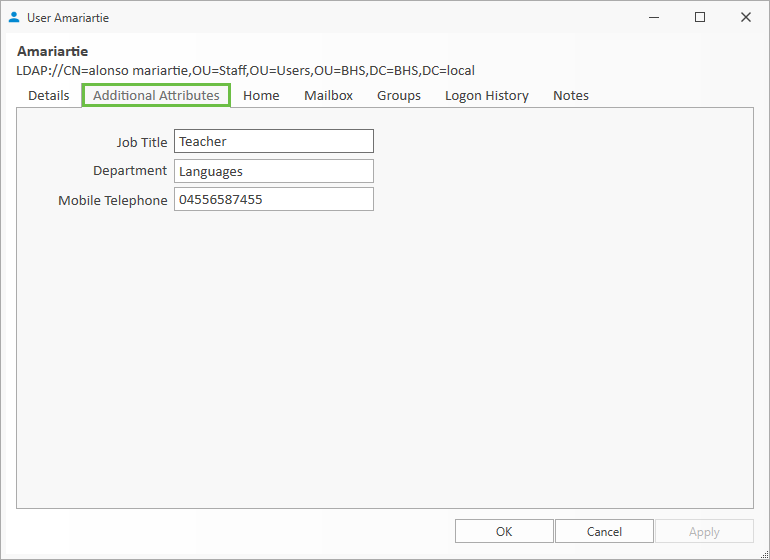 Image showing additional attributes in users properties
And if selected for import, there will be columns added for input shown below.
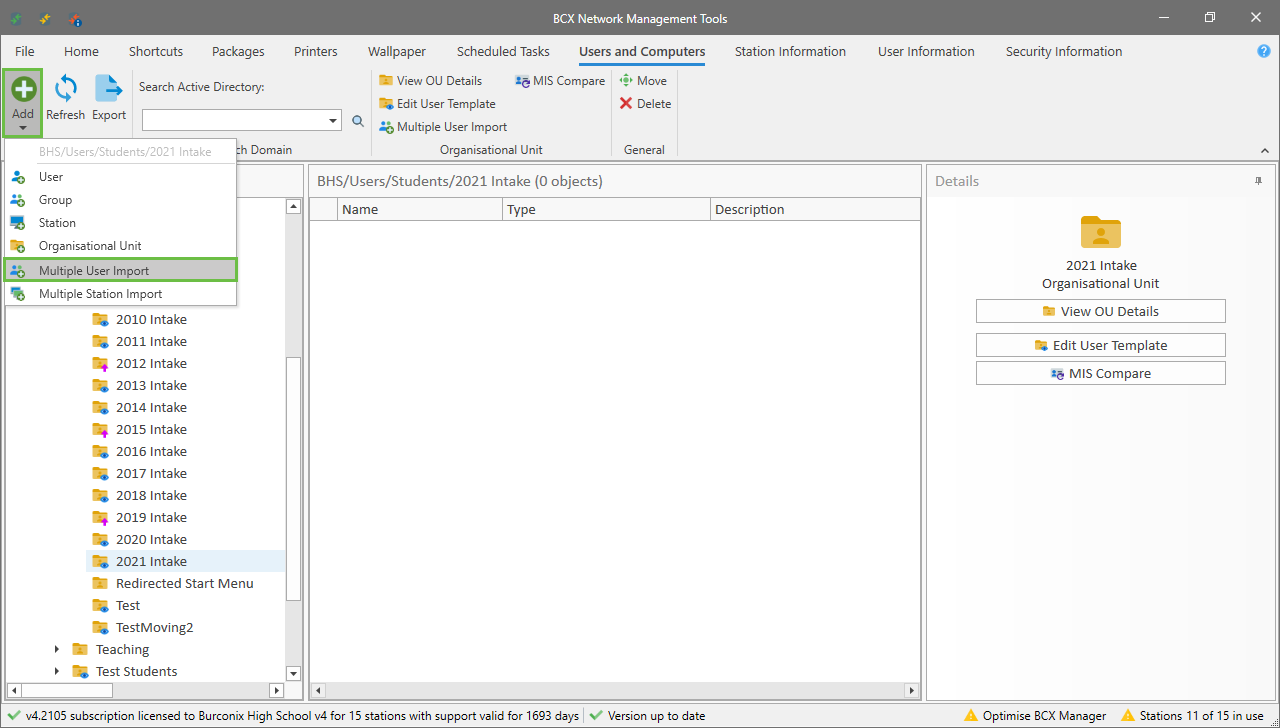 Image showing additional attributes in users import
Web Tools
You can add any http or https web link into the Web Tools section and have it available anywhere you load BCX Manager. Add, sort and delete you web links as well as setting the type of link.
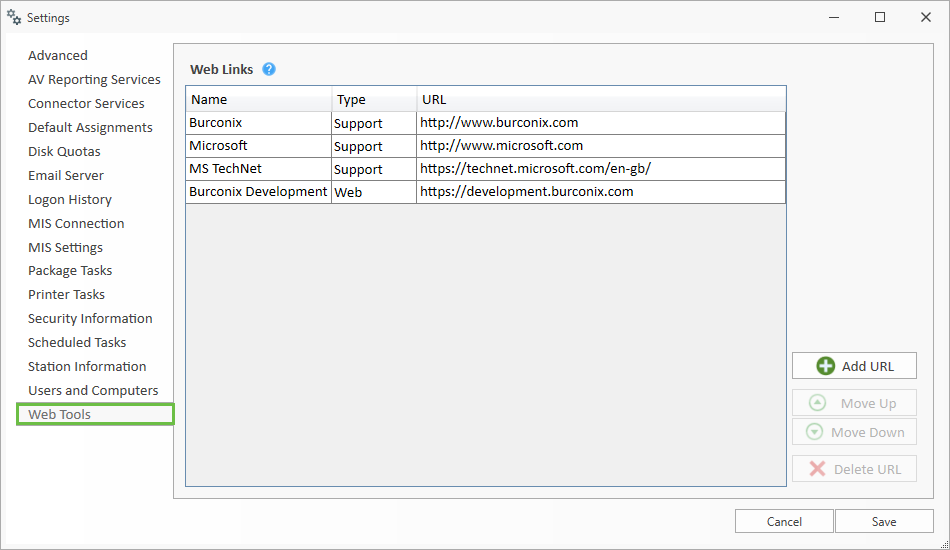 Image showing settings web tools
Links will then be available from File - Web
File:bcx file web.png Image showing manager - file web highlighted
Settings.XML
The Settings.xml can be used to customise the BCX Manager experience. It can be found here: \\bcxmaster\c$\Program Files (x86)\BCX\Managerv3\settings.xml.
Additional OUs
Branding
Return to Contents page