BCX MIS Compare
With BCX Manager you can enable reporting between AD and your MIS system.
Once your MIS has been linked to AD though the BCX tools, you will be able to identify any accounts that are not in sync between the systems. For more information on how to configure BCX Manager with your MIS go to Configuring MIS Connection.
The MIS Compare tool enables you to correct any anomalies, as well as creating groups and synchronising their membership.
This guide will take you through configuring your AD OUs to link to your MIS datasets. Each OU can be configured with different MIS sync settings. The following steps will take you through configuring a single OU and then additional OUs can be configured as required.
Contents
- 1 Accessing MIS Compare
- 2 OU Sync Configuration
- 3 Automatch Existing Objects
- 4 Manual Matching Existing Objects
- 5 Updating Existing AD Objects from MIS
- 6 Create New Users from MIS
- 7 Check Completed OU Sync
- 8 Lookup Linked Person in MIS
- 9 Linking Class Groups to AD
- 10 Updating Group Memberships
- 11 Compare all Configured OUs
- 12 Bulk Change Datasets in September
- 13 Settings for MIS integration
Accessing MIS Compare
Logon to a computer as an Administrator, load BCX Manager and open the 'Users and Computers' tab. Select the OU you wish to sync with your MIS and then either right click, select 'MIS Compare', or use one of the other methods highlighted below.
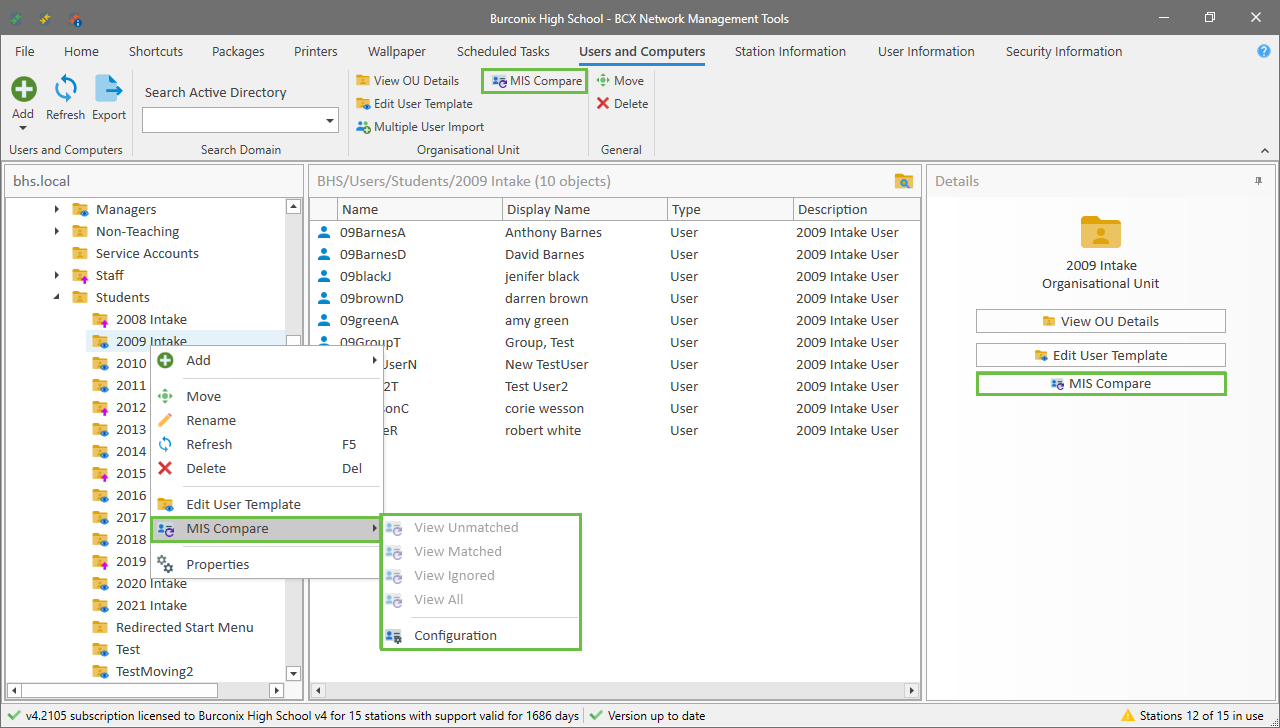
The following 'Configuration' window will appear,
(Populated with any default settings already configured in the File-Settings-MIS Settings tab).
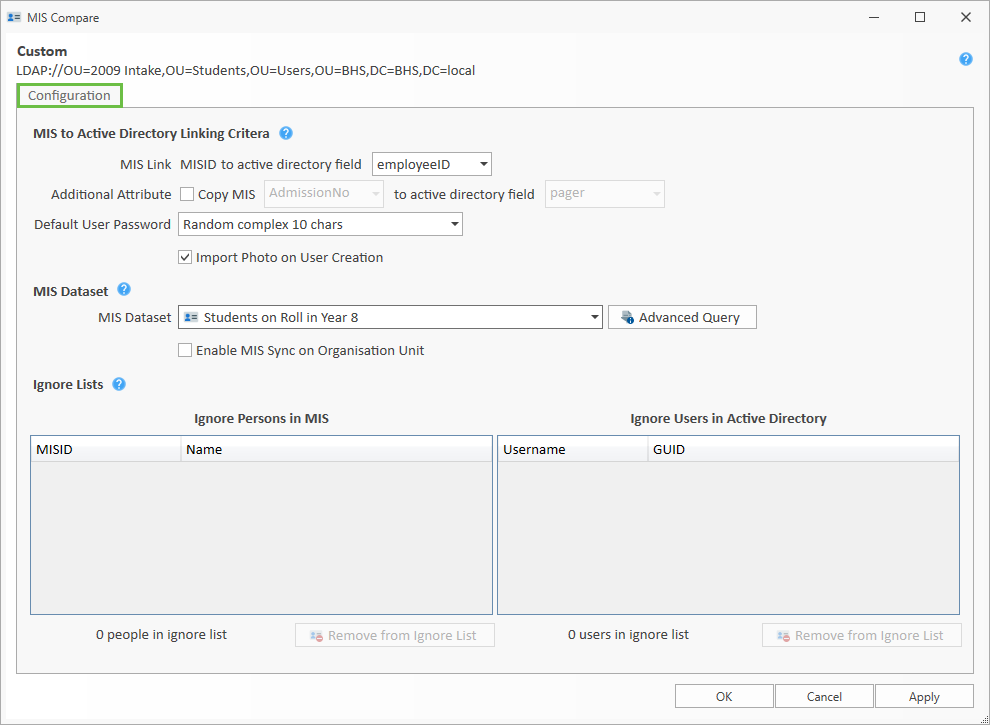
Follow the steps in the next guide to complete the 'Configuaration' tab settings.
OU Sync Configuration
MIS Link – You can specify which AD field you would like the MISID to be stored in.
By default this would normally be the 'employeeID' field but if this is already being used for other software,
(such as Cashless catering or access control) you can select another AD field to write the value to.
Additional Attribute – If you would like to copy an additional MIS attribute to AD then tick this box, and select the MIS attribute and the field in AD you would like it written to.
Default User Password – When a user is created via the MIS Compare tool, you can assign a default password selectable from the drop down list. To choose your own custom static password, chose the second option in the list "Custom", and manually type the password you want to use.
Import Photo on User Creation – Tick this box to import photos from the MIS dataset into Active Directory when creating a new user.
MIS Dataset – In this drop down list you will have a list of all the Datasets available from your MIS. Select the one that will contain the matching users for the OU you are currently configuring the MIS Compare for.
You can click the Advanced Query button if you need to make custom changes to the query, but we would advise these changes are only made after checking with Burconix Support.
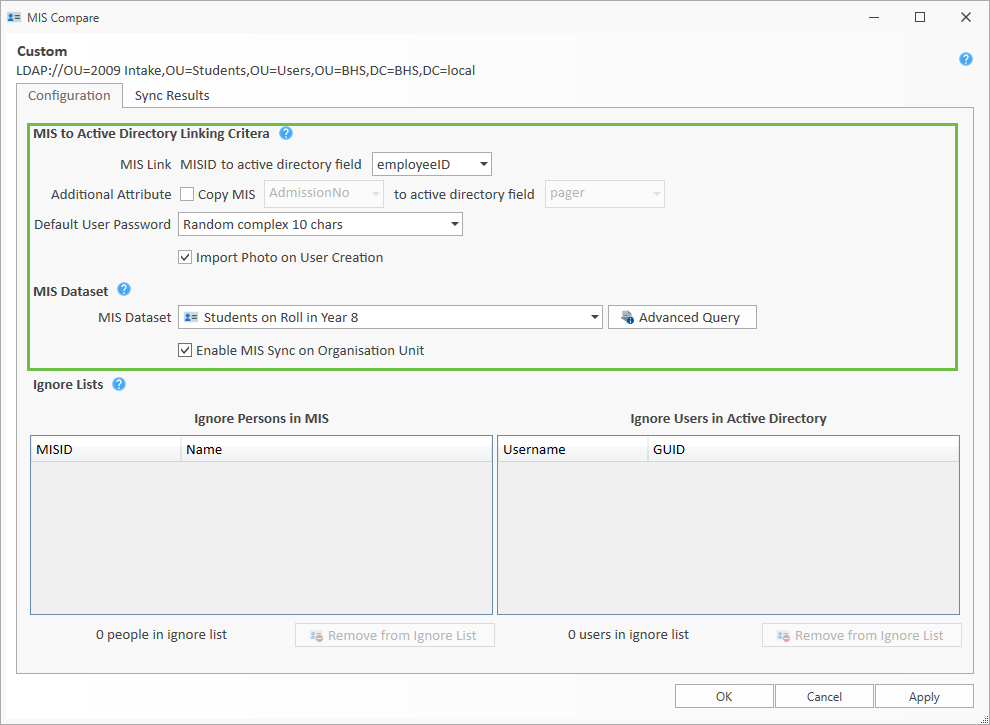
Enable MIS Sync on Organisation Unit – Once you tick this option a 'Sync Results' tab will appear at the top of this window.
Ignore Lists - This table will become populated with any user(s) 'Ignored' during the matching process.
You can set up a default policy for all OUs in File - Tools - MIS Settings
Automatch Existing Objects
The 'Sync Results' Tab now displays the initial unmatched objects, MIS in the left pane and AD in the right pane.
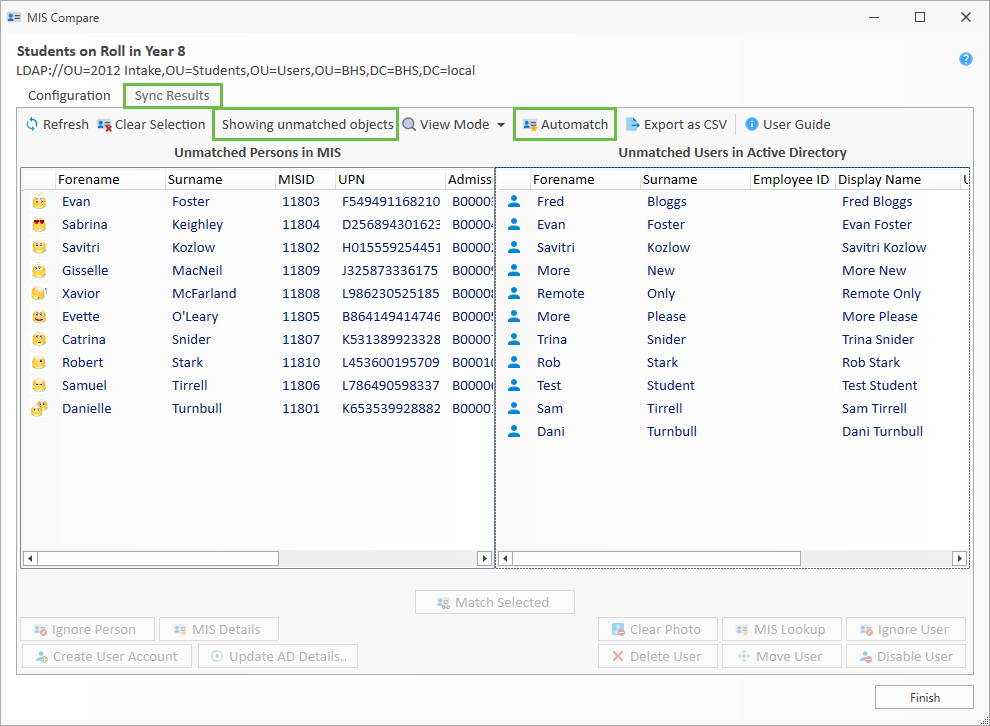
Click the 'Automatch' button and the system will display a message showing all the users that can be linked
by Forename & Surname between the MIS and AD.
Check through the list and if it is all correct click 'Yes'. The MISID will be written into the AD field you specified and these users will now be linked.
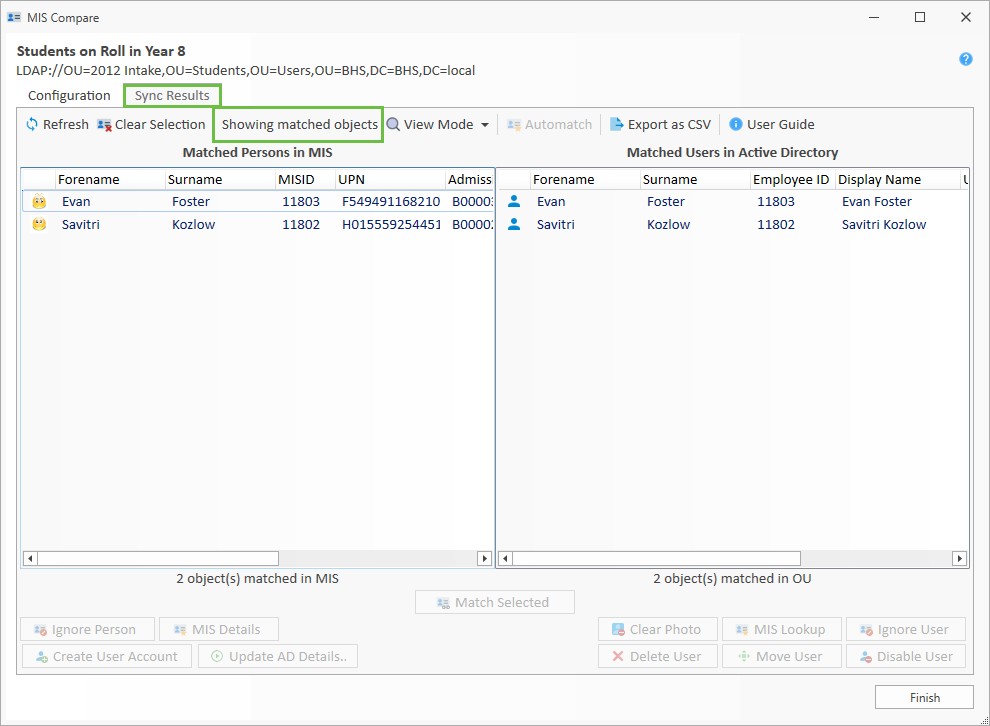
You can change the View Mode to 'Showing Matched Objects' to see the results of the 'Automatch'.
Manual Matching Existing Objects
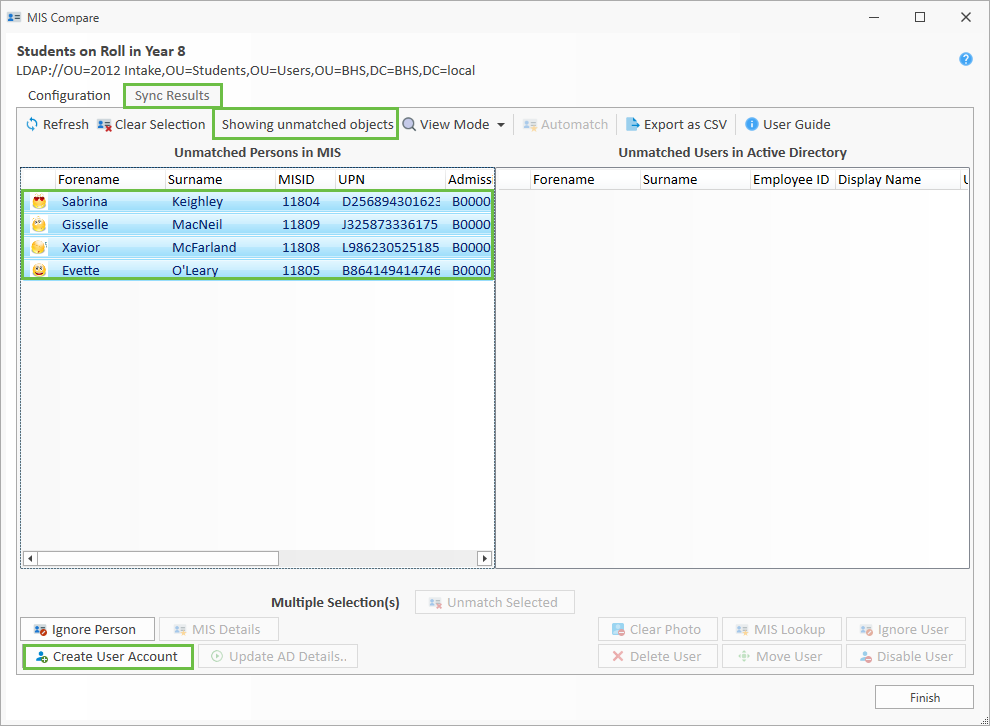
Change the View back to 'Unmatched' where you will now see any users that could not automatically be matched.
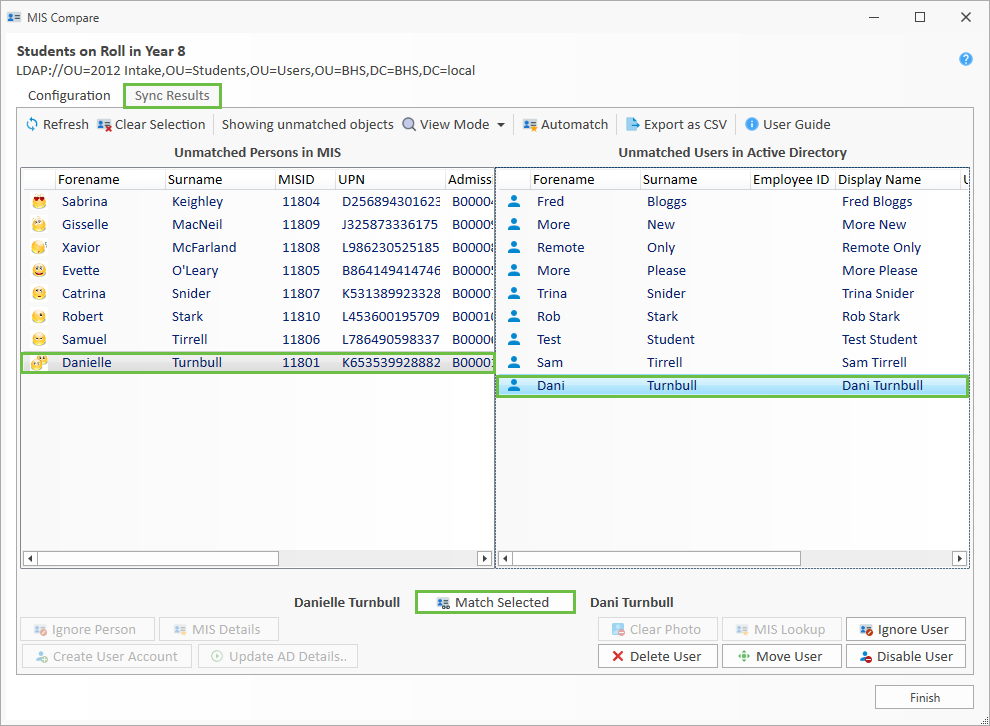
If an account should be synced but hasn’t automatically (due to using a nickname in AD for example),
you can select the account in the MIS pane, then in the AD pane and click 'Match Selected'.
This will create a manual match and update AD with the MISID as shown below.
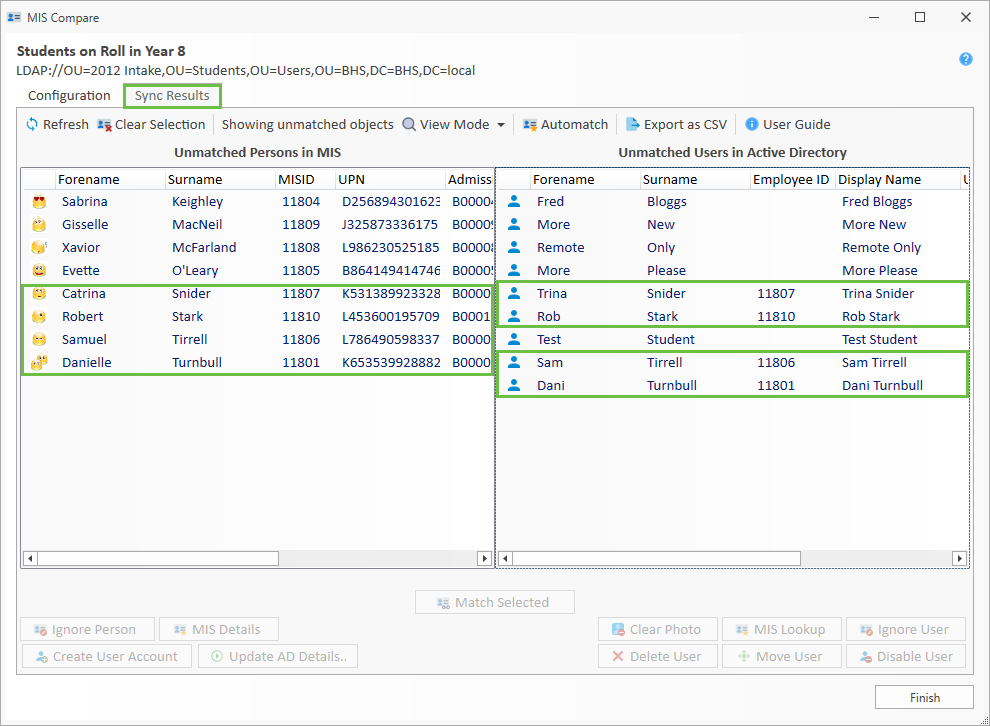
You can click the user in the MIS or AD pane and click 'Ignore User' if this account is not expected to be synced,
for example if it is a test/generic login account (The Ignored user(s) will appear in the Ignore Lists on the Configuration Tab).
If a user appears in the AD pane but does not have an MIS account,you can select the user(s) and click either the 'Disable User' or 'Delete User' to perform the action in AD.
Updating Existing AD Objects from MIS
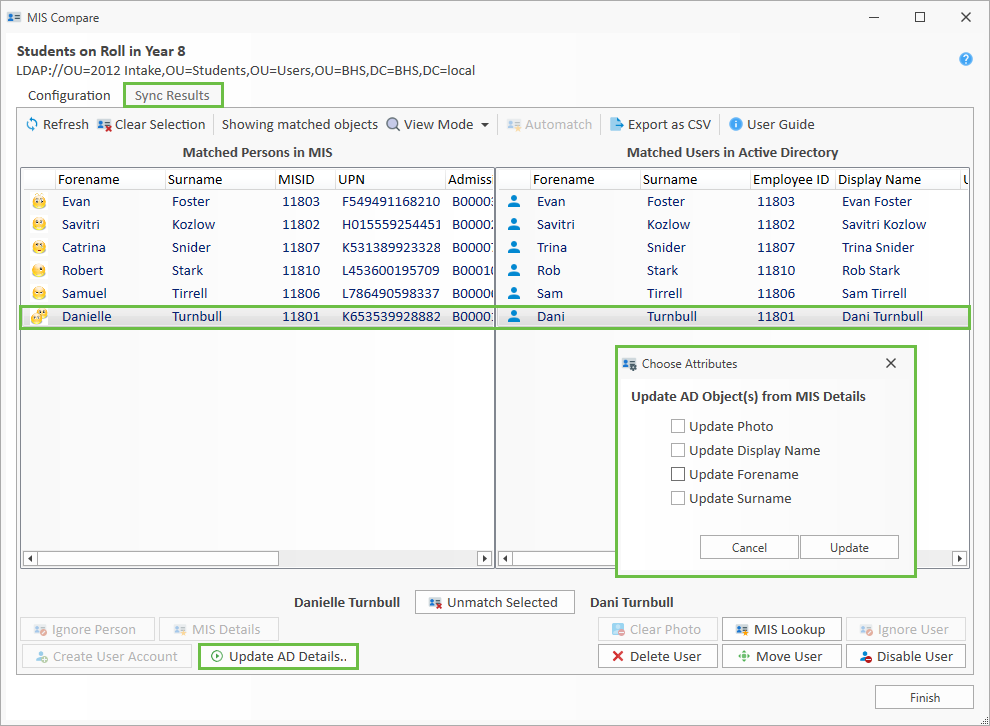
Details such as Forename/Surname/Display Name and Photos stored in your MIS can be imported into AD.
To perform this action you will need to change to 'Show Matched Objects' in the top of the window, then select the required user(s) and click the 'Update AD Details' button.
You can also select users in either pane to enable the relevant action buttons at the bottom of the window,
such as MIS Details/Lookup, Move User, or Clear Photo etc.
Create New Users from MIS
Change the View back to 'Unmatched'. If a valid user appears in the MIS pane but does not have an AD account, you can select the user(s) and click the 'Create User Account' button.
This will then use the existing BCX User Template for this OU,
and display the user creation window for you to edit/accept as required.
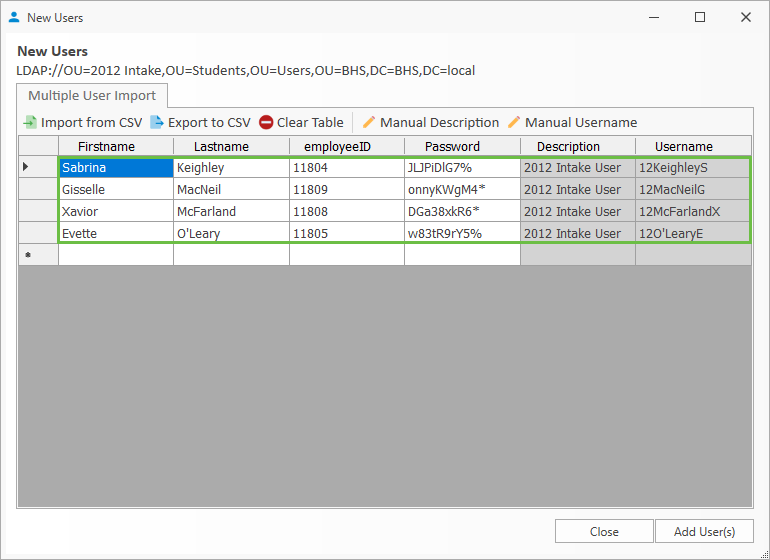
Clicking 'Add Users' provides the option to save to CSV if required, followed by a confirmation request for the import to AD.
Check Completed OU Sync
Once all matching processes have been completed, change the view mode to 'Showing matched objects' view, and you should be left with a correctly mirrored pair of panes. (These can be ordered as required by clicking on the column headers)
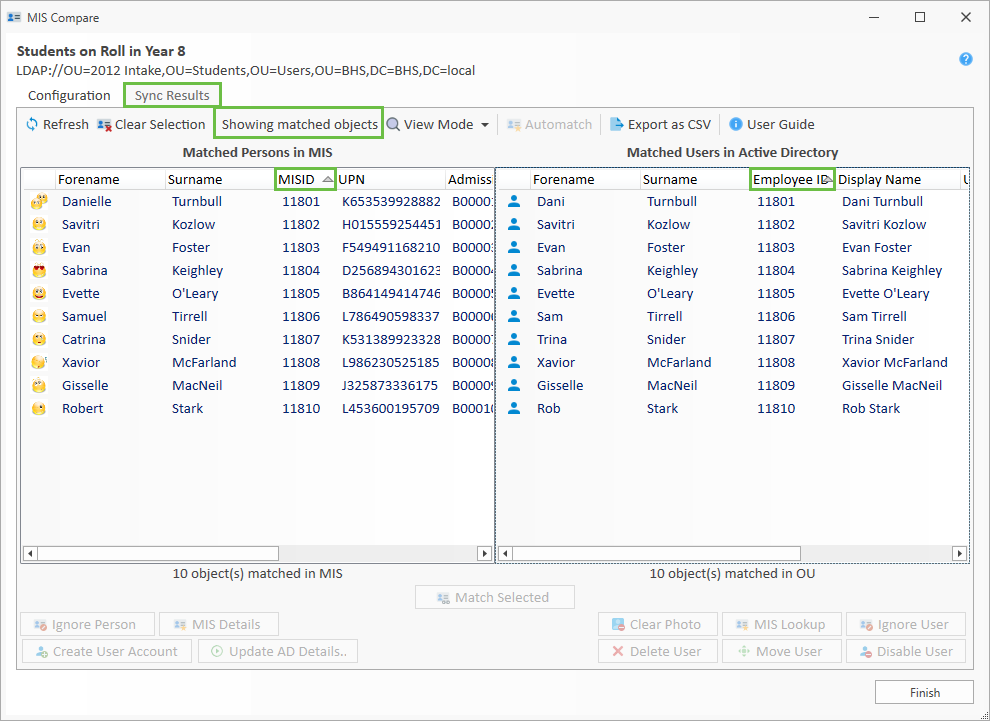
Click 'Finish' to return to Users and Computers.
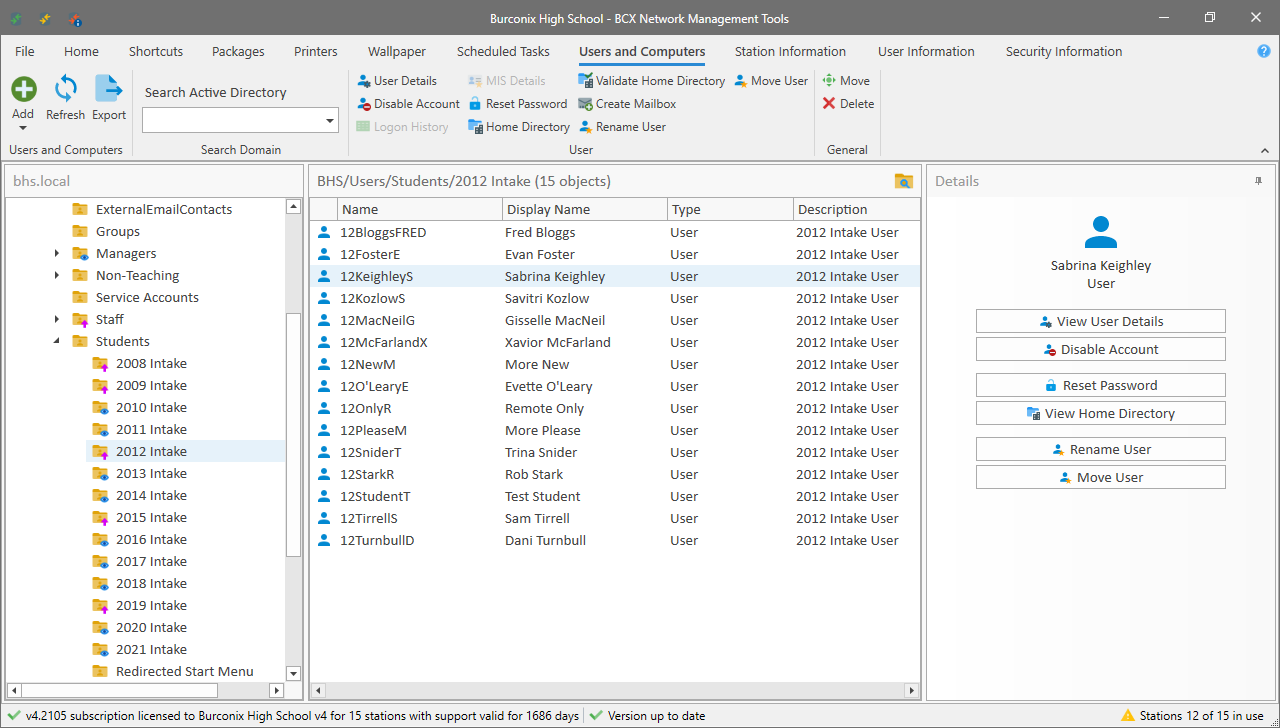
BCX Manager, showing Users and Computers, post MIS Sync, with all imported users.
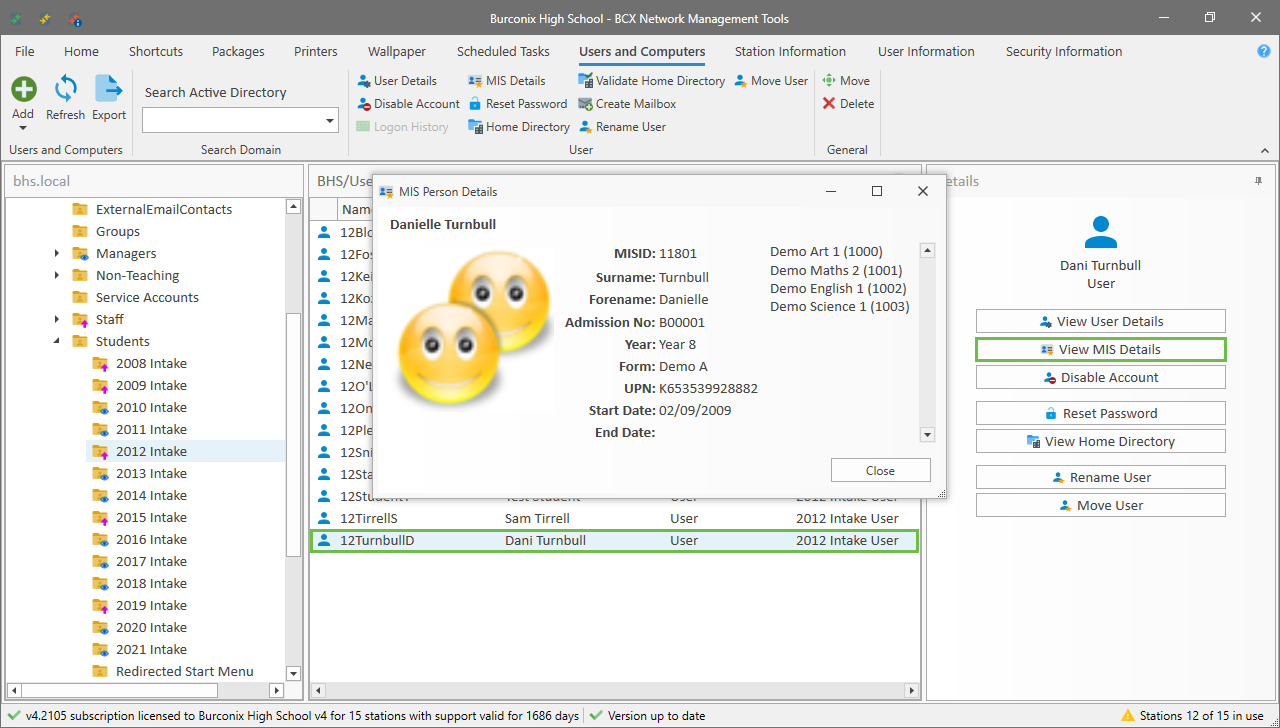
Lookup Linked Person in MIS
From 'Users and Computers' you can choose a linked person, and either right click and select 'View MIS Details' or Select it from thr right hand pane.
In the resultant details window you will see the linked MIS data, including Form, and Classes information.
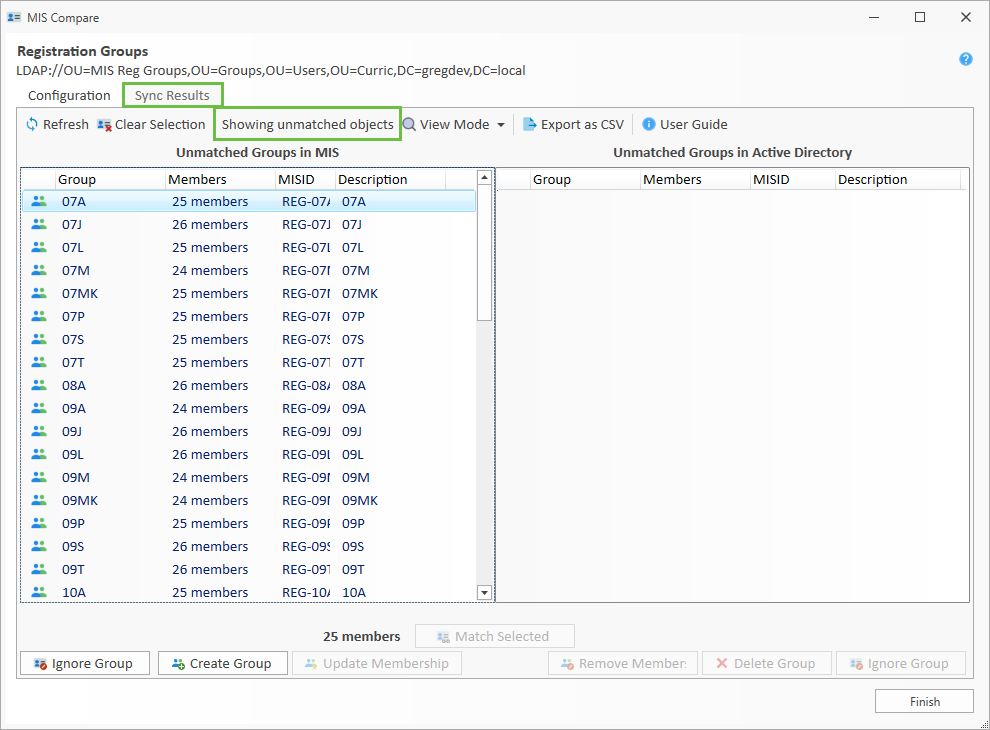
Linking Class Groups to AD
This function can be used to create groups in AD to match required groups from MIS.
From 'Showing Unmatched Objects' view, you would click on the required group(s) in the right hand MIS pane, and then click 'Create Group' to create and populate the corresponding group in AD.
You can also click 'Ignore Group' for those not required.
Updating Group Memberships
Once MIS and AD groups have been linked you can check and update as required.
Change the view mode to 'Showing matched with different memberships', highlight the required groups and click Update membership'.

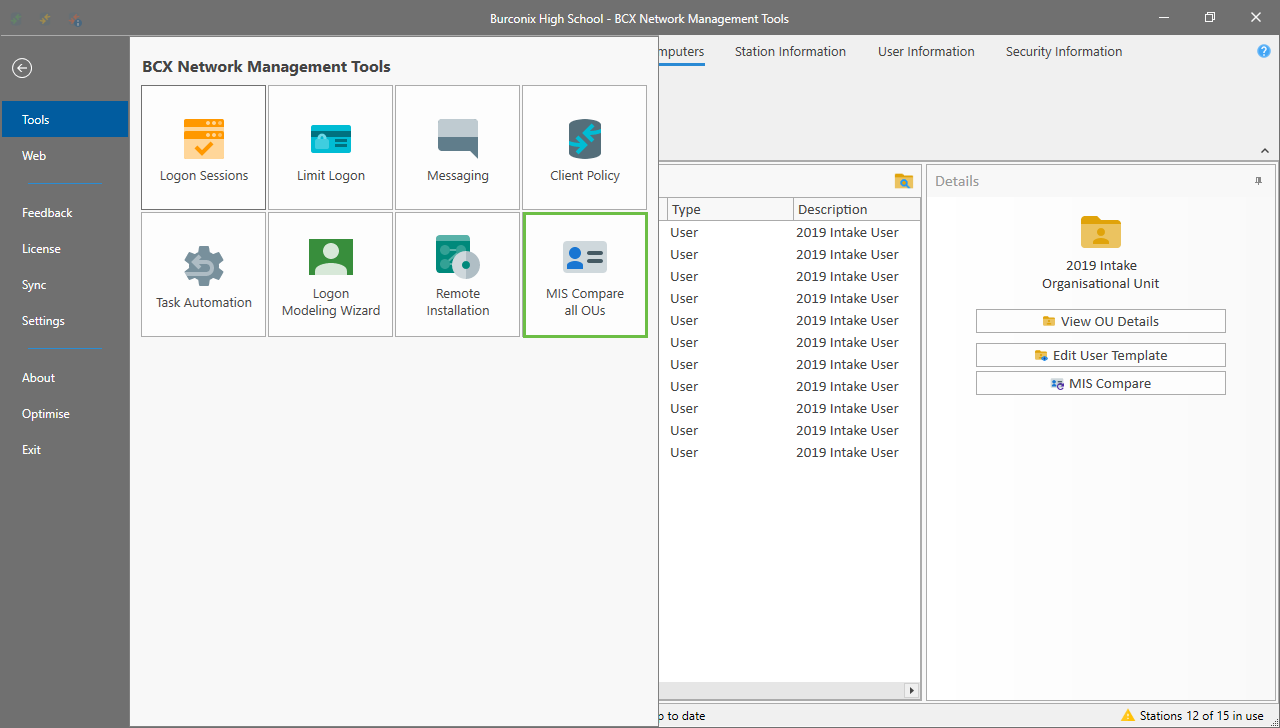
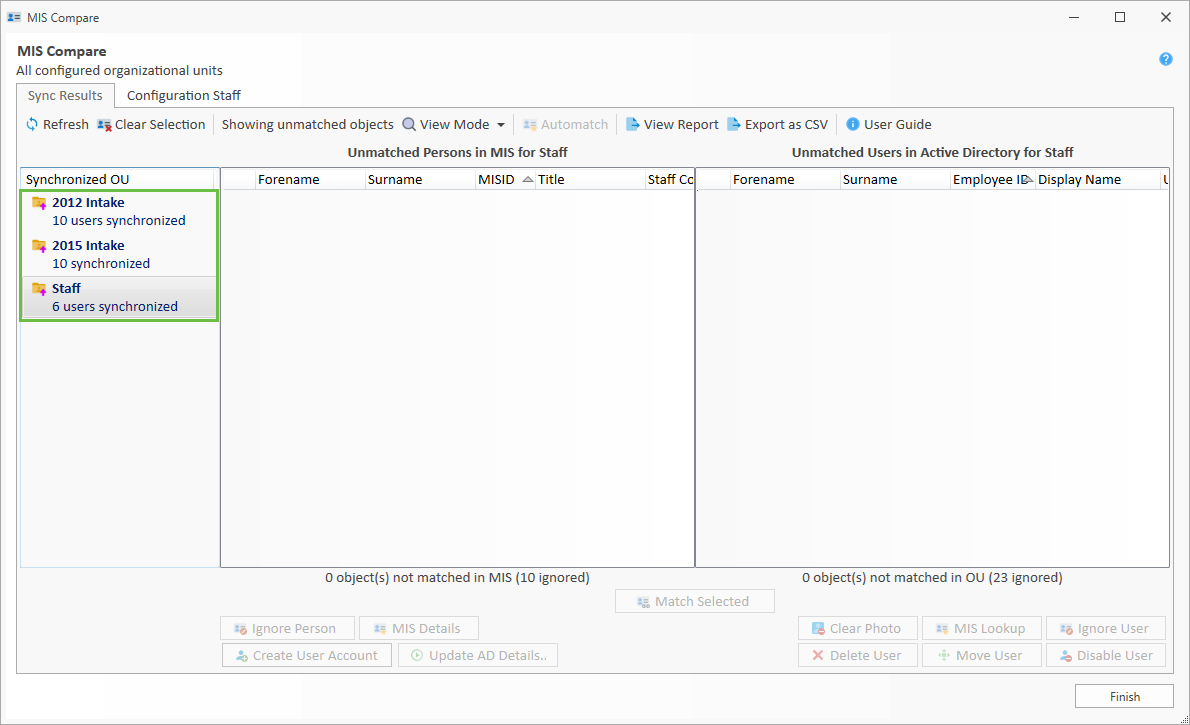
Compare all Configured OUs
This is the 'Management Console' for your MIS Integration. It shows, at a glance, an overall picture of your configured/synced MIS OUs, and allows for the easy detection/correction of post configuration/sync anomalies. For example, this is where we would check on a regular basis for new enrollments or leavers etc.
To access the console click, File - Tools - MIS Compare all OUs.
Once an OU is configured it will appear in the console.
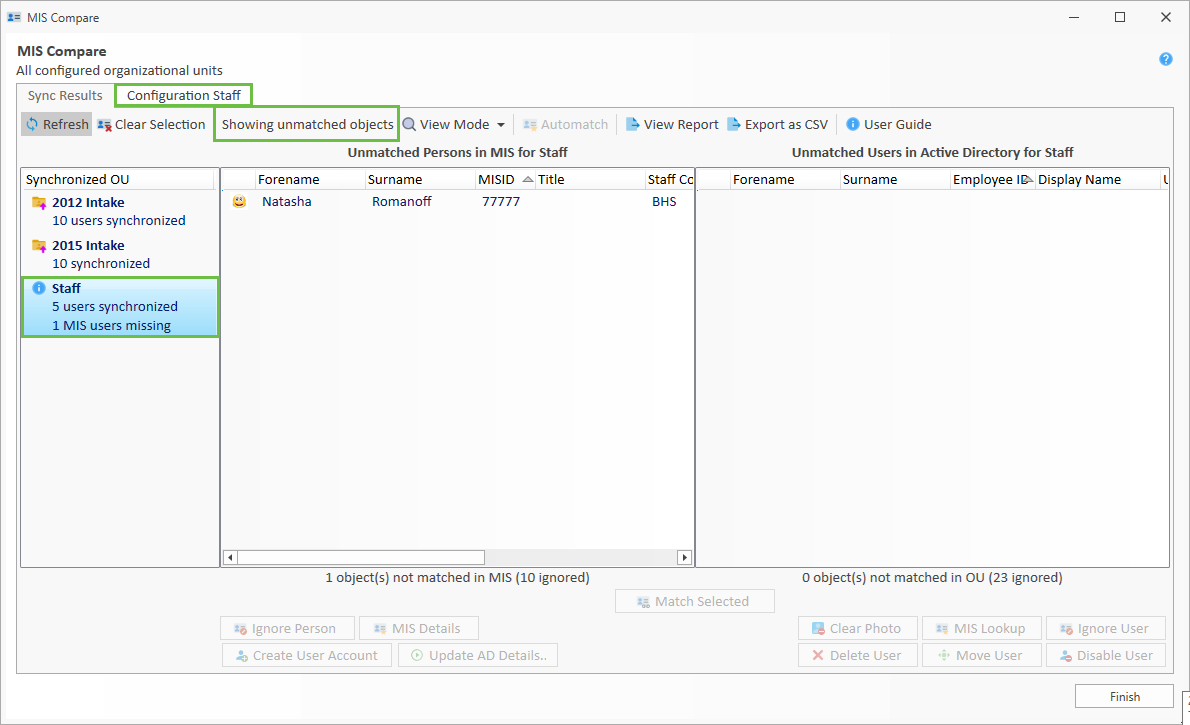
From here you will see a global view of all the synced data. As shown in the test data, of the 3 synced OUs, 'Staff' requires attention '1 MIS Users missing'.
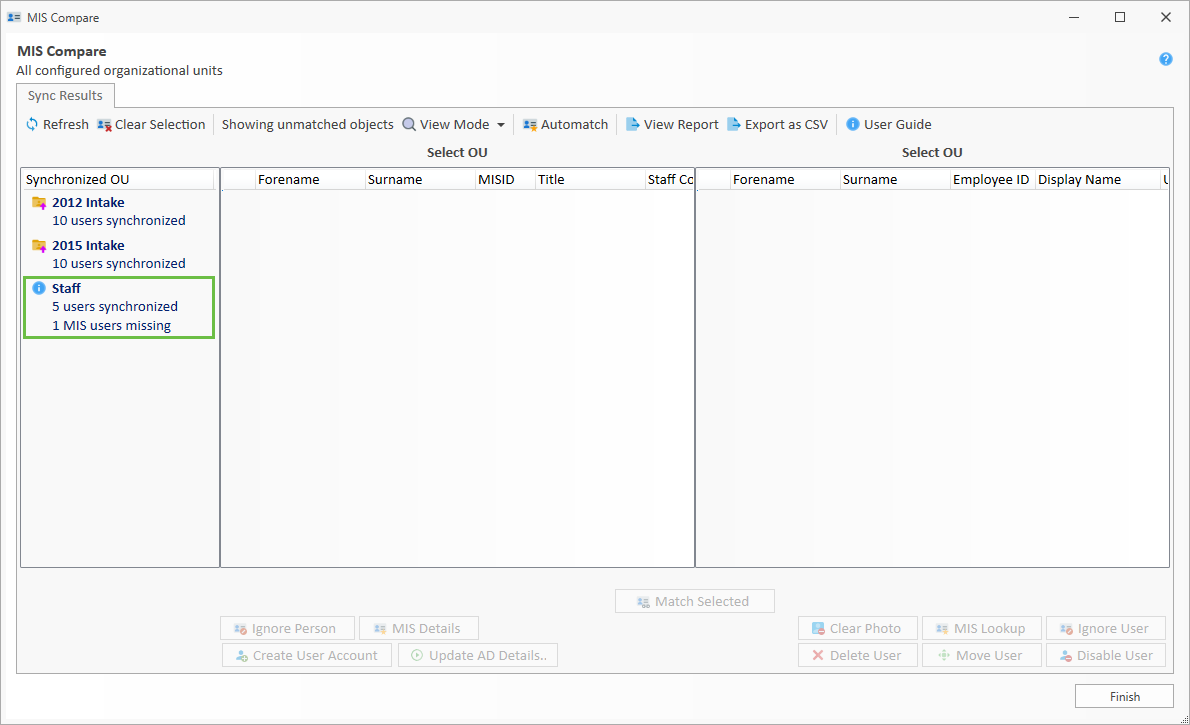
First we’ll view '2015 Intake' - clicking on the OU creates the OU’s 'Configuration' tab, and propagates the data panes accordingly.
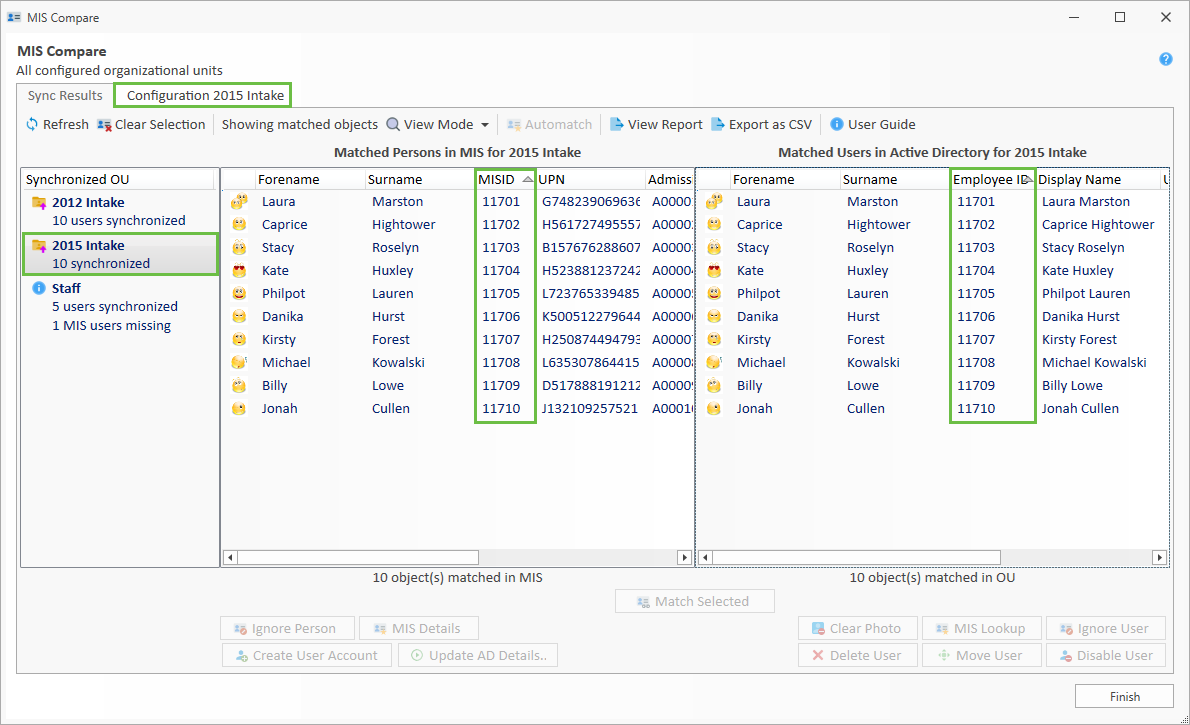
(Here we’ve also switched to 'Matched' view as there is no unmatched data)
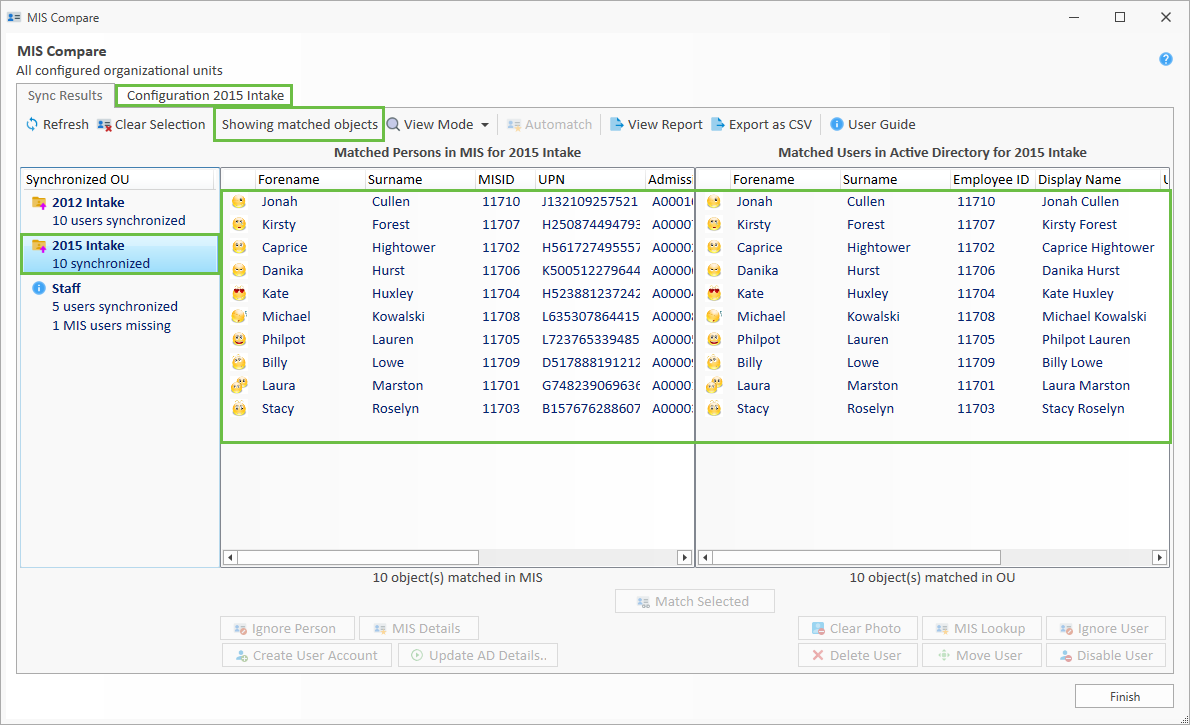
The individual panes can be ordered as desired by clicking on the column titles (seen here 'MISID' and 'Employee ID').
Clicking on any item will enable access to relevant buttons. ('Update AD Details', 'Delete User', 'Unmatch Selected', etc.)
Now we click on 'Staff' and switch back to 'Unmatched' view as the OU is showing '1 MIS Users missing'.
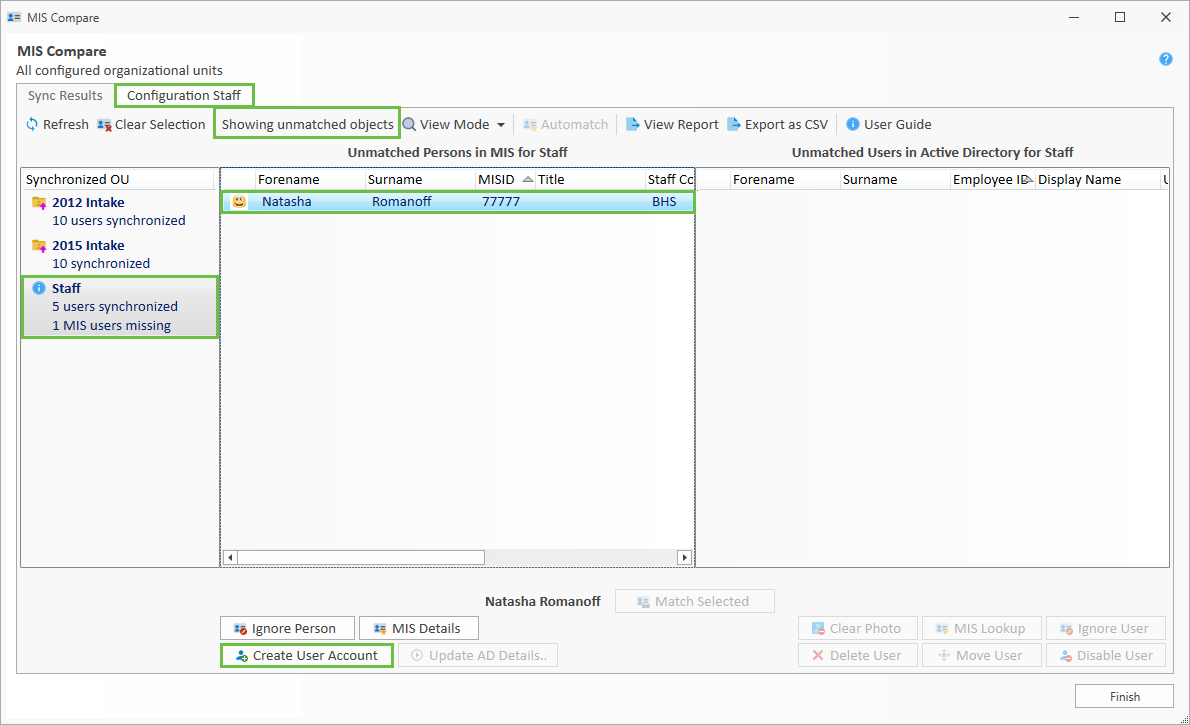
From here we can see that the user that hasn’t been synced. Any anomalies such as this can be rectified straight from the console.
We highlight the user and click 'Create User Account' to create the user in AD and sync with MIS.
This will follow the same dialogues and confirmations as in the OU syncing procedure.
Once all anomalies have been rectified we now reopen the 'MIS Compare all OUs' console to confirm the fully synced OUs.
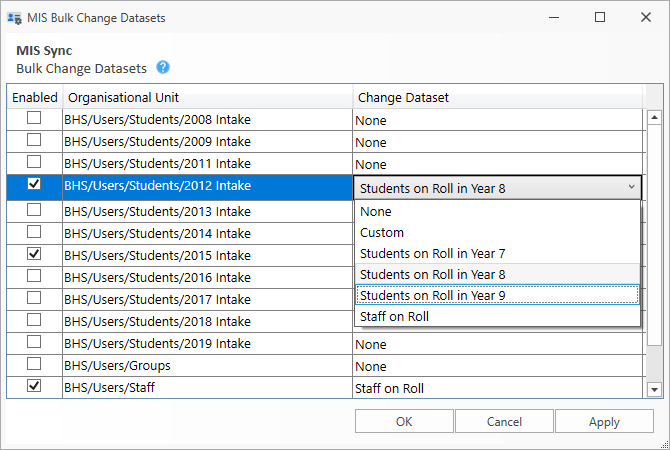
Bulk Change Datasets in September
'Bulk Change OU Datasets' – Accessed from MIS Settings, this allows you to Enable/Disable sync on chosen OU's, and also change the respective Dataset linked to an OU from a dropdown list of available Datasets.
This is where you would perform your September data roll-up.
Settings for MIS integration
Please follow the links below for the relevant settings information:
Configuring MIS to AD Linking Criteria.
Return to Contents page