BCX Manager Settings
Accessible from the File Menu, the Settings screen can be used to modify various sections of the BCX Manager.
Contents
- 1 Advanced
- 2 AV Reporting Services
- 3 Connector Services
- 4 Default Assignments
- 5 Disk Quotas
- 6 Email Server
- 7 Logon History
- 8 MIS Connections
- 9 MIS settings
- 10 Package Tasks
- 11 Printer Tasks
- 12 Security Information
- 13 Scheduled Tasks
- 14 Station Information
- 15 Users and Computers
- 16 Web Tools
- 17 Settings.XML
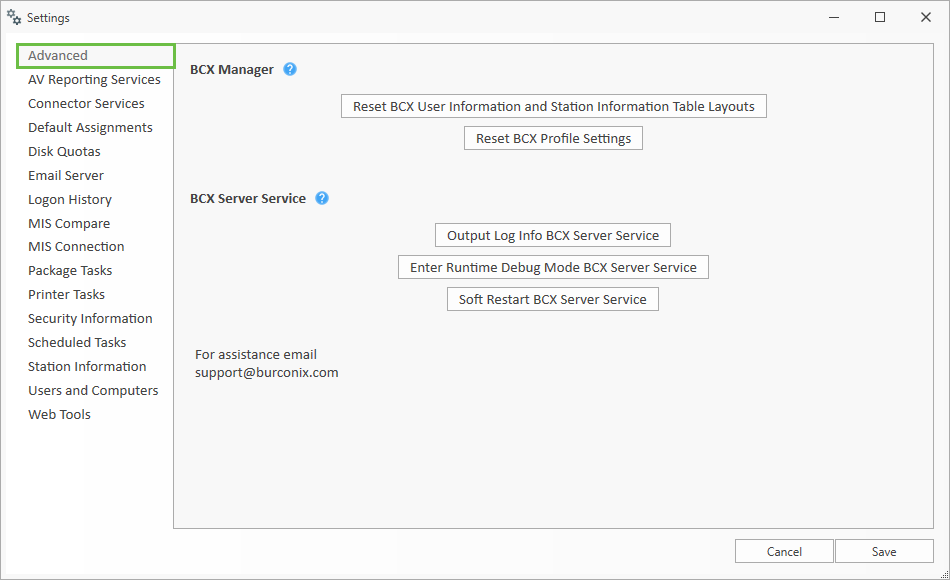
Advanced
The Advanced settings allow you to reset any chnages you have made to the layout in BCX Manager, and enable the dislpay of tips at startup if you have previuosly chosen to disable them. The BCX Server Service settings can be used for troubleshooting and should only be used when requested by Burconix Support.
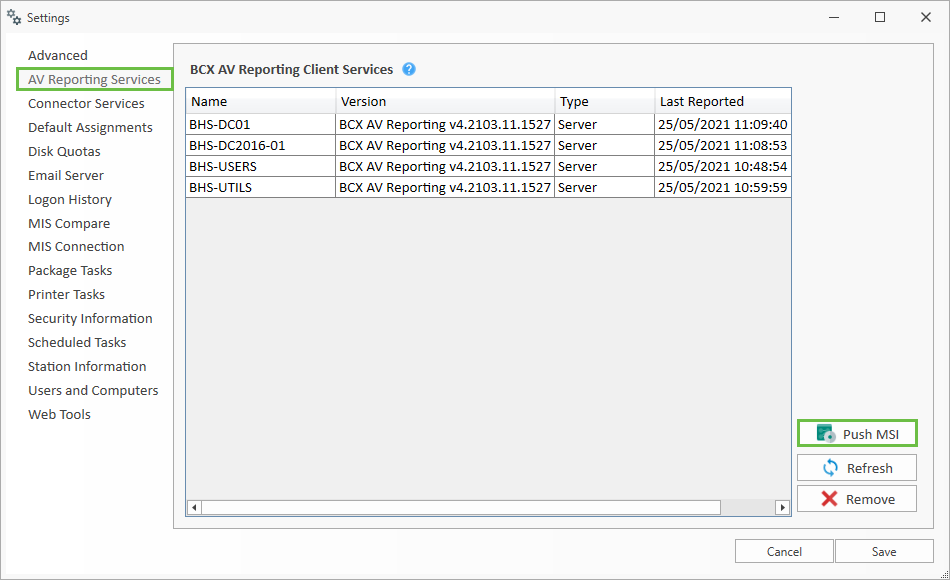
AV Reporting Services
Stations with BCX Client will automatically have AV Information collected.
For Servers etc. that don’t have the BCX Client, use the AV Reporting Services Tab to install the AV reporting client.
Click Push MSI to begin a client install. (The Target device will need .NET4.0 pre-installed).
In the resulting interface, either enter the desired station name, or click Browse.
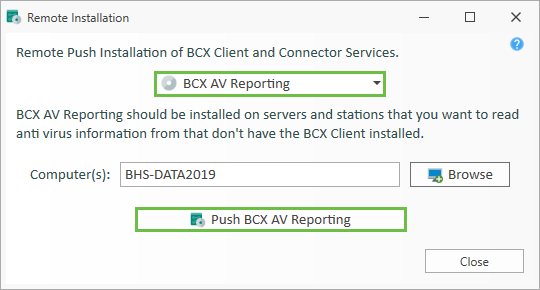
Browse for the required server, click Push BCX AV Reporting, confirm and wait for the installation to complete.
The new deployment will appear in the AV Reporting Services tab, and will also be added to the AV Information Tab in BCX Manager.
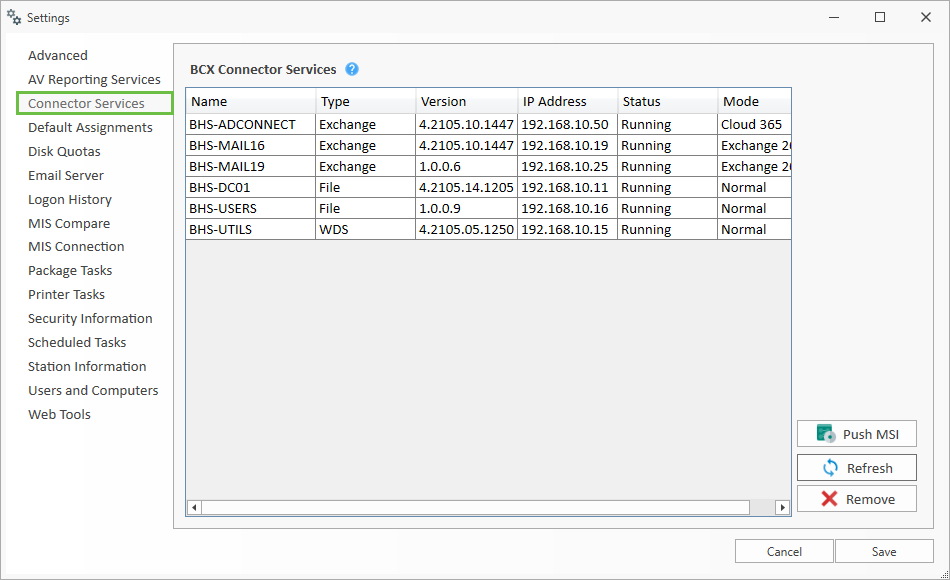
Connector Services
This screen shows the BCX Connector services that are registered with the BCX Server. Please consult support before making any changes on this screen.
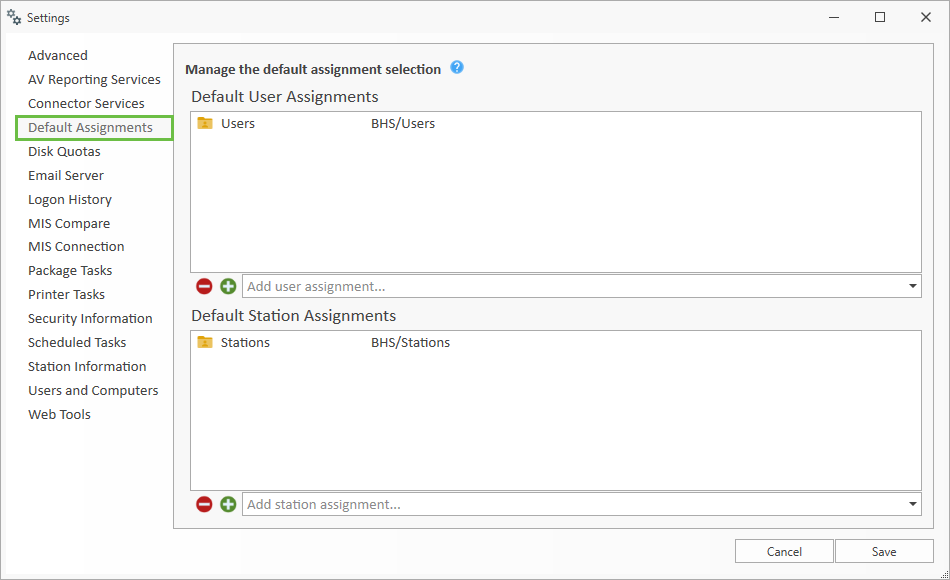
Default Assignments
Default assignments can make it easy to deploy shortcuts, packages, printers and wallpaper tasks to users quickly.
Default assignments are generally all users and all stations within the network, and can be set from File - Settings - Default Assignments
Disk Quotas
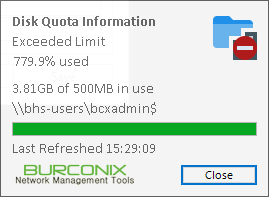
When using the File Server Connector on the servers that hold user's home folders, the BCX Server can manage quota information. This can then be used within the Manager and configured to show users their quota upon login with a small notification.
NTFS Disk Quota
When the BCX File Server Connector service starts, it checks to see if NTFS quota settings are enabled on each disk. If NTFS disk quotas are enabled, these quotas will be used for all user home folders located on this disk.
If using NTFS disk quotas, you can Enable Legacy NTFS Quota Management from within BCX Manager - Settings, and manage individual users and user template quotas from within BCX Manager.
File Server Resource Manager (FSRM Quotas)
File Server Resource Manager is the preferred method and offers much more flexibility with options to set multiple limits and different actions for each limit. Quotas can be assigned at a top folder level and automatically propagated to all sub folders.
First disable NTFS disk quotas if enabled and restart the BCX File Server Connector on that server. If NTFS disk quota management is disabled, BCX will assume home folders located on this disk are using FSRM quota management.
When using this method BCX simply reads quota values from FSRM. We recommend using the Microsoft tool under Administrative Tools - File Server Resource Manager on your file servers to manage your quota settings.
You can mix NTFS quotas and FSRM quotas on different disks on the same server. For example, you can have NTFS quotas enabled on D:, and File Server Resource Manager quotas on E:.
Configure Settings
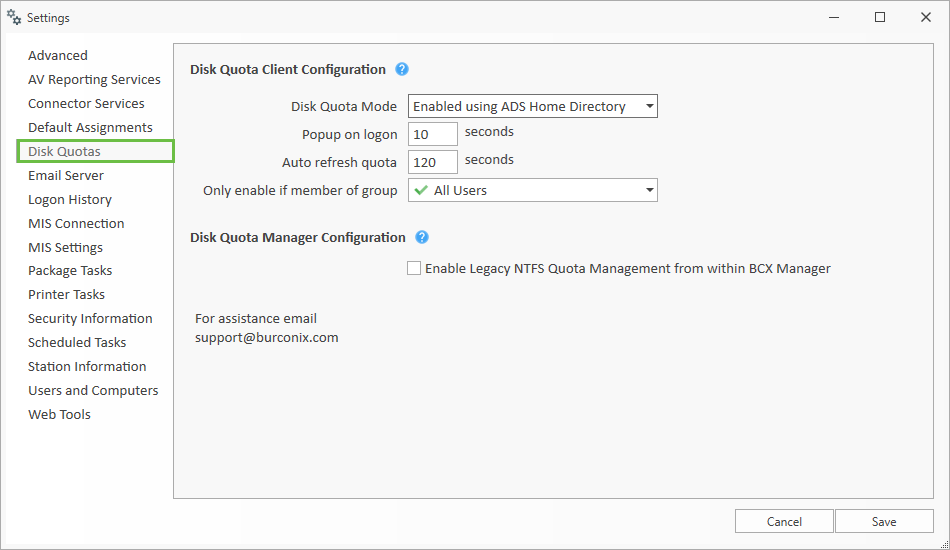
Disk Quota Mode: Here you can set the disk quota mode to disabled, ADS Home Directory or Documents Path.
ADS Home Directory uses the users home folder directory location to check quota information, as specified in the users Active Directory properties.
Documents Path will use the users Documents path for when using redirected folders in Group Policy.
Popup on logon: Use this value to specify how long the popup remains on screen for, or set to 0 to disable automatic popup.
Auto refresh quota: Use this value to specify how often the client should refresh it's quota information.
Only enable if member of group: Use this dropdown list to select the user Organisational Unit or Security Group that these settings apply to.
Enable Legacy NTFS Quota Management from within BCX Manager: Allows the use of NTFS disk based quota system which can be edited from within user properties in BCX Manager.
Email Server
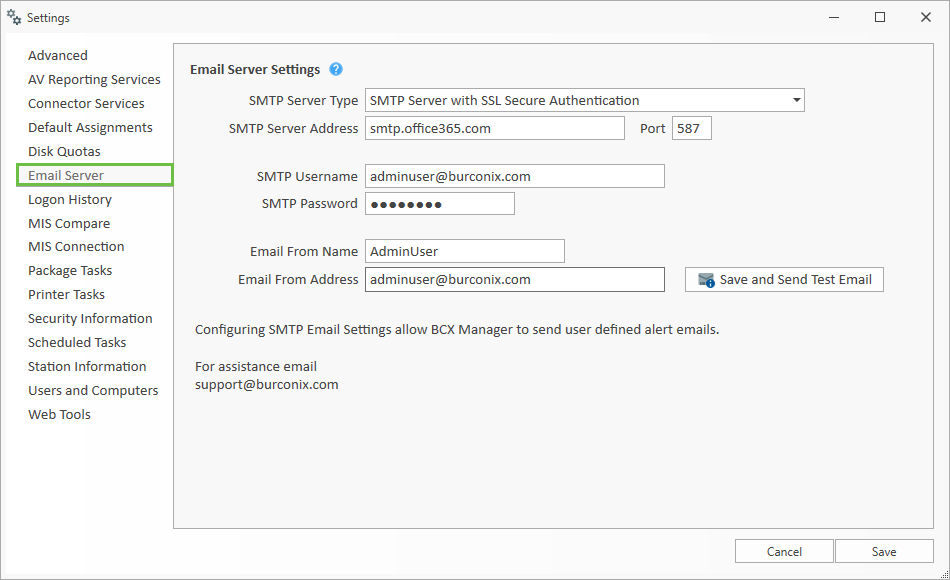
The Email Server settings enable the BCX Server Service to automatically distribute user defined alerts configured in the Task Automation feature.
SMTP Server types available are as follows: SMTP Server SMTP Server with Basic Authentication SMTP Server with SSL Secure Authentication SMTP Server with SSL Secure Authentication (Ignore Certificate Errors)
We also recommend a dedicated user be set up to relay the email as.
Once set up, the configuration can be confirmed by using the Save and Send Test Email function.
Examples:
Exchange
Depending on your requirements, this can be set up as a simple SMTP Server, however you will probably need to set up a connector to allow the BCX server to relay in exchange Exchange Receive connector to allow BCX Server Service to send email
SMTP Server Address: Exchange01
Port: 25
SMTP Username: bcxmiscompare@myschool.com
SMTP Password: *******
Email From Name: BCX MIS Compare
Email From Address: username@myschool.com
Office 365
For Office 365 use SMTP Server with SSL Secure Authentication The 365 from address must be same as the username, or have rights on that mailbox. (You can configure a different from name, but 365 will change it to the account holder name)
SMTP Server Address: smtp.office365.com
Port: 587
SMTP Username: bcxmiscompare@myschool.onmicrosoft.com
SMTP Password: *******
Email From Name: BCX MIS Compare (Note Office 365 rewrites this with Display Name set in 365)
Email From Address: bcxmiscompare@myschool.onmicrosoft.com (For Office 365 this must match the SMTP username or be granted Send As)
Gmail
For Gmail use SMTP Server with SSL Secure Authentication Gmail will allow a different from name and from address, but will replace the from address with the username address configured previously You may need to Allow Less Secure Apps for Gmail to relay the mail.
SMTP Server Address: smtp.gmail.com
Port: 587
SMTP Username: bcxmiscompare@gmail.com
SMTP Password: *******
Email From Name: BCX MIS Compare
Email From Address: bcxmiscompare@myschool.com (Note Gmail rewrites this with the preconfigured account Address)
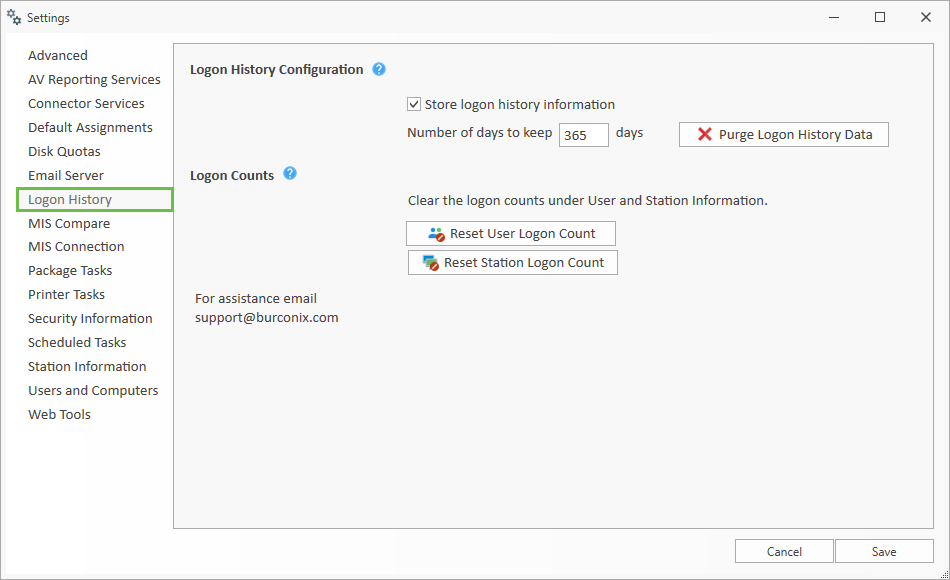
Logon History
Here you can set the numbers of days logon history will store, and also purge the stored data.
You can also reset the counts for both users and stations
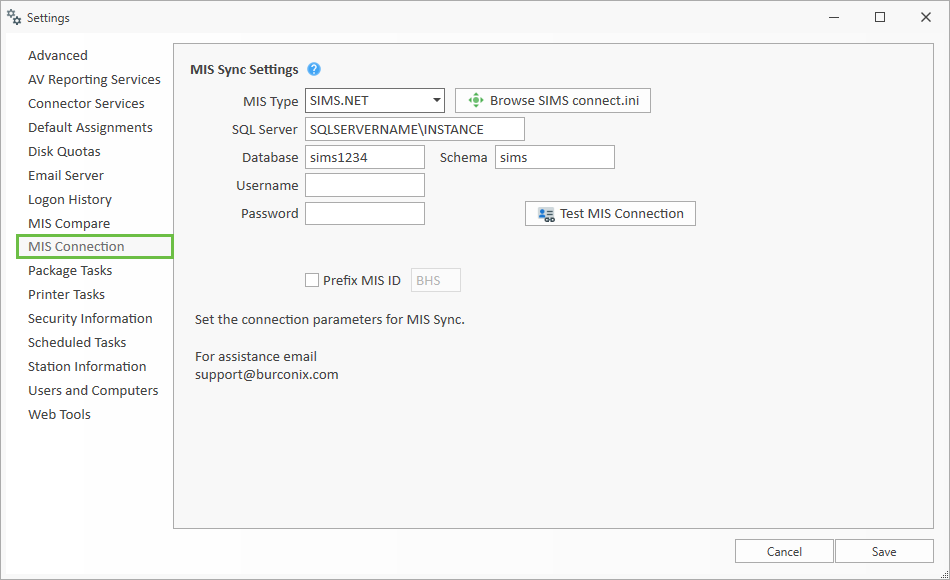
MIS Connections
The settings for SIMS can normally be found in your S:\Sims\Connect.ini file and will have been configured by Burconix. Please contact support if you require any changes to be made here.
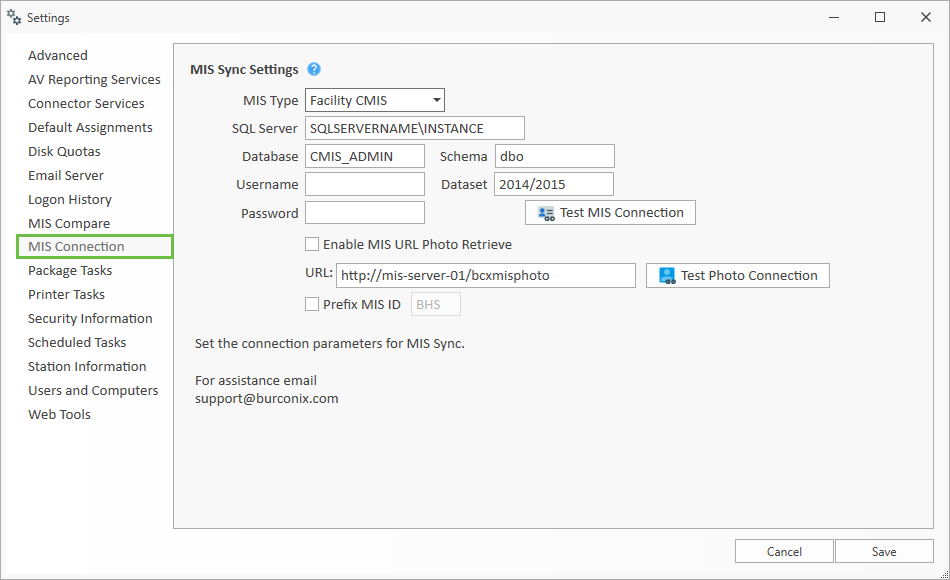
The settings for Facility CMIS and will have been configured by Burconix.
Please contact support if you require any changes to be made here.
Additional setup is required for Photo support in BCX Manager. An IIS application
must be set up on the ePortal to retrieve the Photos from MIS for use by BCX Manager.
MIS settings
This is where you can enable the legacy MIS feature, settings on this tab will become the defaults for all OU's The Default settings can be edited on individual OU's if required.
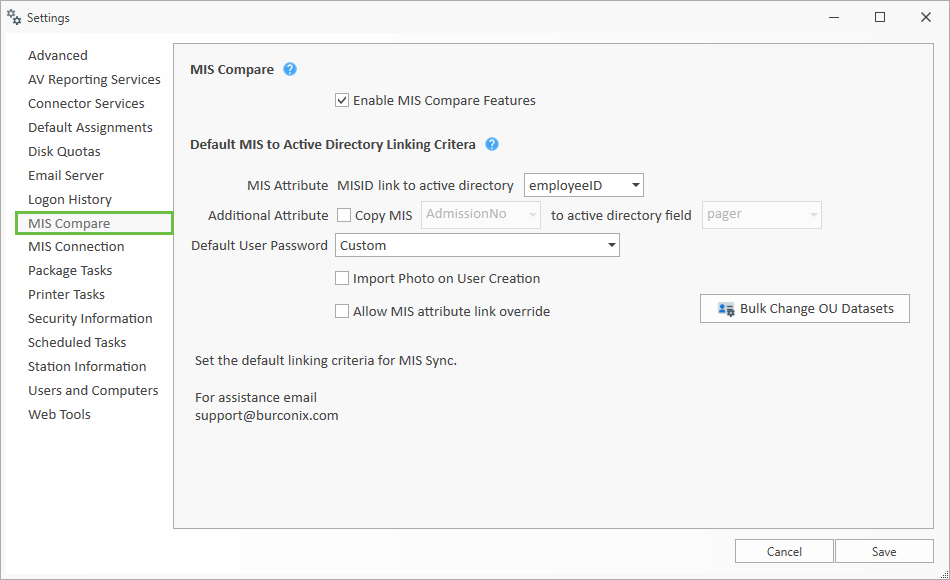
'MIS Attribute' – You can specify which AD field you would like the MISID to be stored in.
By default this would normally be the 'employeeID' field but if this is already being used for other software,
(such as Cashless catering or access control) you can select another AD field to write the value to.
'Additional Attribute' – If you would like to copy an additional MIS attribute to AD then tick this box,
and select the MIS attribute and the field in AD you would like it written to.
'Default User Password' – When a user is created via the MIS Sync tool, you can assign a default password selectable from the drop down list. To choose your own custom static password, chose the second option in the list "Custom", and manually type the password you want to use.
'Import Photo on User Creation' – Tick this box to import photos from the MIS dataset into Active Directory when creating a new user.
'Allow MIS Attribute Link Override ' – Ticking this box allows you to change the MIS Attribute from MISID to one available from a generated drop down list. This however, is not advised as you will not be able to use the 'Group' functions in 'MIS Compare'
For information on the Bulk Change OU Datasets option go to Bulk Change Datasets.
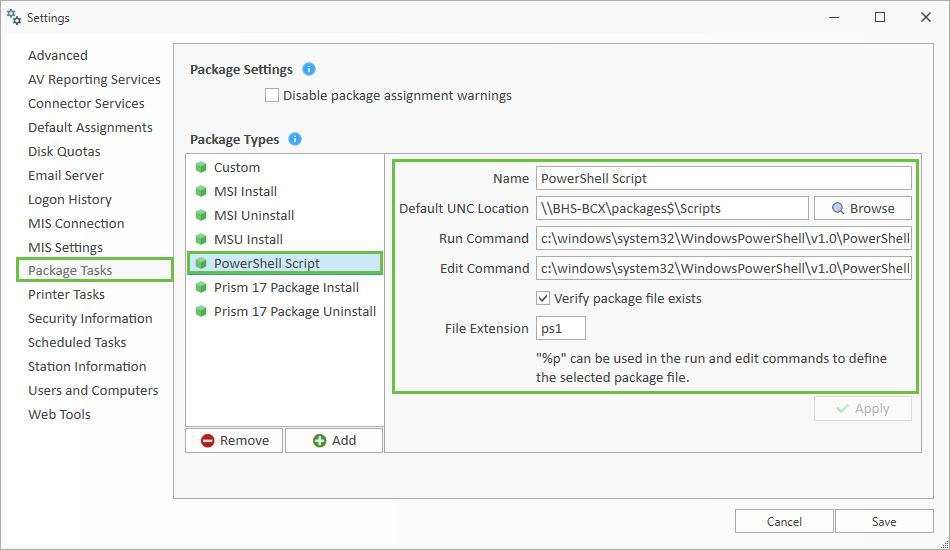
Package Tasks
From here you can change the default package location for each package type, as well as the run command for certain types of package task. You may need this if there are revisions to some of the software used to install packages.
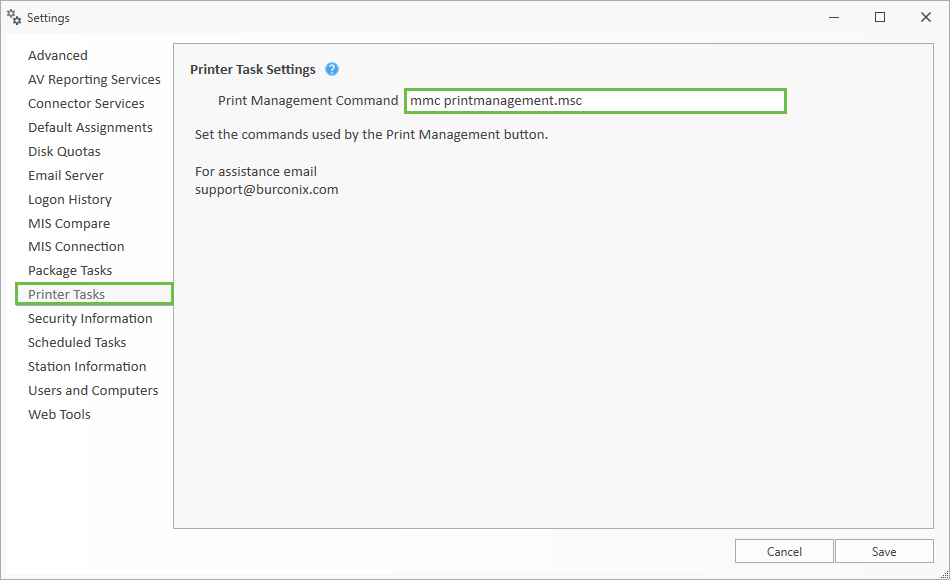
Printer Tasks
This screen allows you to customise the utility that is loaded when you click on the Open Print Management button in the ribbon bar of Printer Tasks. If you run 3rd party print management software such as Papercut or PCounter you may wish to change this to load their utility.
Security Information
To set up the AV feature in BCX go to File – Settings – AV Information. From here select and adjust the settings as required.
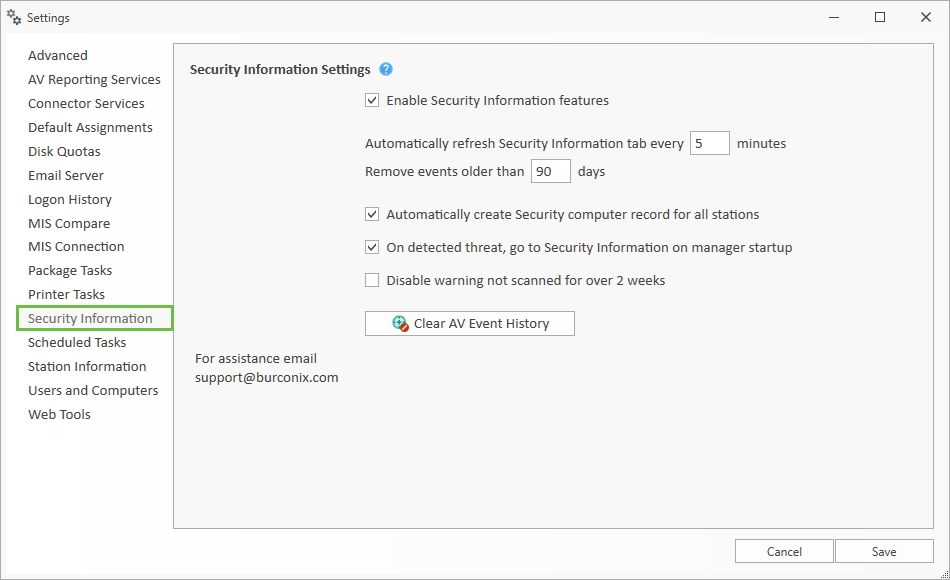
Enable AV information features – Tick to enable AV Information tab in BCX Manager (Default),
adjust refresh interval and retention period as required. Untick to disable.
Automatically create AV computer record for all stations - Tick to enable (Default), causes a record to be created for all stations existing in the Station Information tab, with or without an AV installation. Untick to disable.
On detected threat, go to AV Information on manager startup – Tick to enable (Default), forces the BCX Manager on startup, to open at the AV Information tab if a threat has been detected (or threats have not been acknowledged). Untick to disable.
Disable warning not scanned for over 2 weeks – Tick to enable, will not flag stations that have not been scanned for 2 weeks or more. Untick to disable (Default) and have stations not scanned present warnings.
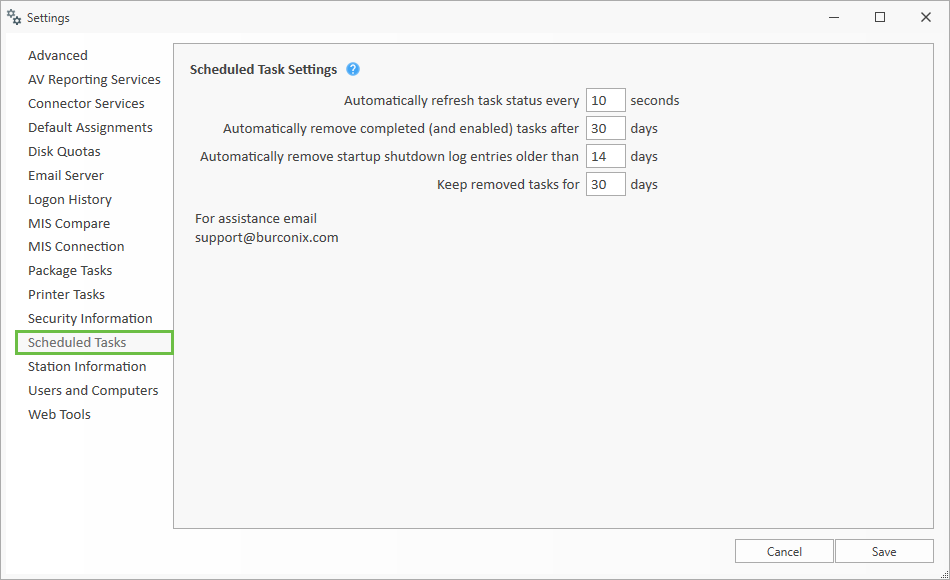
Scheduled Tasks
This screen allows you to control how often BCX Manager will refresh the task status and when it will automatically remove the tasks. These values can be changed to suit your specific needs, alternatively please contact support if you would like to discuss these settings.
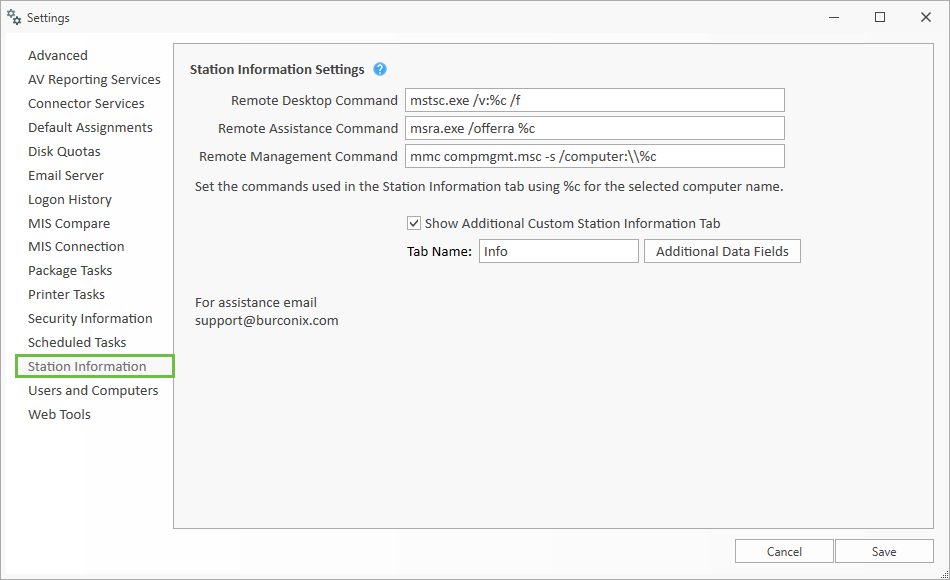
Station Information
The Remote Desktop, Remote Assistance and Remote Management commands can all be customised from this settings screen. By default these are set to use the integrated Microsoft utilities, but if you would prefer to use different options simply set them here and they can be access in a single click from the station information tab.
If you need any help configuring these options please contact support
Users and Computers
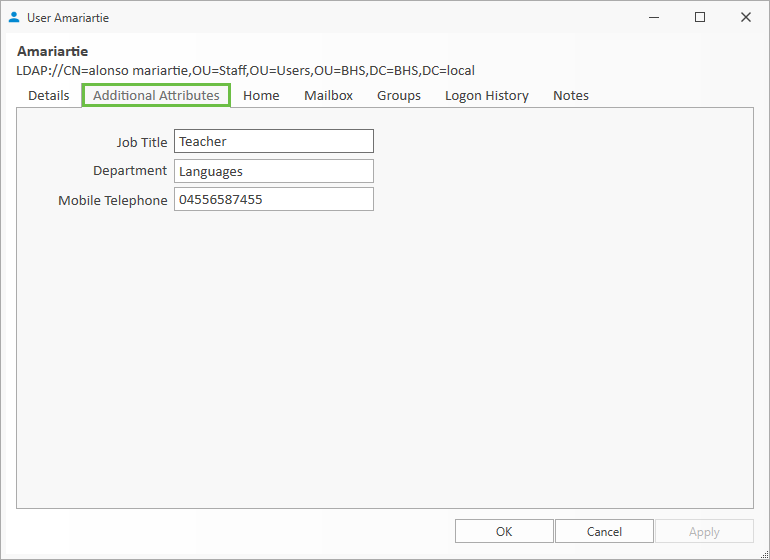
This screen allows you to modify up to three custom attributes to be displayed in the User Details screen when opened from Users and Computers. If you wish to change a custom attirbute, just type the label you would like to appear the the Display Name box, and the required AD field name into the Attribute box. You can also add additional attributes by enabling the "Show Additional Custom User Tab".
The Exchange Advanced Configuration options will usually be completed by a BCX engineer if required.
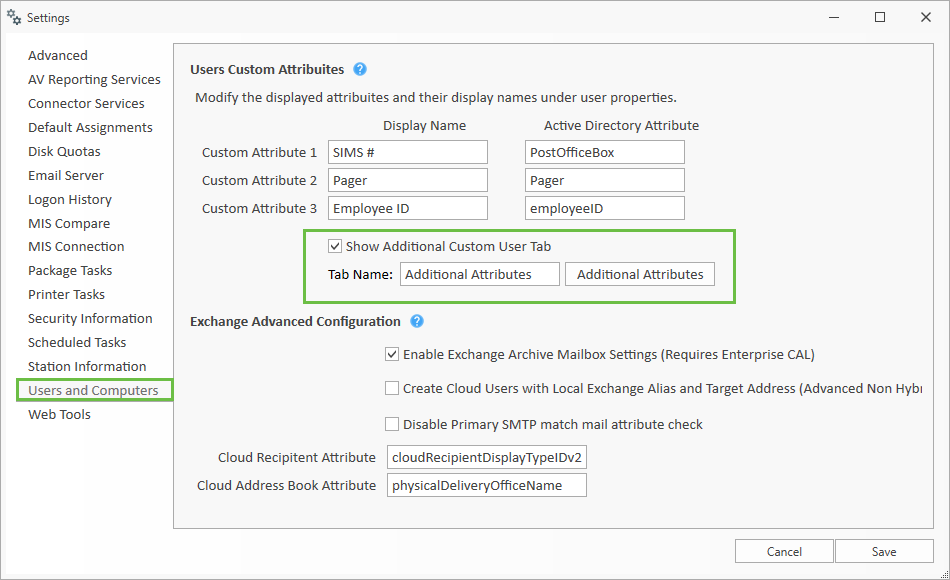
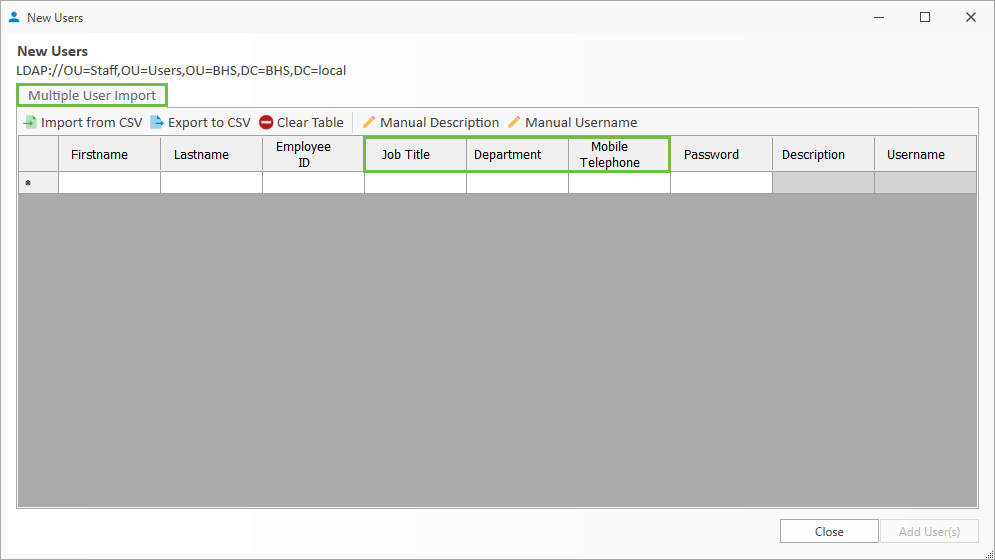
Attributes on the Additional Custom User Tab can also be utilised in the import of new users if selected here.
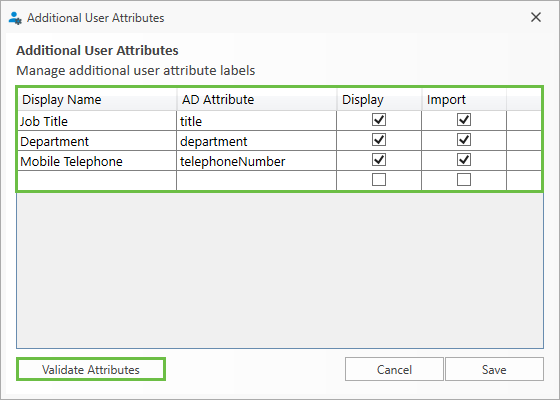
Once selected to display the attributes will be available in a user's details as shown below.
And if selected for import, there will be columns added for input shown below.
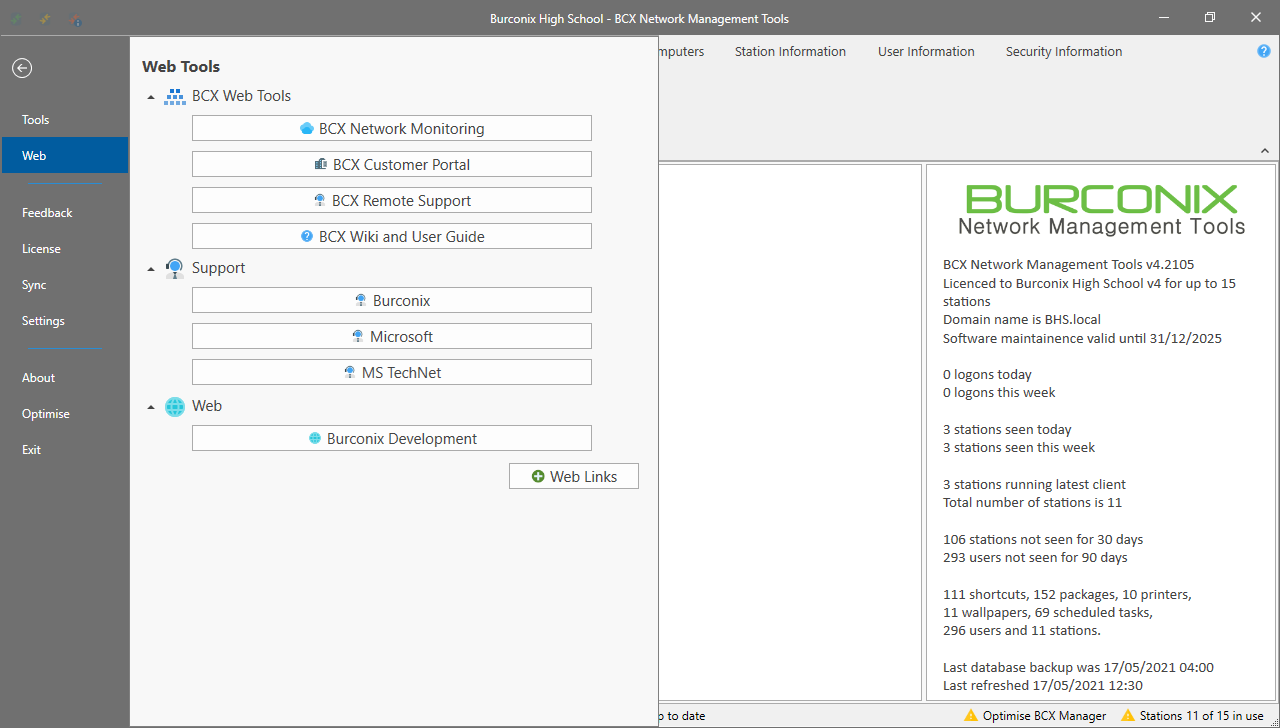
Web Tools
You can add any http or https web link into the Web Tools section and have it available anywhere you load BCX Manager. Add, sort and delete you web links as well as setting the type of link.
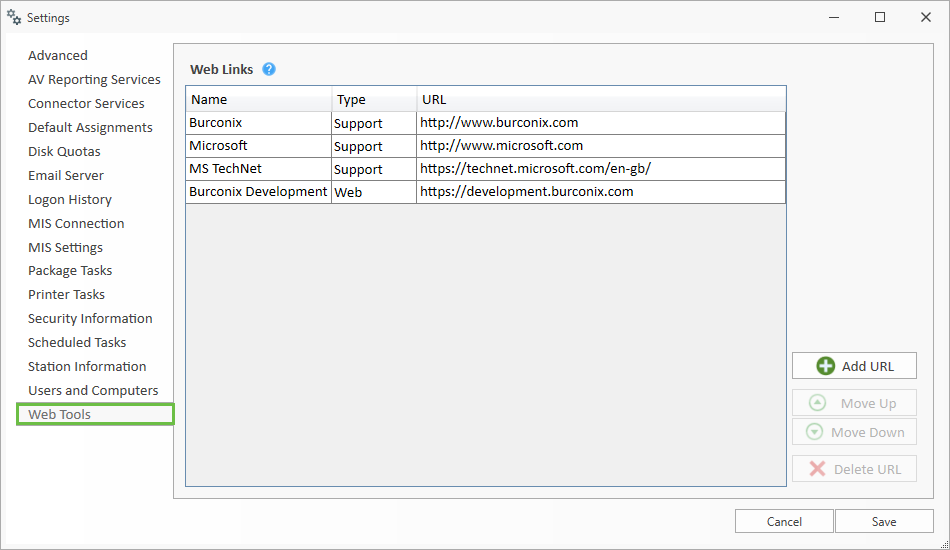
Links will then be available from File - Web
Settings.XML
The Settings.xml can be used to customise the BCX Manager experience. It can be found here: \\bcxmaster\c$\Program Files (x86)\BCX\Managerv3\settings.xml.
Additional OUs
BCX Management Tools traditionally uses 1 root OU for users, and 1 root OU for stations, to manage deployments.
It is possible to add additional OU's within the server settings.xml
This is particularly useful if you want to run 2 management systems side by side and migrate computers and users slowly in to a new structure to avoid disruption, allowing both systems to recognise users without having to move them within Active Directory. Or where bespoke systems and scripts rely on a specific OU structure within Active Directory.
Adding the following variables in the settings.xml on the BCX Server, (C:\Program Files\BCX\Server), will make BCX aware of the OUs:
<AdditionalADSUsersOU>OU=Users,OU=BCX2</AdditionalADSUsersOU>
<AdditionalADSStationsOU>OU=Stations,OU=BCX2</AdditionalADSStationsOU>
<AdditionalADSUsersOU>OU=People,OU=Other</AdditionalADSUsersOU>
<AdditionalADSStationsOU>OU=Computers,OU=Other</AdditionalADSStationsOU>
Replacing the OU values with your own. The values are in the Distinguished Name format, omitting the DC values.
The BCX Server Service will need a restart and all instances of BCX Manager closing for the new settings to take effect. This can be done from within the Services management on the server, command line, or by restarting the server itself.
If you have added multiple sites (OUs) it is possible to filter User Information to show only the required OUs.
Add below to the BCXManager settings.xml to filter out required OU(s)
<FilterIgnoreADSUsersOU>OU=Users,OU=BCX2</FilterIgnoreADSUsersOU>
Replacing the OU values with your own. The values are in the Distinguished Name format, omitting the DC values.
BCXManager will need to be closed and re-opened to take effect.
Return to Contents page