BCX Users and Computers
Users and Computers is used to manage users and stations and their organisational structures.
Contents
- 1 Creating an Organisational Unit
- 2 Creating a User Template
- 3 Adding a new user onto network
- 4 Importing multiple users
- 5 Quick find and resetting user passwords
- 6 Editing user details
- 7 Renaming existing users
- 8 Multiple user changes
- 9 Moving users
- 10 Validate Shares and Permissions
- 11 Adding groups
- 12 Converting multiple groups
- 13 Viewing details for a station
- 14 Importing multiple stations
- 15 Disk Quotas
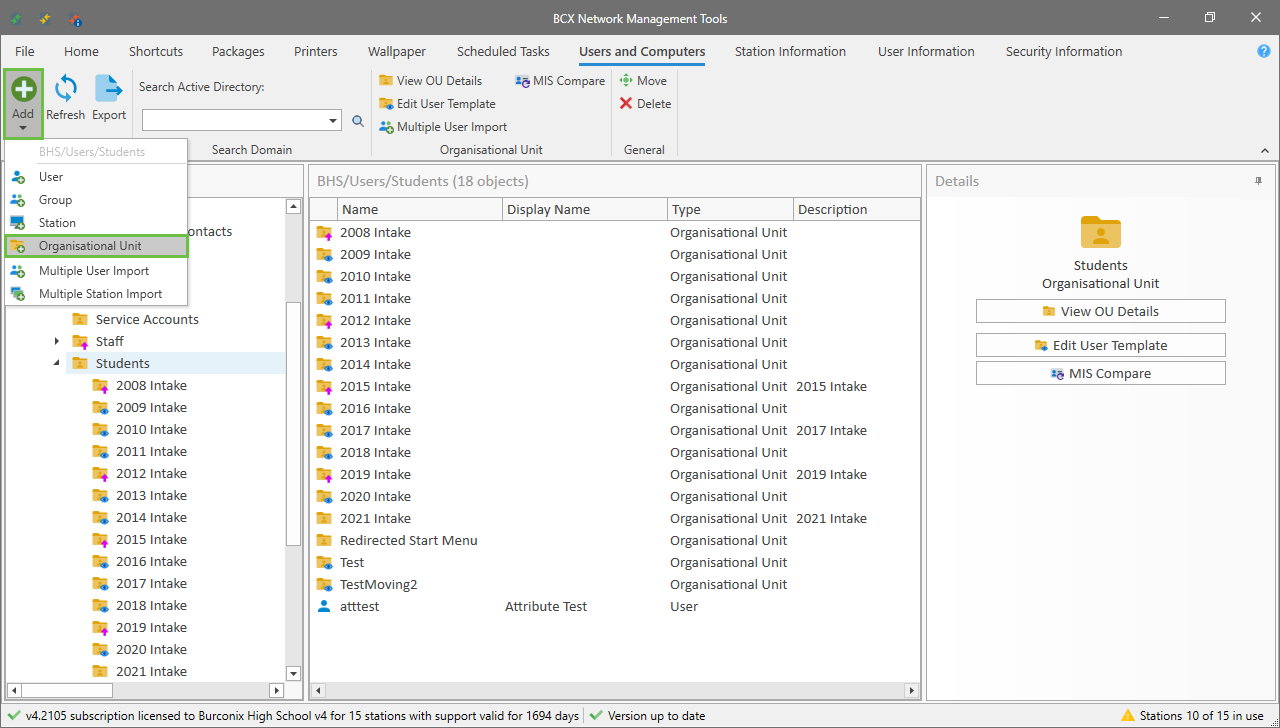
Creating an Organisational Unit
An Organisational Unit is a container in which you can store computer or user objects.
To Create an OU find that location in Users and Computers that you want to place a new OU, click 'Add New' and then 'Organisational Unit'. For example a new intake of students would be created under the Students OU.
You will then see the OU Details window where you can enter the name of the OU and a description.
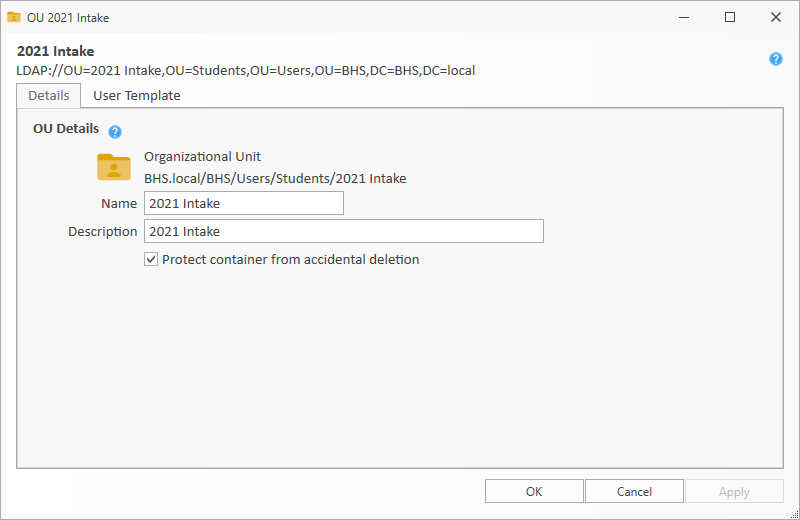
The 'Protect container from accidental deletion' when checked prevents accidental deletion of the OU and all of the objects contained within. To disable it, you have to go into the properties of the OU by right clicking it and un-ticking the box before trying again to delete it.
Once created, the User Template tab is where you create a template that governs the way that all users under the OU are created.
Creating a User Template
A User Template is a set of rules that you apply to an Organisational Unit. The rule govern the way a user is created when you create them in that location. Rules can set the way the username is formatted, where their home directory is and how it is mapped, their logon scripts, where their mailbox will exist, what groups they are part of and many other properties such as password requirements.
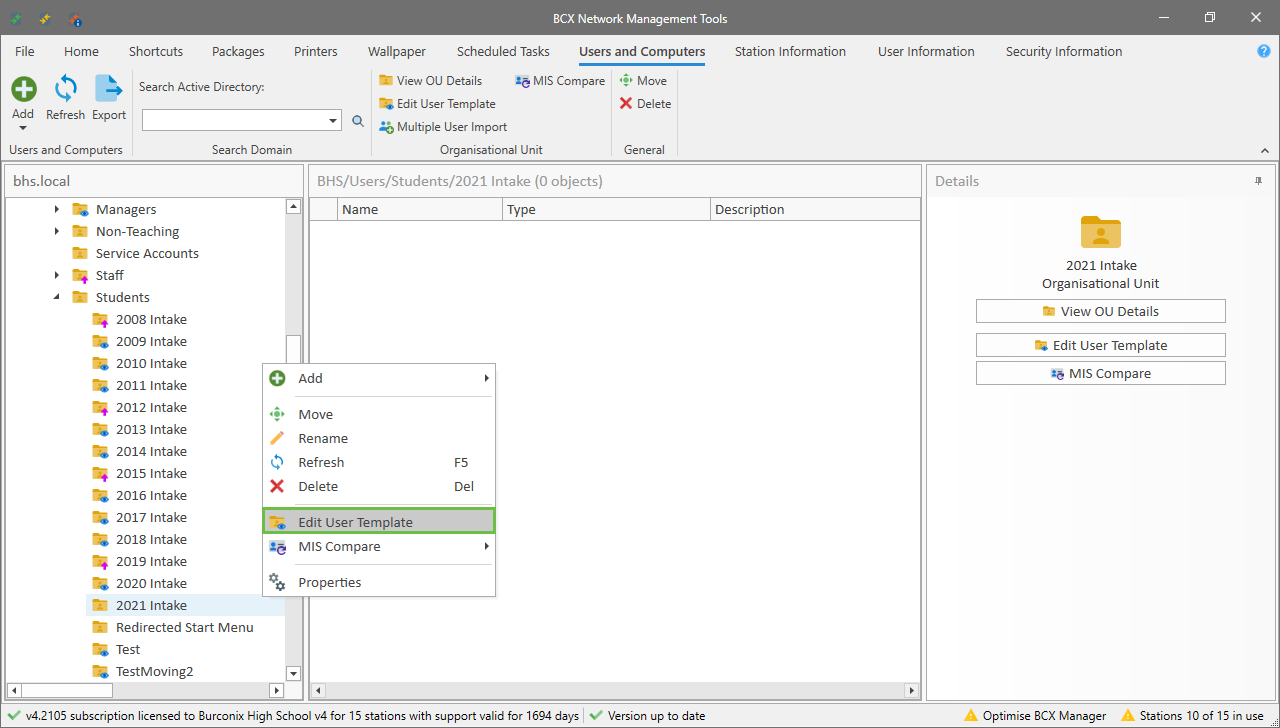
To create a user template, go to the Users and Computers tab. Find the folder where you are going to create new users.
Right click the folder and click the 'Edit User Template' option.
This will give you the edit template window. Here there are options to either copy an existing template, or 'Create New Template'
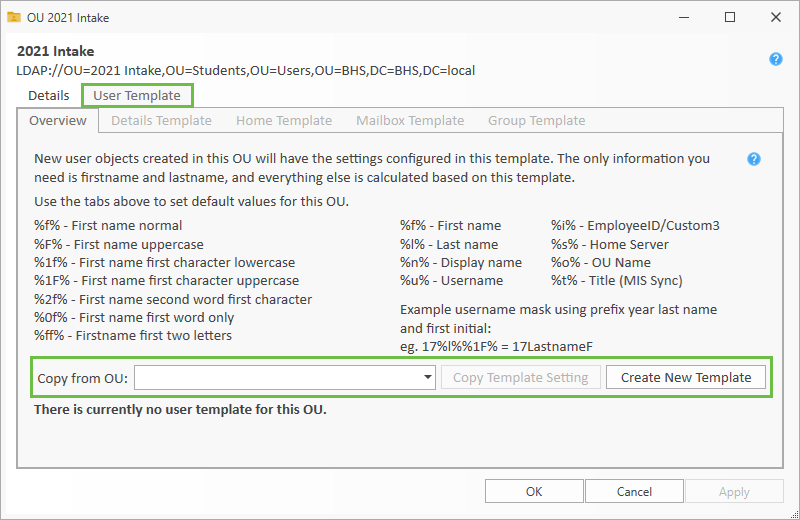
The masks that are shown are ways to format a username in the User Details Template tab.
Here are some examples applied to Joe Bloggs:
%f%%l% :- JoeBloggs
%F%%l% :- JOEBloggs
%l%%1f% :- Bloggsj
%l%%1F% :- BloggsJ
%l%%ff% :- BloggsJo
User details are set on the "Details" tab. All details need to be generic here, you are not yet creating the user.
Wild-cards are used that specify how to format the the display name and username. If you have more than one UPN suffix for your domain you can set that here too.
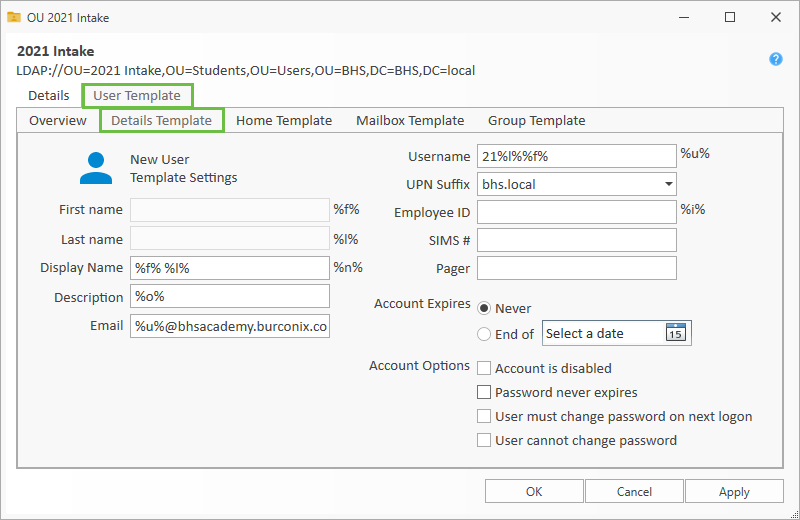
An example of a username is 21%l%%f%. This would create a user with the prefix of 21 followed by their surname and forename.
So a firstname of Joe and surename of Bloggs would give a username of 21BloggsJoe
The account options with the check boxes will be set as default for all new users.
The Home directory is set on the "Home" tab.
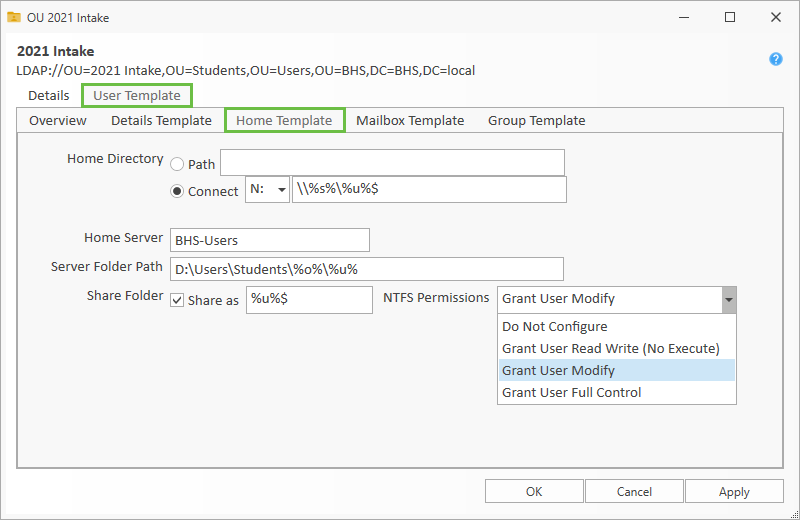
Here you can set which drive letter to assign for a homedrive and where the folder will be shared from.
The name of server where the user data is stored should be entered, then the physical path to the folder where it exists on the server.
You can also choose the NTFS permissions from a pre-set list, the default being Grant User Modify.
You can set mailbox settings on the "Mailbox" tab.
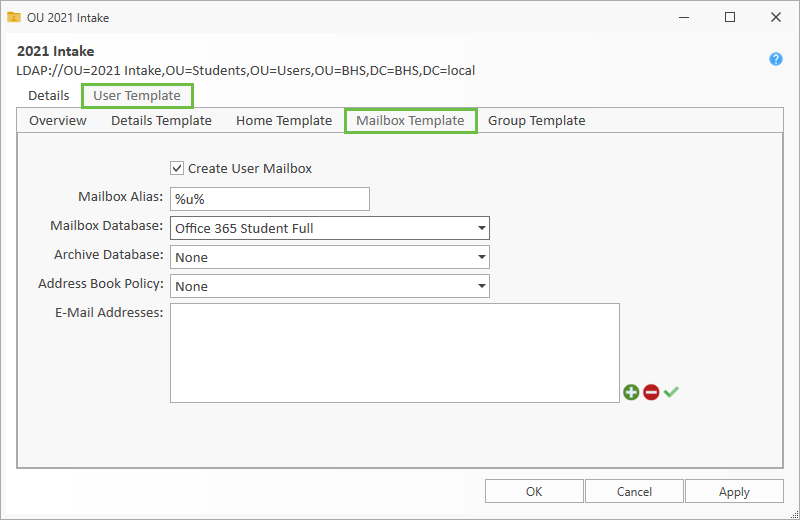
This requires that the BCX Exchange connector be setup and that you have an onsite exchange server or 365 Exchange Online.
You would select the most appropriate mailbox database for the user.
Groups can be added on the "Group" tab
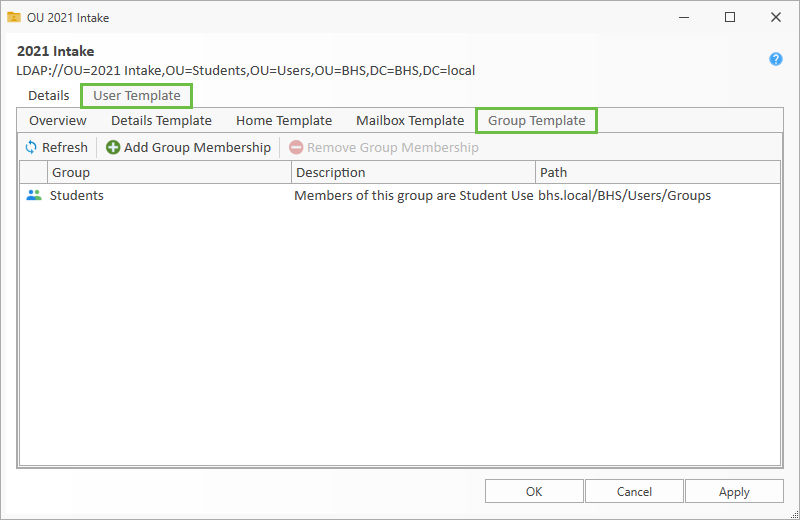
Users are added to groups when they are created.
You just click 'Add Group Membership' button and select the groups that are appropriate.
Adding a new user onto network
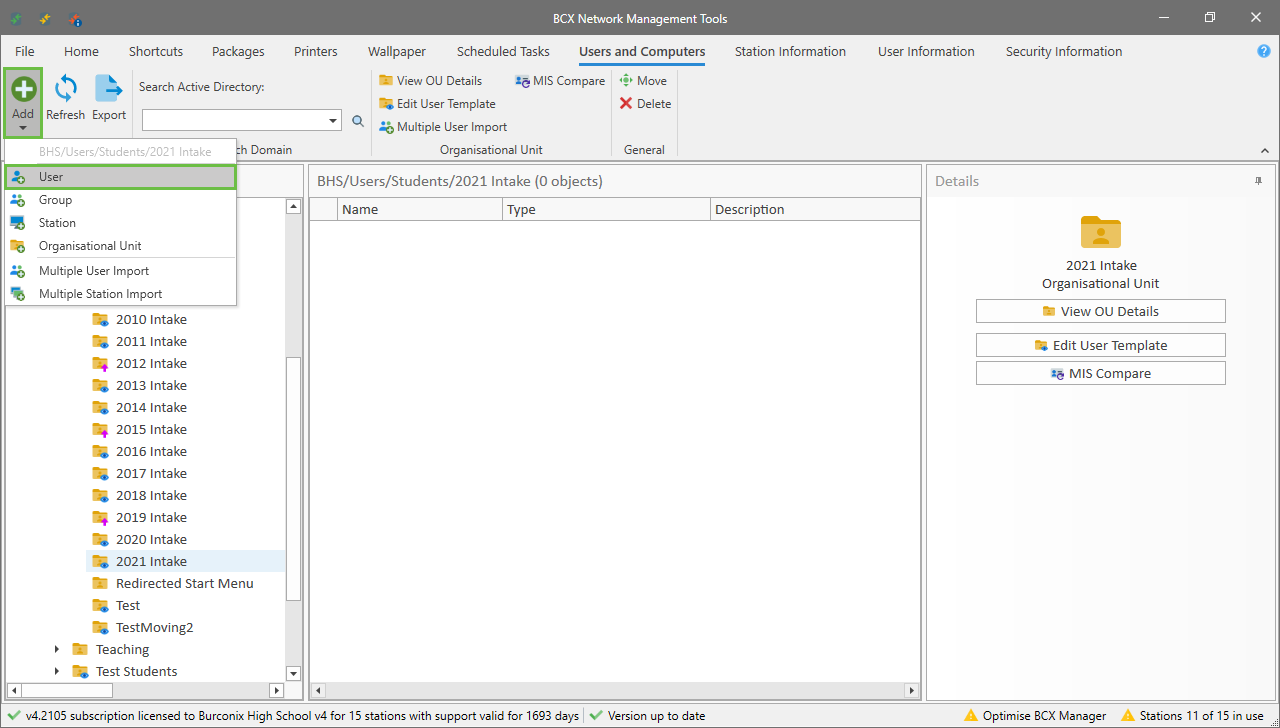
Find the location that you want to create your new user. Click 'Add New' at the top and click 'User'
You will see this window
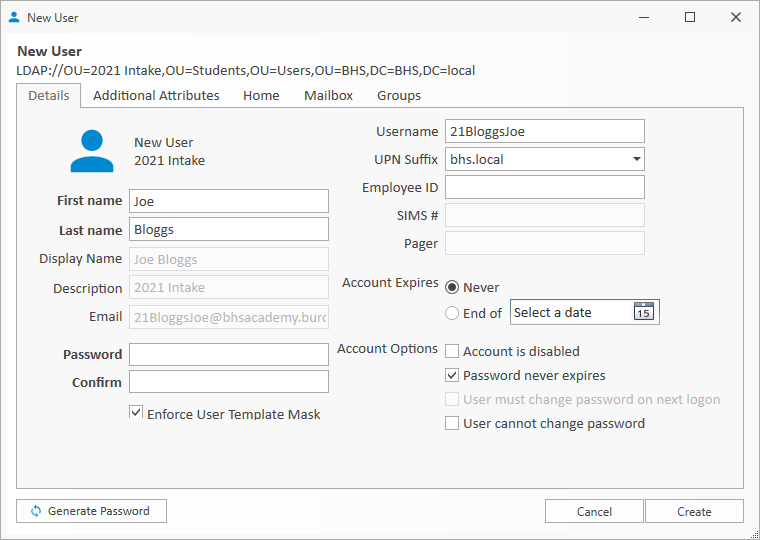
Populate the first name and last name, and the rest of the user details will be populated as per the template. You can override the template settings by un-ticking the 'Enforce User Template Mask' Other settings can be overridden in the other tabs as per the user template.
Importing multiple users
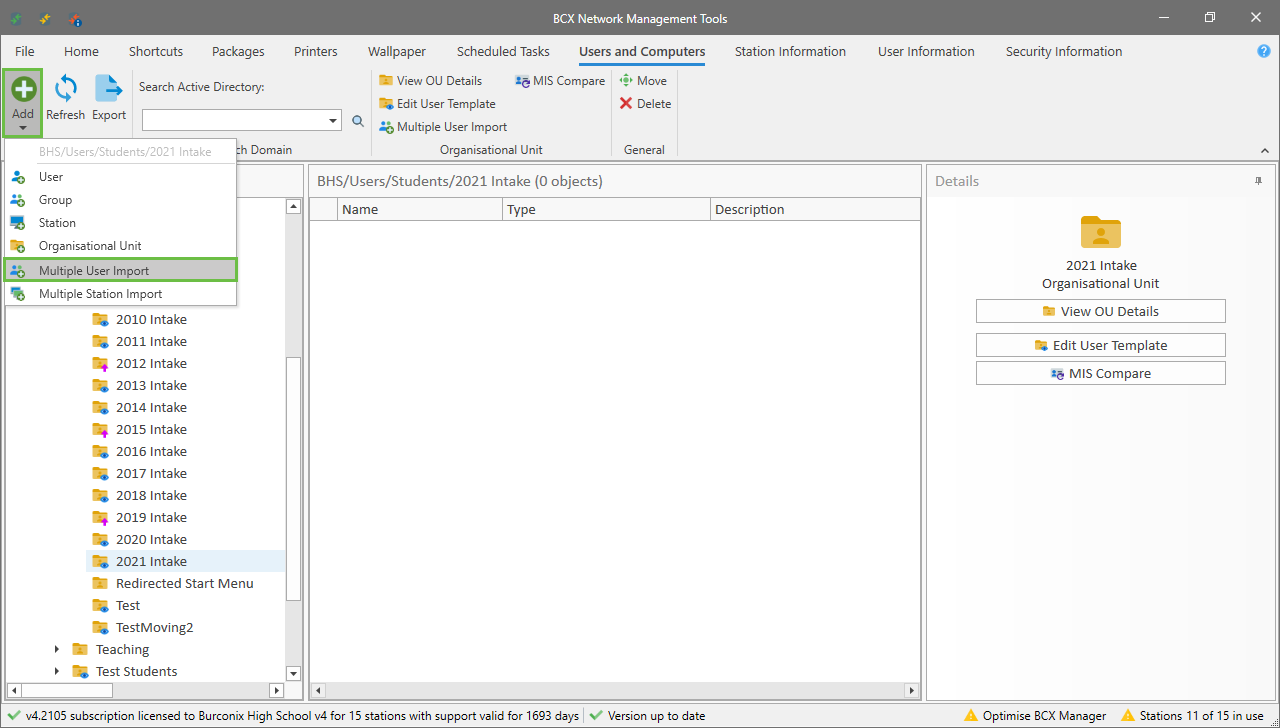
You can import multiple users at the same time easily. Just click 'Add New' on the ribbon and click 'Multiple User Import'
You will then see this window
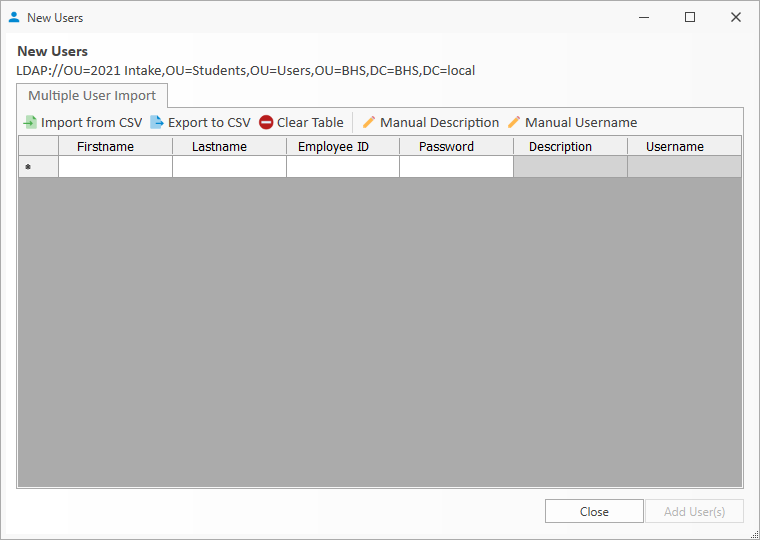
You can either type in the names yourself manually and let it generate the username automatically, or import them from a CSV. Override the automatic description and username by pressing the appropriate buttons. If the last 2 columns are the CSV are populated with data, the import wizard will see this and ask you if you want to override them. There is no way to override other settings from the template mask from this window. You would have to change the template to suit. If any duplicates or errors are detected, you will be given a chance to go back and correct them and retry the import again.
Quick find and resetting user passwords
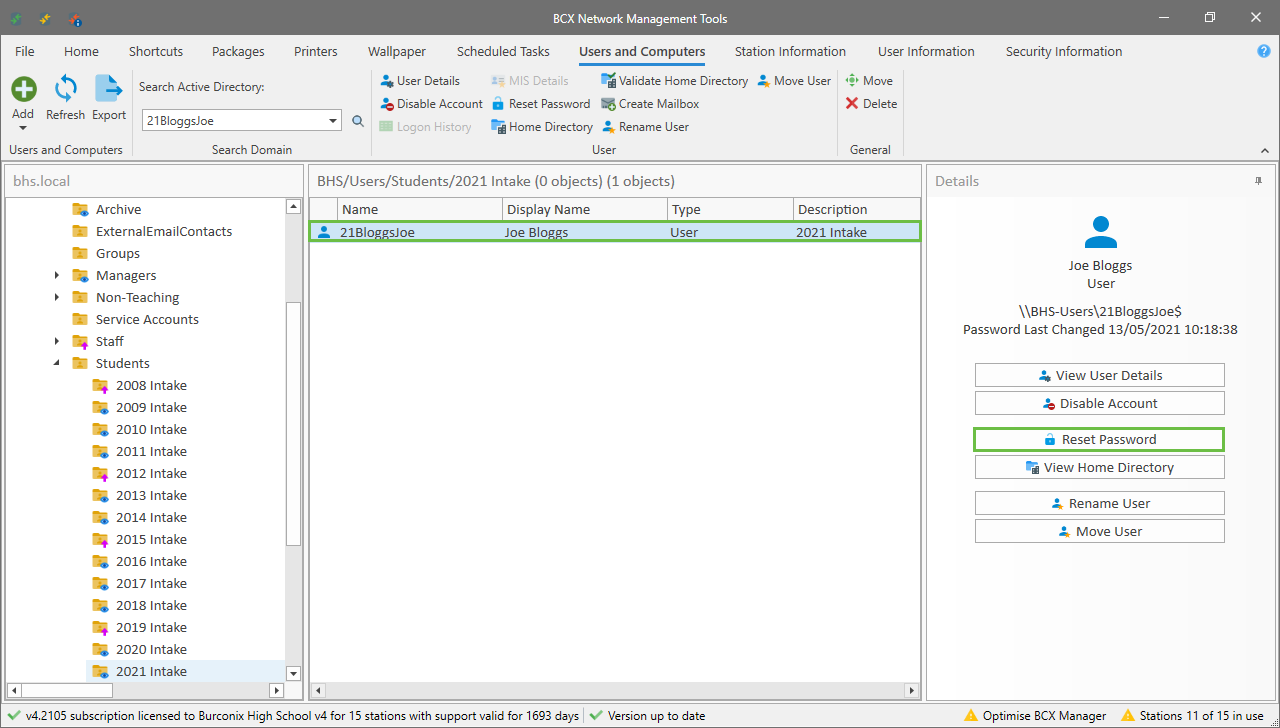
To quickly find a user, from the Users and Computers tab begin to type their username in to the 'Search Active Directory:' box. The name will begin to auto-populate. Click the magnifying glass icon or press enter to find the user.
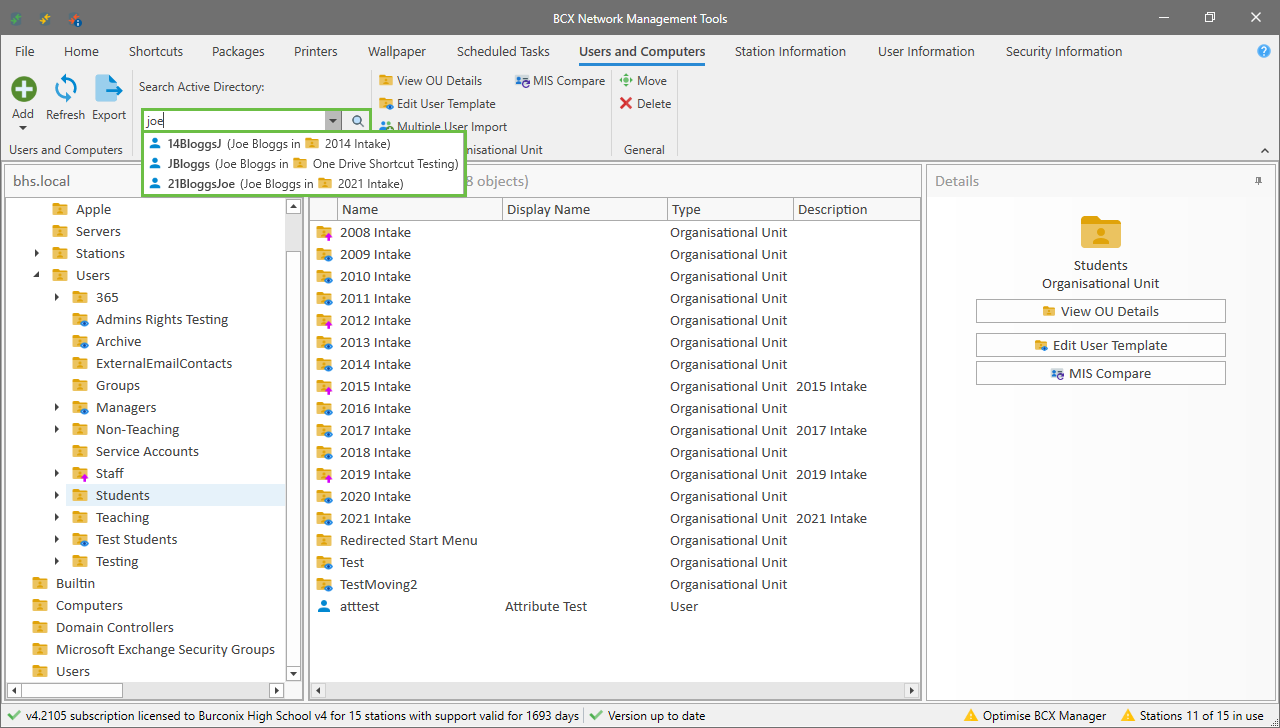
Once the user is highlighted, click 'Reset Password' either on the right hand side, or in the ribbon at the top of the window. Follow the on screen prompts to complete the password reset.
Editing user details
To edit a users details, find them in the Users and Computers tab either by navigating the folder structure, or by using the search function. Double click their username, or highlight and click 'View User Details' You will then see this window
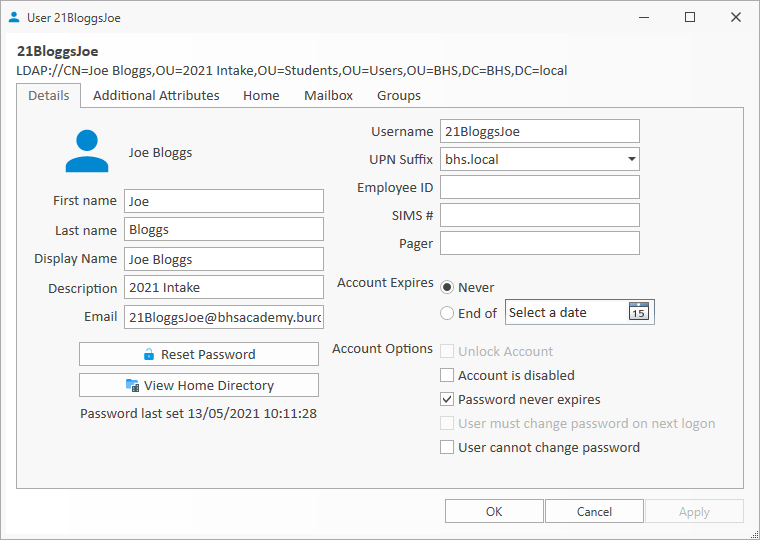
You can edit the details of the user here as you would be accustomed to with the user template you've already created. There is a button to view their home directory and reset there password here too.
Renaming existing users
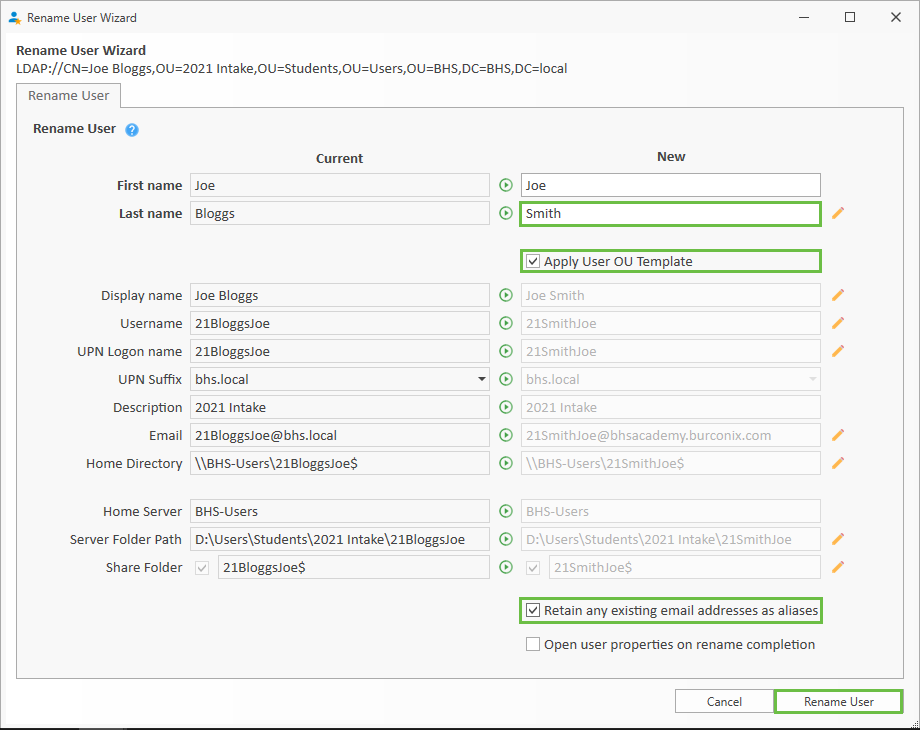
When a user changes their name, Users and Computers can be used to ammend their account updating email aliases and home directory paths at the same time.
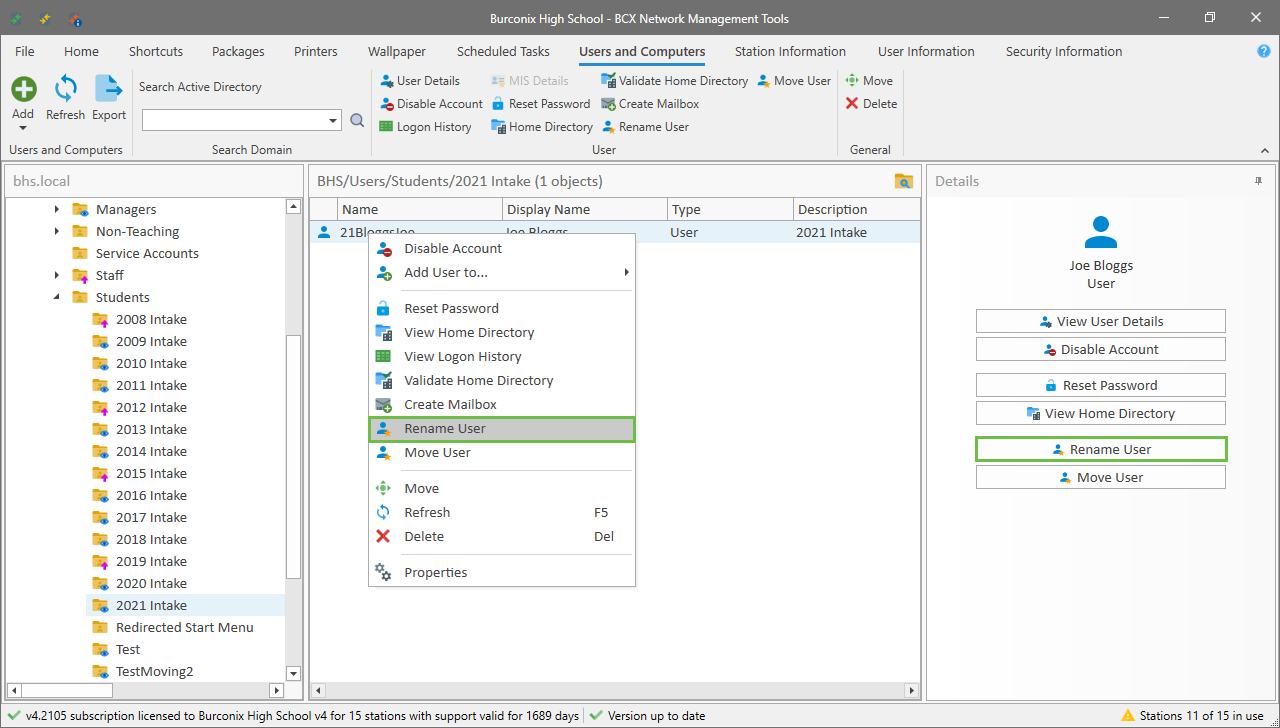
Select the user and right click for menu, or choose Rename User from the details pane as shown.
Rename the user under the new heading, as shown here, surname to Smith.
Checking the Apply User OU Template box will fill out the corresponding requirements shown greyed out.
Checking the Retain any existing email addresses as aliases box will keep existing addresses as well as creating a new default address.
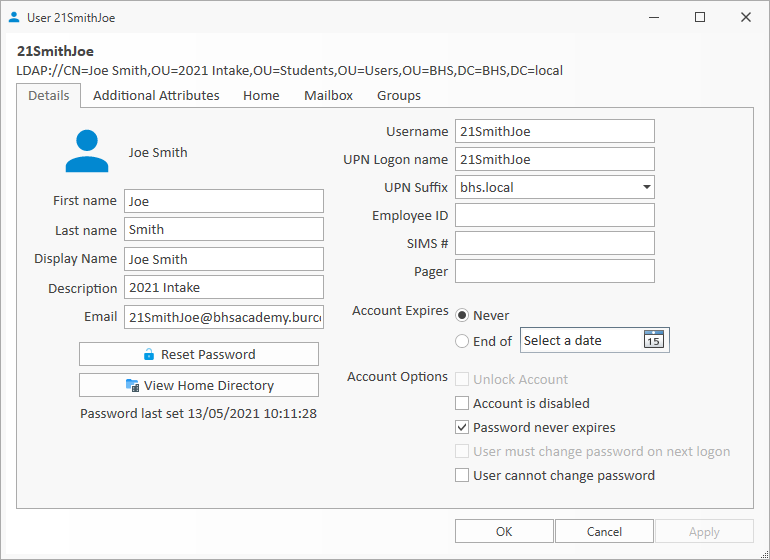
After the rename you can view the changes in user details.
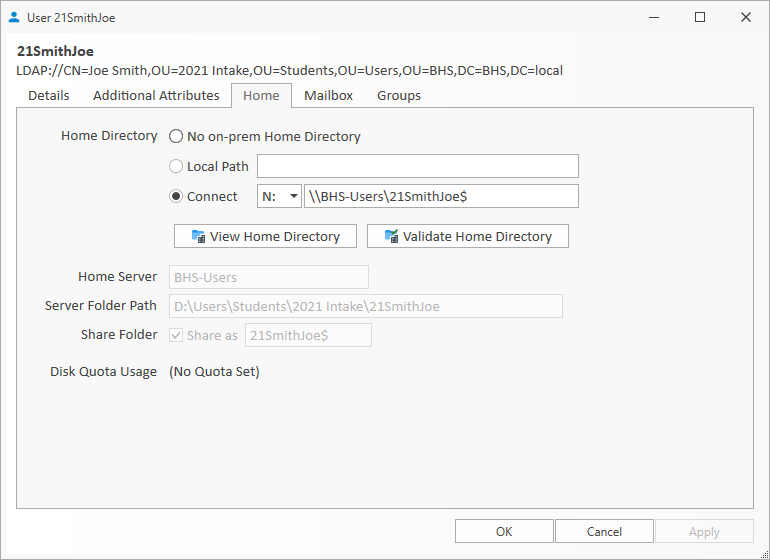
Also review the Home Directory.
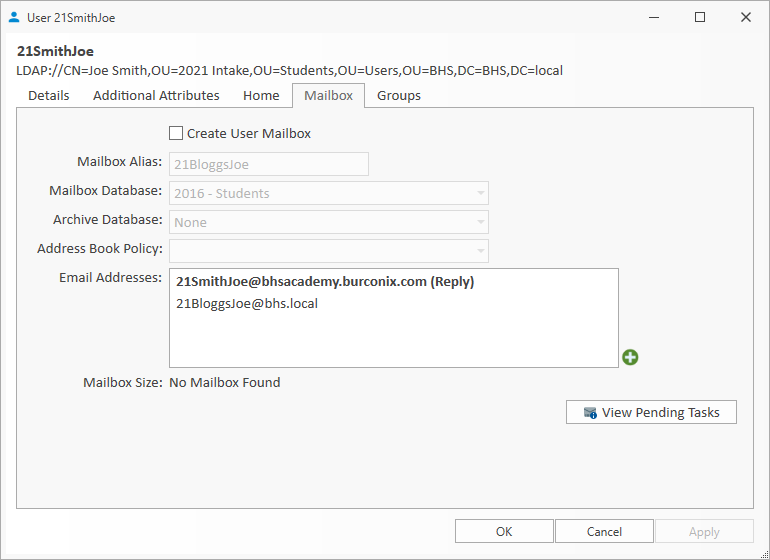
And under mailbox you can see the user now has a new default address and has also kept the original address.
Multiple user changes
As with renaming a user, if you select multiple users, you can change various attributes relating to the users template.
After selecting the users and clicking rename, the following wizard is presented.
As shown here the UPN for the selected users will be changed in bulk.
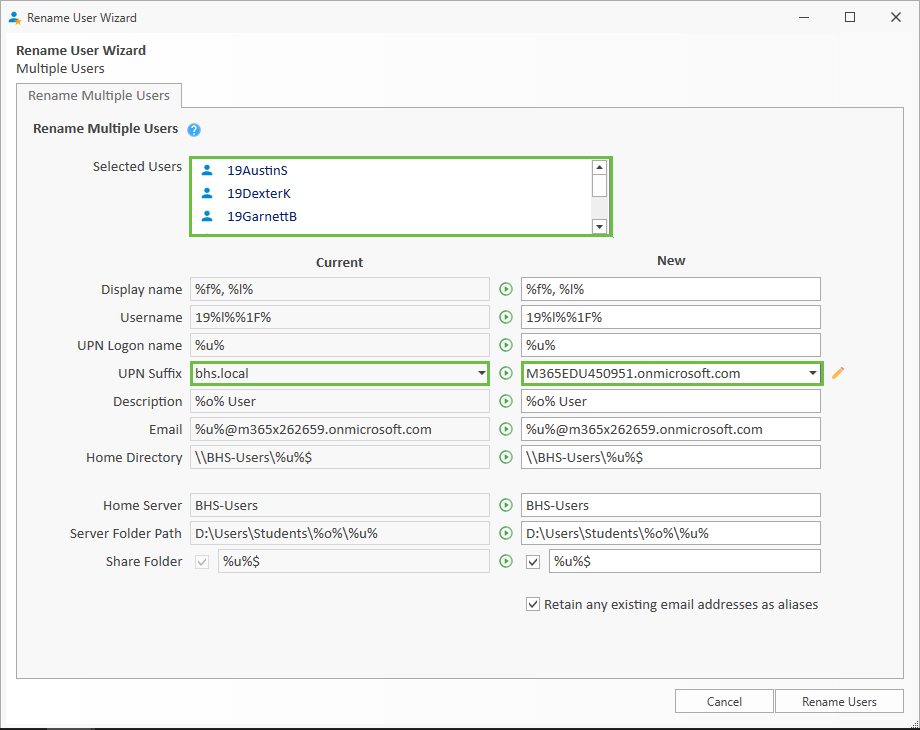
This same wizard can also be used to update usernames and update home directories using the OU template syntax.
Moving users
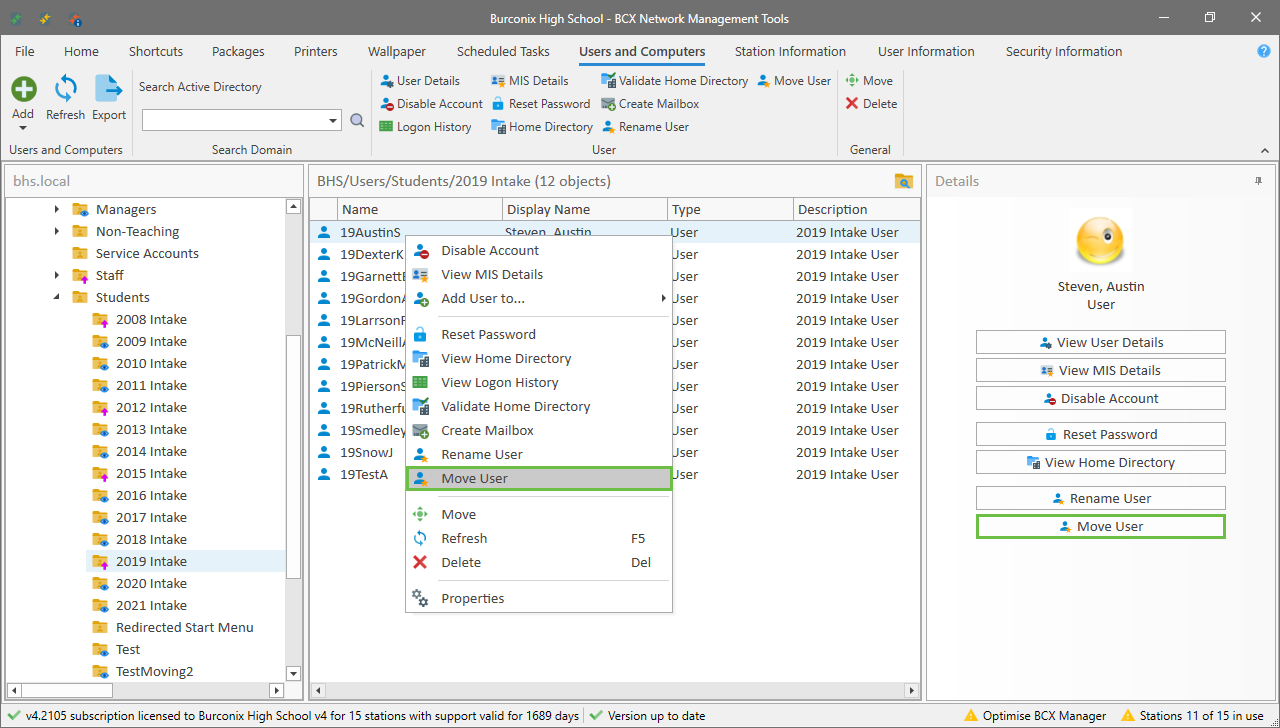
If you have a requirement to move a user or multiple users into a different OU, migrate data, or both, this can be done easily using the Move User function in Users & Computers.
Highlight the user and right click, choose move, or pick Move User from the details pane as shown.
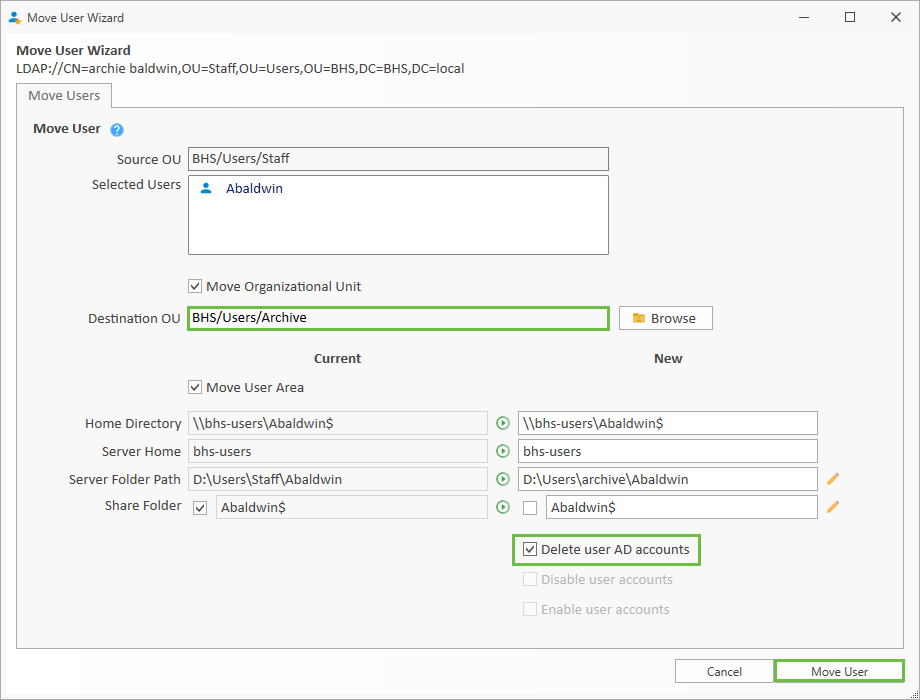
Here we choose to both move OU and Migrate Data.
Click Browse and in the resulting window to choose the required destination OU.
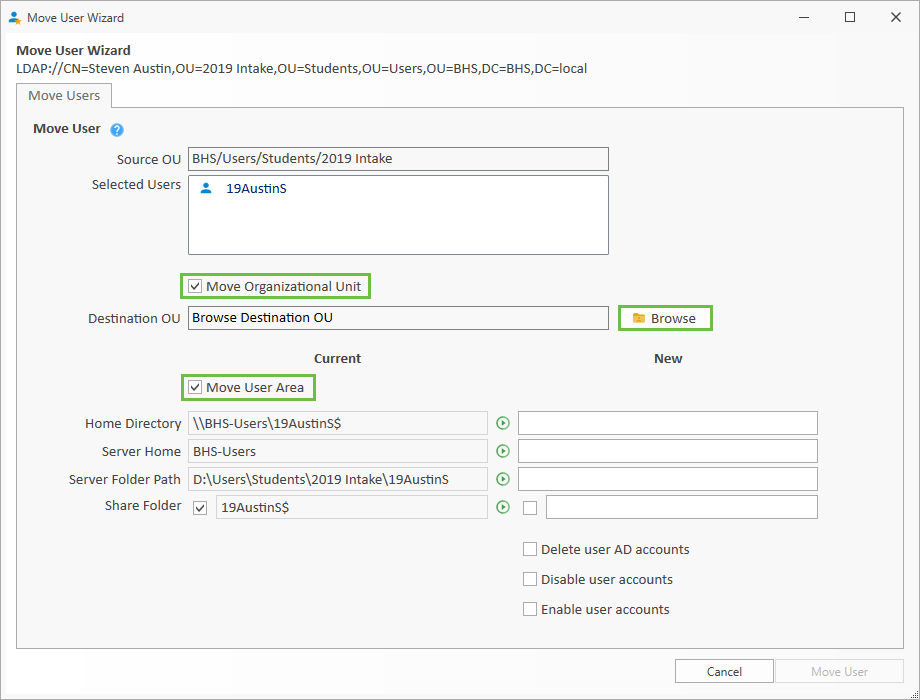
After selecting the required OU, the Move User Wizard window now automatically displays the expected new settings.
Check everything is correct and click Move User.

You will be prompted to confirm the user is not using offline files, and is not logged onto the network.
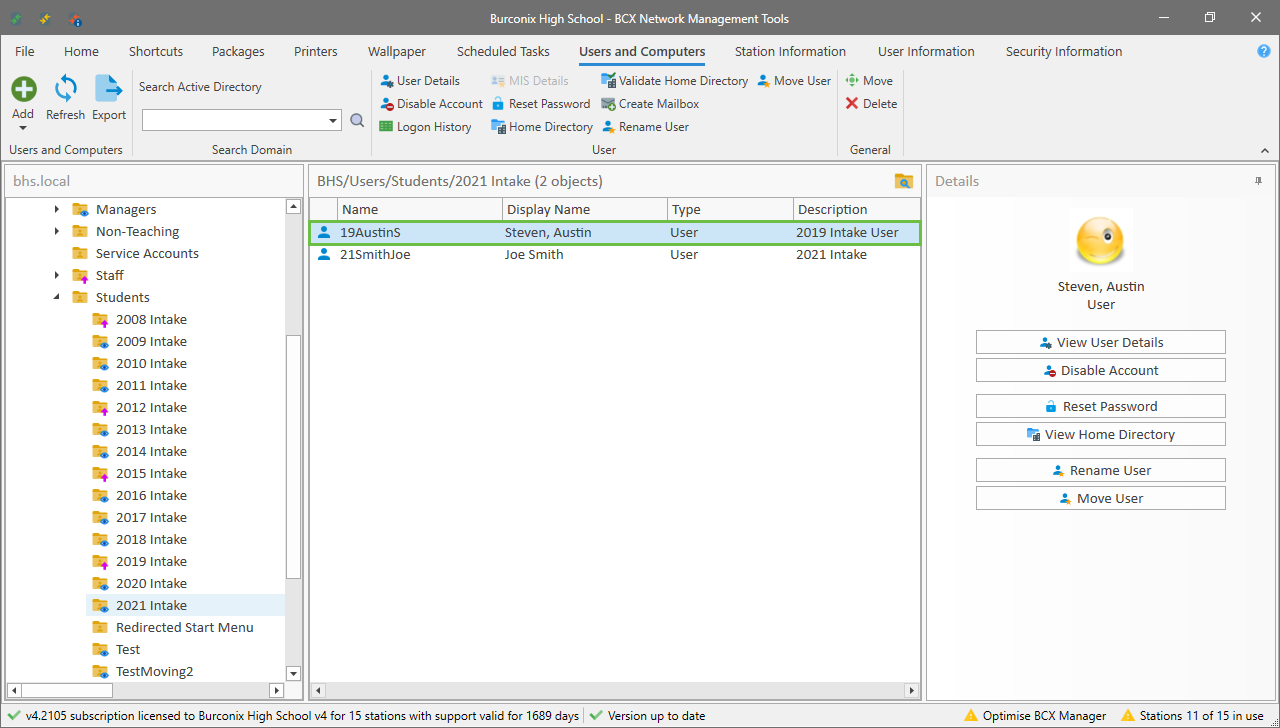
The move is then performed, the results visible in Users and Computers.
Delete user AD Accounts can be checked to provide an effective method of archiving data before user account deletion.
Initially, set up an Archive OU, then use the move wizard to move the user and data into that archive OU, and with the delete checkbox ticked, the users AD account would be deleted upon completion of the move.
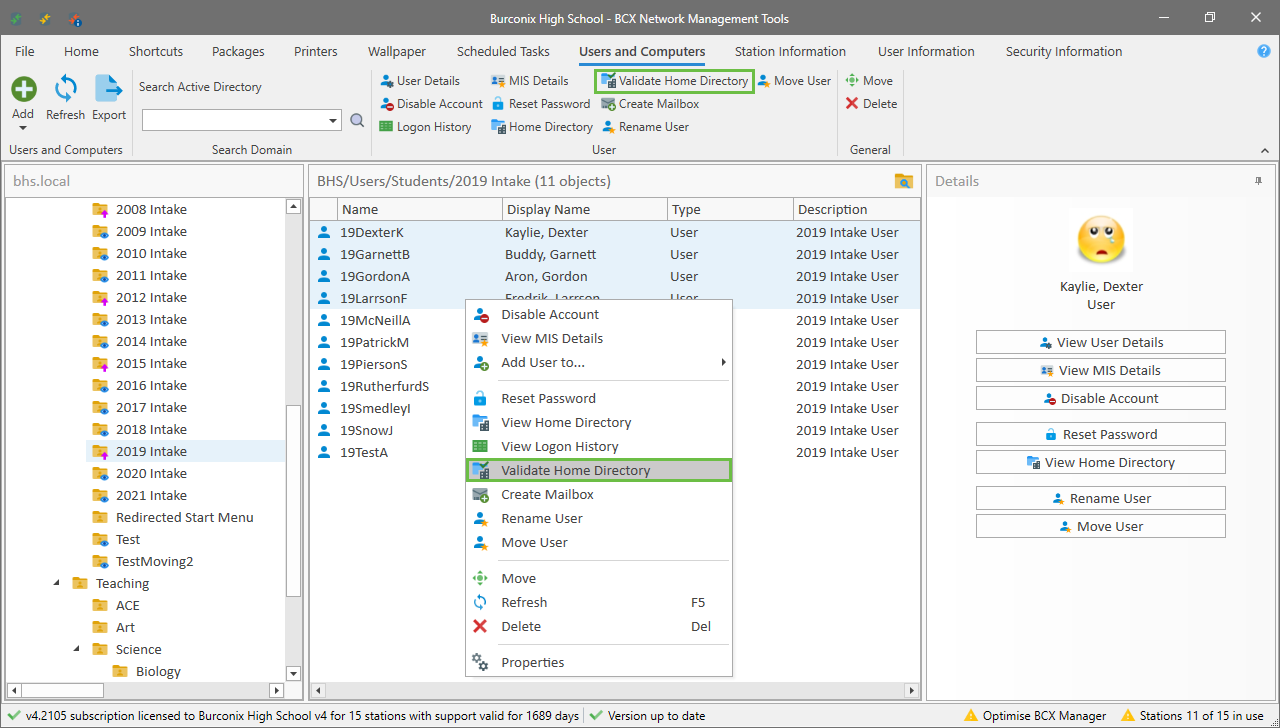
This function enables a users’ Home Directory to be checked for the correct share access and permissions.
If the Home Directory exists, permissions are checked against the Template and adjusted if incorrect. If not, the will Home Directory will be created in line with the Template.
This can effectively be used to bulk change existing or set missing permissions.
This can be utilised for single or multiple users. Select the user(s) and either choose the option from the ribbon or from the right click menu.
You are presented with a confirmation dialogue, followed by a dialogue confirming the results.
Adding groups
Groups can be used to group computers or users together. BCX deployment tasks can be assigned to a group of users or stations.
To create a group click 'Add New' and then 'Group'.
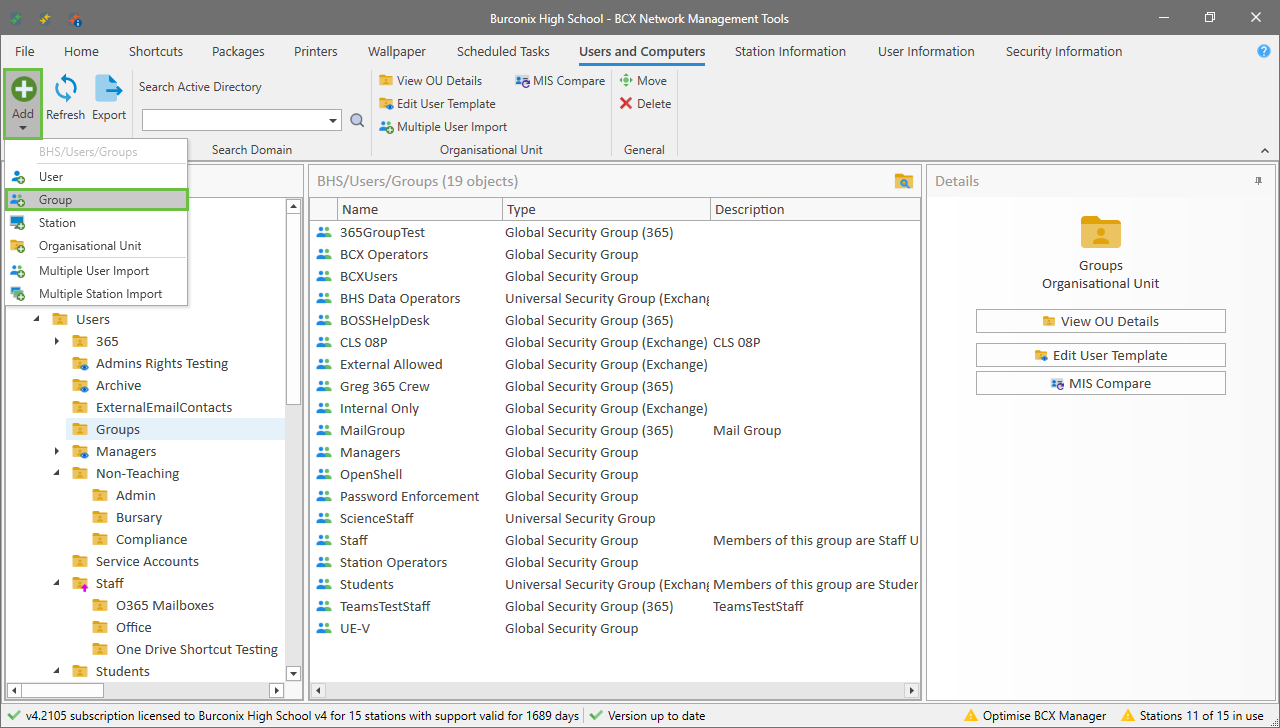
You name your group with an administrative name.
Eg: Science
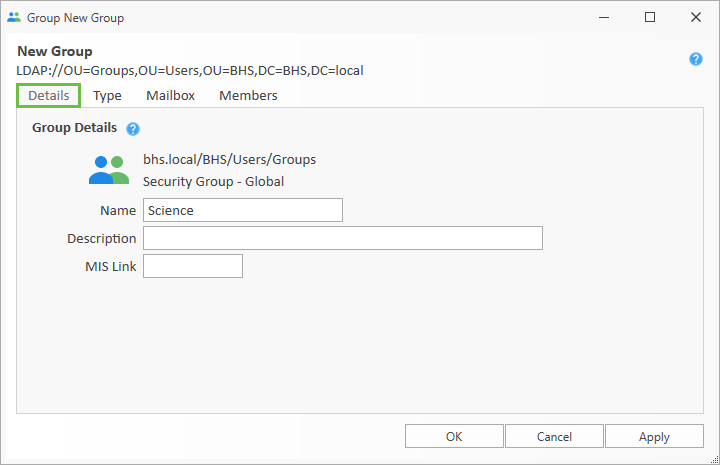
Group Type
By default any groups created will be global security groups, which allow you to set permissions based on this group on files and folders.
If you would like to use an existing group for email purposes you can choose to convert the group to either an Exchange, or 365 based group.

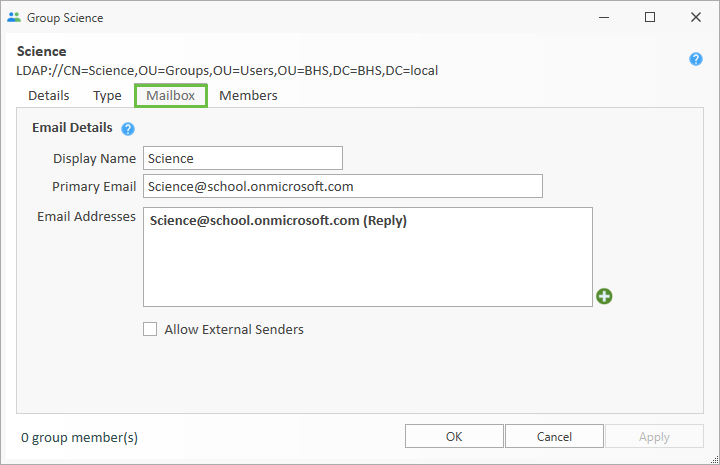
Under the Group Email Addresses tab there are options to mail-enable the group in Office 365 to allow for distribution emails to all group members.
The display name is how the group will be presented in the address book. The email address will be the global address for all members Eg: science@school.sch.uk Multiple additional group e-mail addresses can also be managed from the Group Email Addresses tab.
Group Members
To add members to the group, click 'Add Group Members'
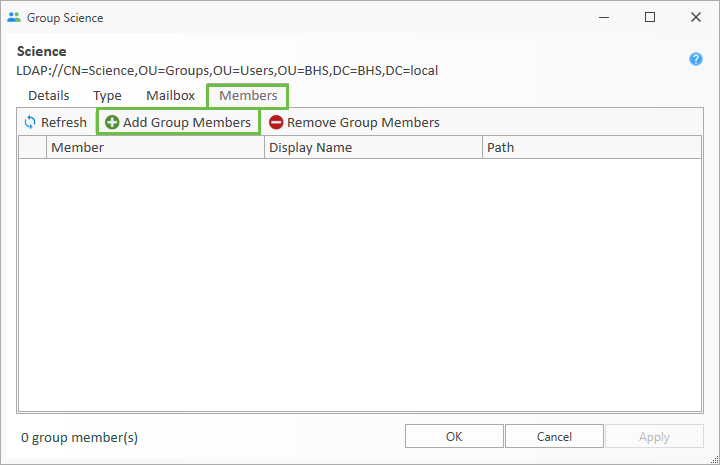
Select the users you want to add to the group from the list, using the control key to select individual users, or the shift key to select a large portion of users.
Clicking the 'Show all Active Directory Object' will show users that aren't under the BCX users root OU, and computer objects too.
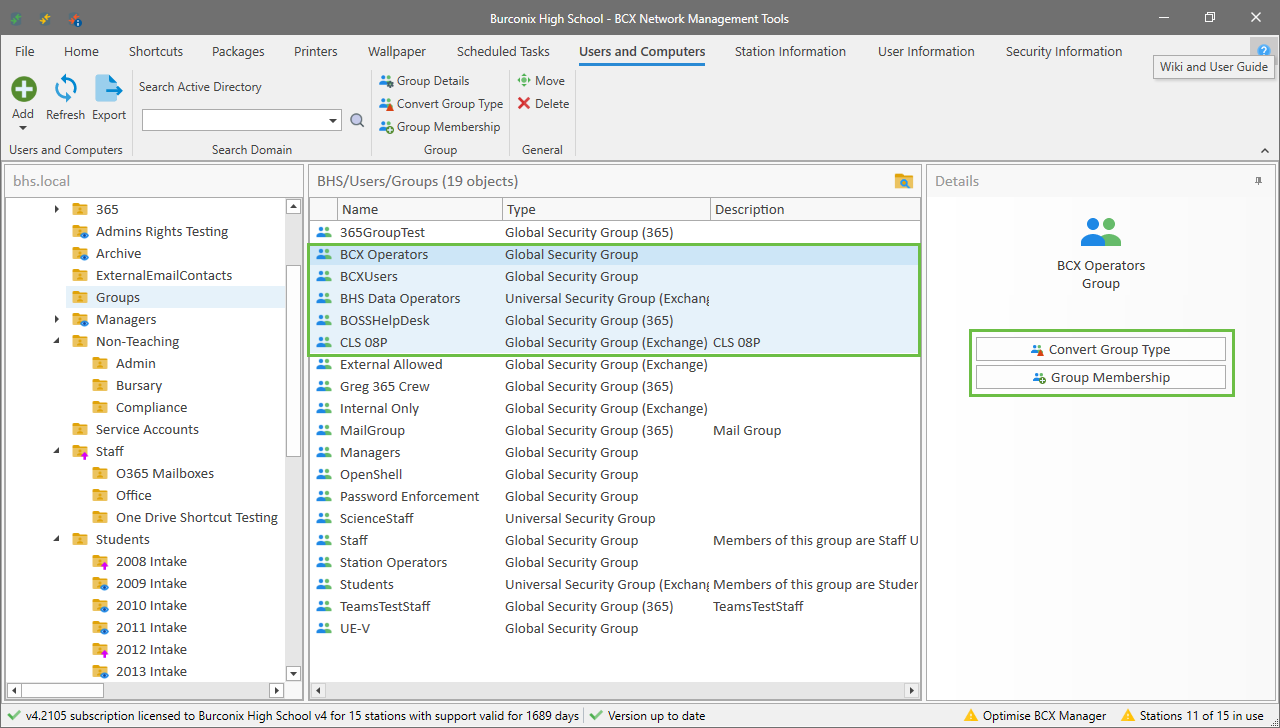
Converting multiple groups
Once you have created groups, the facility then exists to manage them in bulk.
Simply select the required groups, and you have the ability to make changes to the group type or membership of those groups in one operation.
Viewing details for a station
You can view the Station Details by clicking the button in the ribbon bar, details pane or right clicking the station in the list. This window will show you the DNS name fo the station as well as its Active Directory location and LDAP path. The description field is read from Active Directory and any change in AD or BCX will be reflected in the other. If the 'Account is Disabled' box is ticked then the station will be unable to log any users on to the network, this may be useful if you would like to prevent the computer from being used. The 'Notes' box is stored in the BCX central database and will be kept on the rebuild of a station. This section can be very useful for keeping details such as why the station was rebuilt, or any changes to the station.
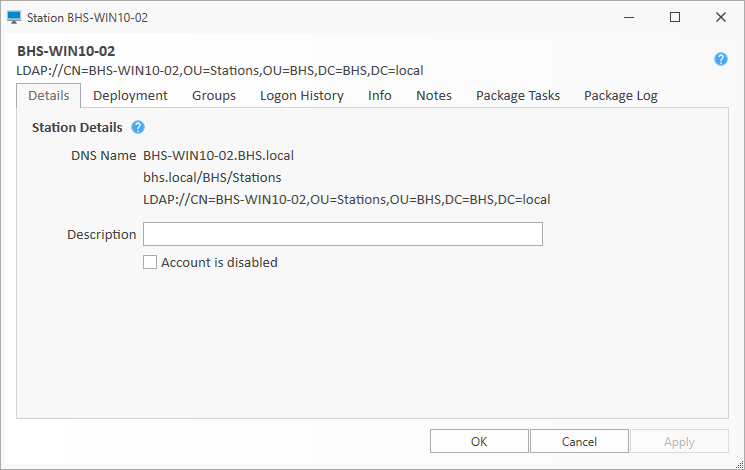
You can access all of the other tabs from this screen.
Importing multiple stations
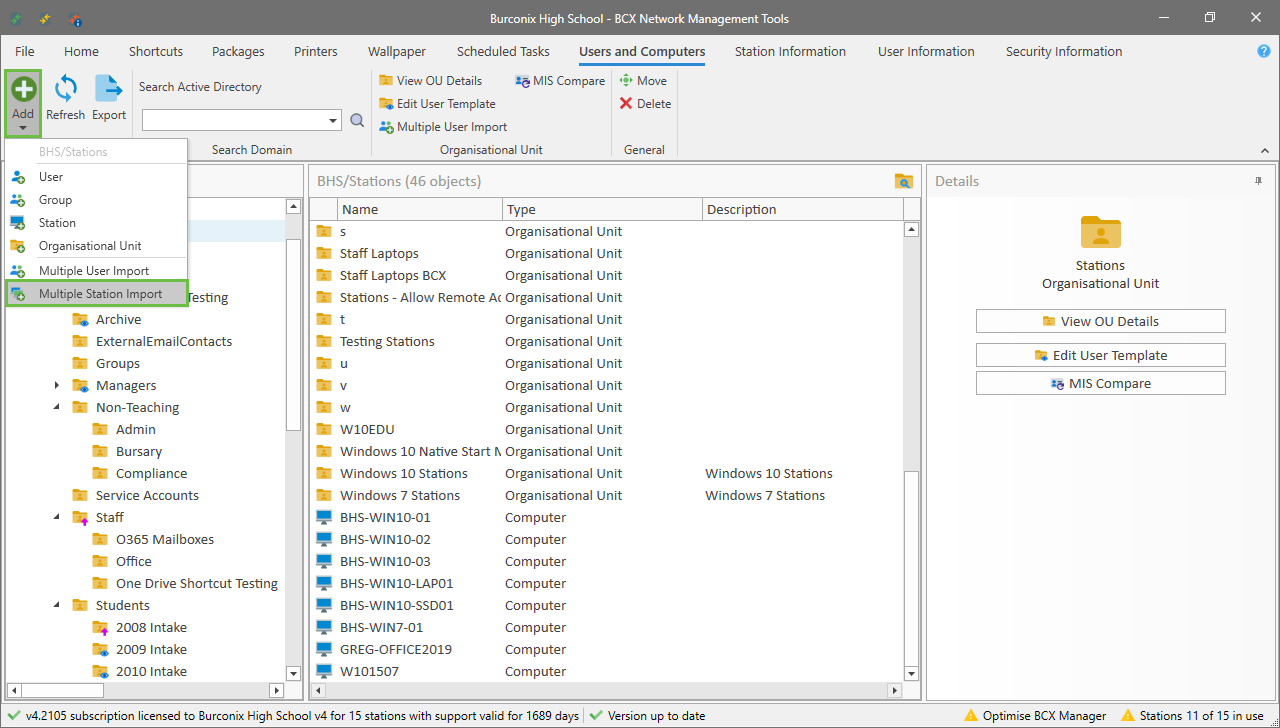
Importing station accounts lets you prestage computers with their MAC address so that when they are imaged for the first time they will automatically be given the correct name. You can import multiple stations at the same time easily. Navigate to the OU you would like to import the accounts in and then click 'Add New' on the ribbon and click 'Multiple Station Import'
You will then see this window
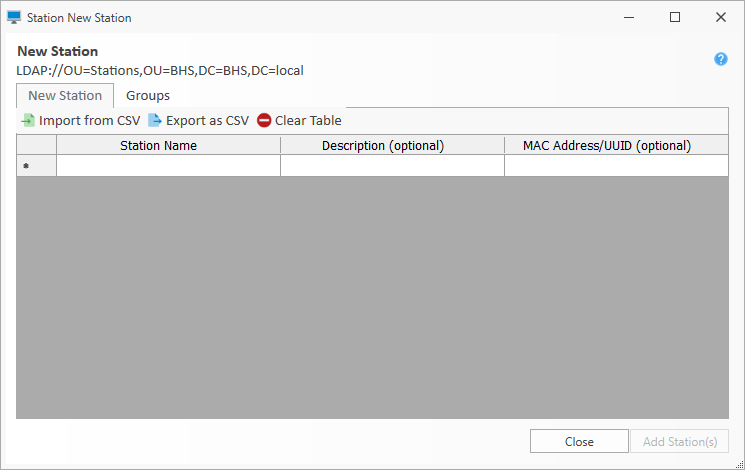
You can type your station names and MAC addressed in manually, or choose to import them from a CSV.
The decription field is optional.
Once your list is complete click 'Add Stations' and the accounts will be created with their corresponding MAC address in the OU you are in.
Disk Quotas
When using the File Server Connector on the servers that hold user's home folders, the BCX Server can manage quota information. This can then be used within the Manager and configured to show users their quota upon login with a small notification.
NTFS Disk Quota
When the BCX File Server Connector service starts, it checks to see if NTFS quota settings are enabled on each disk. If NTFS disk quotas are enabled, these quotas will be used for all user home folders located on this disk.
If using NTFS disk quotas, you can Enable Legacy NTFS Quota Management from within BCX Manager - Settings, and manage individual users and user template quotas from within BCX Manager.
File Server Resource Manager (FSRM Quotas)
File Server Resource Manager is the preferred method and offers much more flexibility with options to set multiple limits and different actions for each limit. Quotas can be assigned at a top folder level and automatically propagated to all sub folders.
First disable NTFS disk quotas if enabled and restart the BCX File Server Connector on that server. If NTFS disk quota management is disabled, BCX will assume home folders located on this disk are using FSRM quota management.
When using this method BCX simply reads quota values from FSRM. We recommend using the Microsoft tool under Administrative Tools - File Server Resource Manager on your file servers to manage your quota settings.
You can mix NTFS quotas and FSRM quotas on different disks on the same server. For example, you can have NTFS quotas enabled on D:, and File Server Resource Manager quotas on E:.
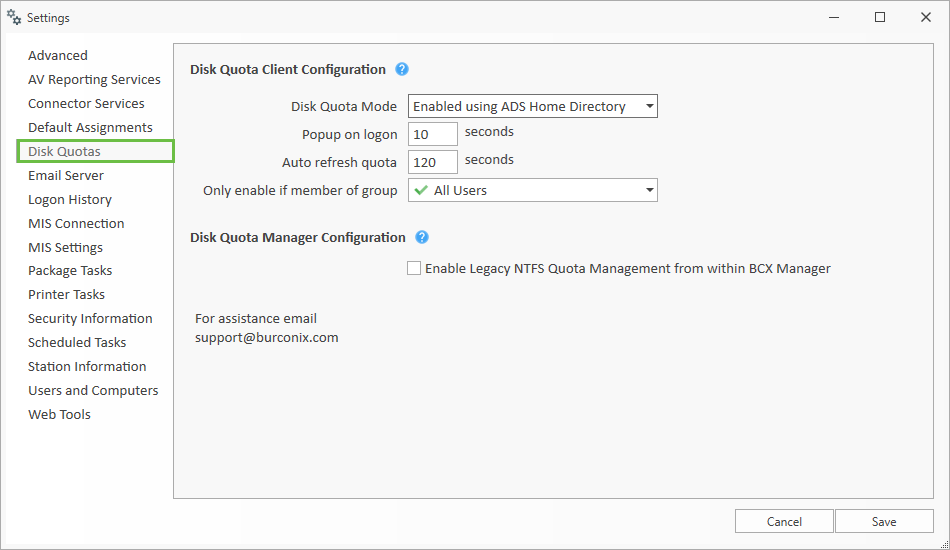
Disk Quota Mode: Here you can set the disk quota mode to Disabled, Enabled using ADS Home Directory or Enabled using Documents Path.
ADS Home Directory uses the users home folder directory location to check quota information, as specified in the users Active Directory properties.
Documents Path will use the users Documents path for when using redirected folders in Group Policy.
Popup on logon: Use this value to specify how long the popup remains on screen for, or set to 0 to disable automatic popup.
Auto refresh quota: Use this value to specify how often the client should refresh it's quota information.
Only enable if member of group: Use this dropdown list to select the user Organisational Unit or Security Group that these settings apply to.
Enable Legacy NTFS Quota Management from within BCX Manager: Allows the use of NTFS disk based quota system which can be edited from within user properties in BCX Manager.
Return to Contents page