Difference between revisions of "BCX Security Information"
| Line 56: | Line 56: | ||
This section of the guide will take you through displaying the available data using various views/filters. | This section of the guide will take you through displaying the available data using various views/filters. | ||
| − | We will start by looking at the " | + | We will start by looking at the "Unacknowledged, and Detected Threat" reports |
Both options available here allow you to view detections in greater detail, and acknowledge threats. | Both options available here allow you to view detections in greater detail, and acknowledge threats. | ||
| − | |||
| − | |||
| − | |||
| − | |||
Selecting "View All Unacknowledged Detected Threats" will display a listing of outstanding threats to follow up on. | Selecting "View All Unacknowledged Detected Threats" will display a listing of outstanding threats to follow up on. | ||
| − | + | The "View All Detected Threat History" will display all detected threats acknowledged or not. | |
| − | |||
| − | |||
| − | |||
| − | The "View All Detected Threat History" will display all detected threats acknowledged or not | ||
| − | [[File:bcx security information | + | [[File:bcx security information quick view.png|link=]] |
| Line 80: | Line 72: | ||
| − | [[File:bcx security information filters.png|link=]] | + | [[File:bcx security information filters.png|link=]] |
| Line 86: | Line 78: | ||
| − | [[File:bcx security information adv filters.png|link=]] | + | [[File:bcx security information adv filters.png|link=]] |
| Line 92: | Line 84: | ||
| − | [[File:bcx security information station events filter.png|link=]] | + | [[File:bcx security information station events filter.png|link=]] |
| − | |||
| − | |||
==AV Tasks== | ==AV Tasks== | ||
Revision as of 13:40, 19 May 2021
The BCX Manager is able to alert you to events triggered on stations protected by SCEP, Defender or Sophos antivirus software.
The Security Information Tab gives you global visibility of your antivirus estate on both stations and servers, and from here, you can view events, acknowledge detections, initiate scans and update definitions.
Contents
Acknowledge Detected Threats
This section of the guide will take you through Threat Management.
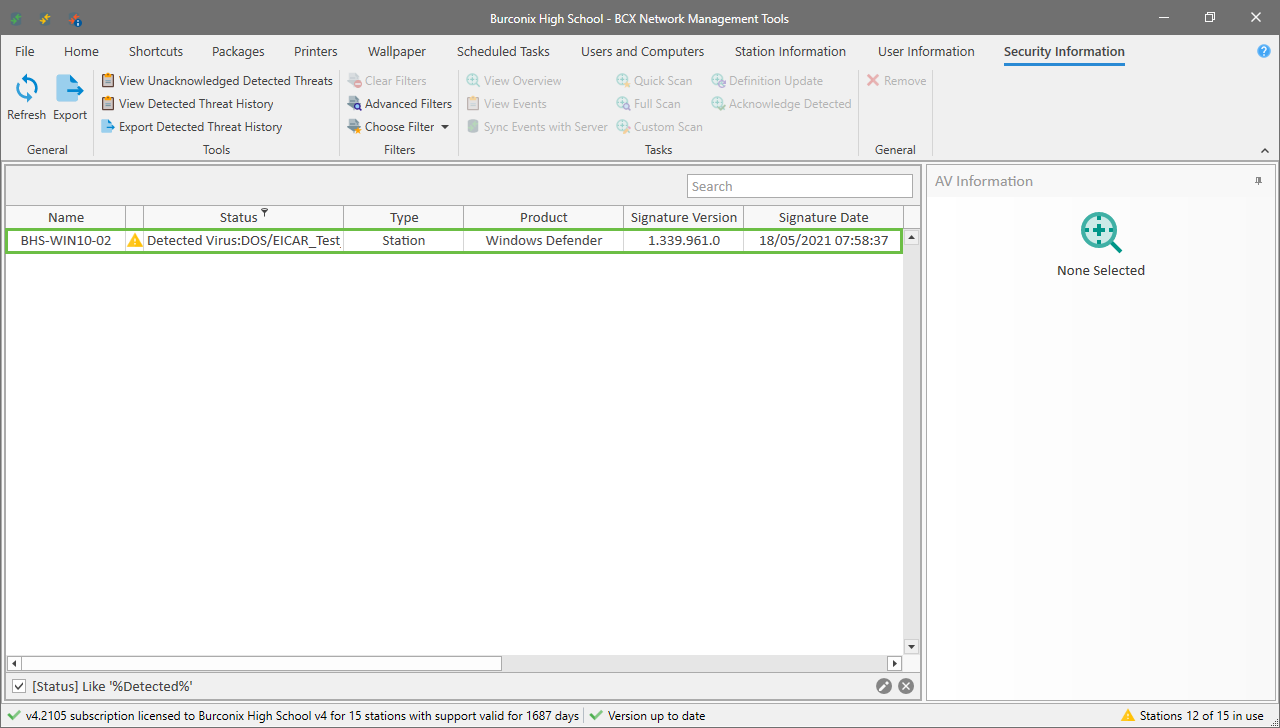
If a threat has been reported by a station, on opening BCX Manager it will take you straight to the detected event in Security Information. If BCX Manager is already open, it will display a warning in the status bar.
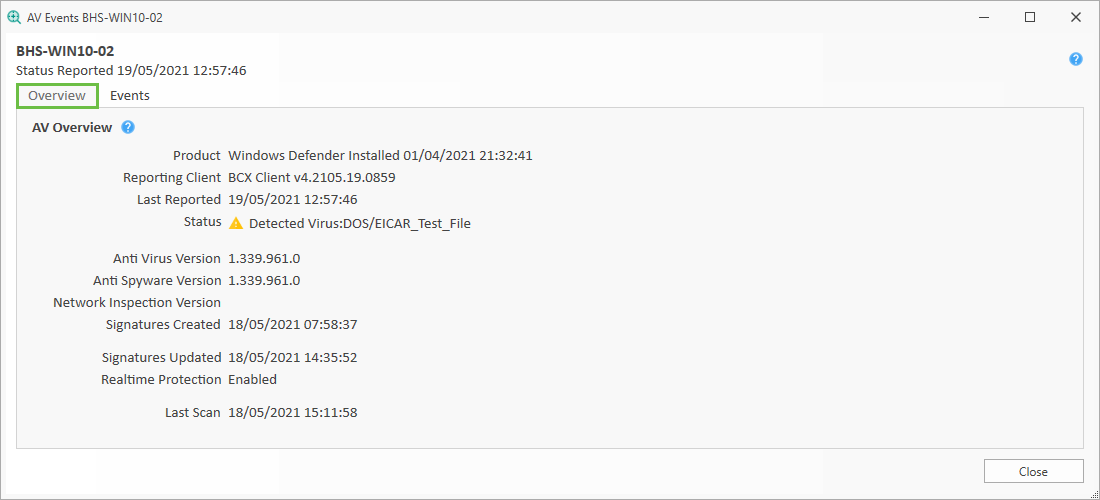
Clicking on the event displays an overview of the threat.
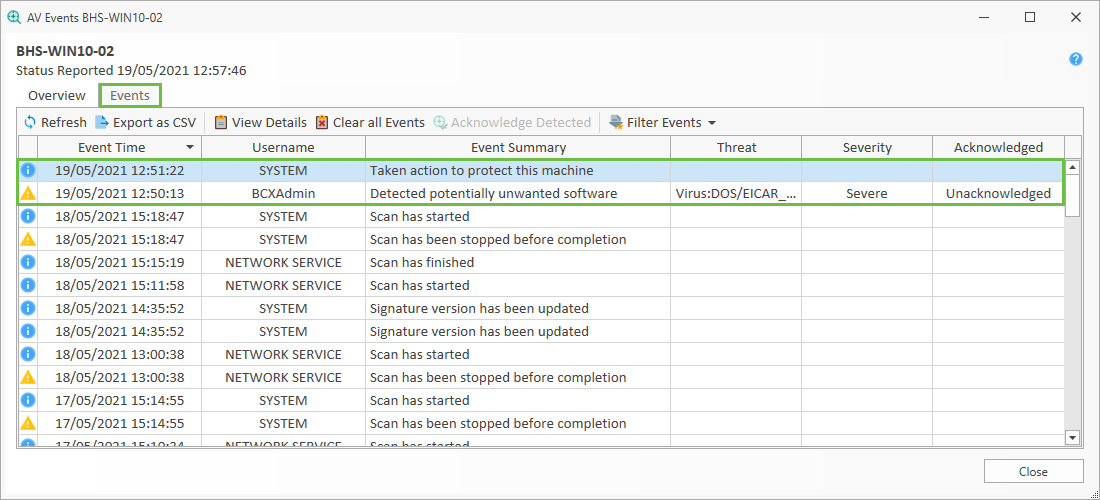
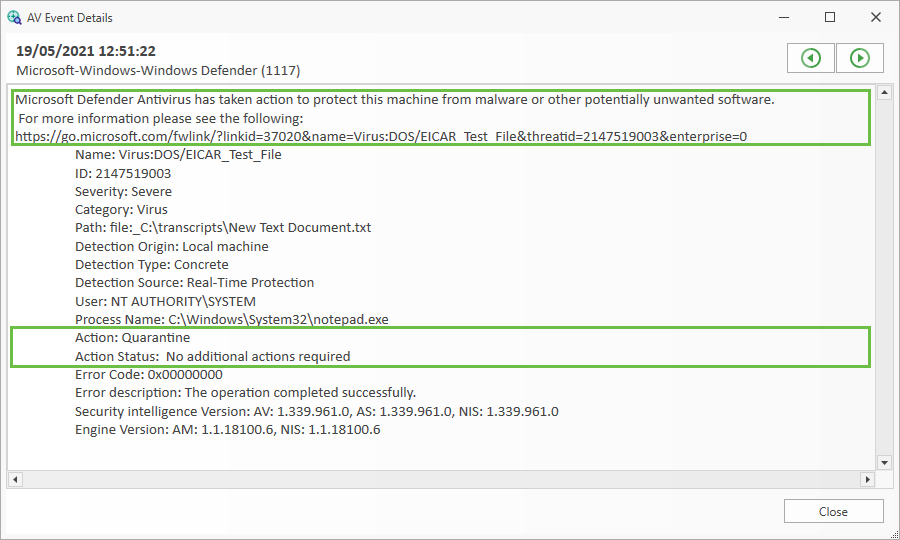
The Events tab allows you to investigate both the threat, and the action taken by the stations virus protection.
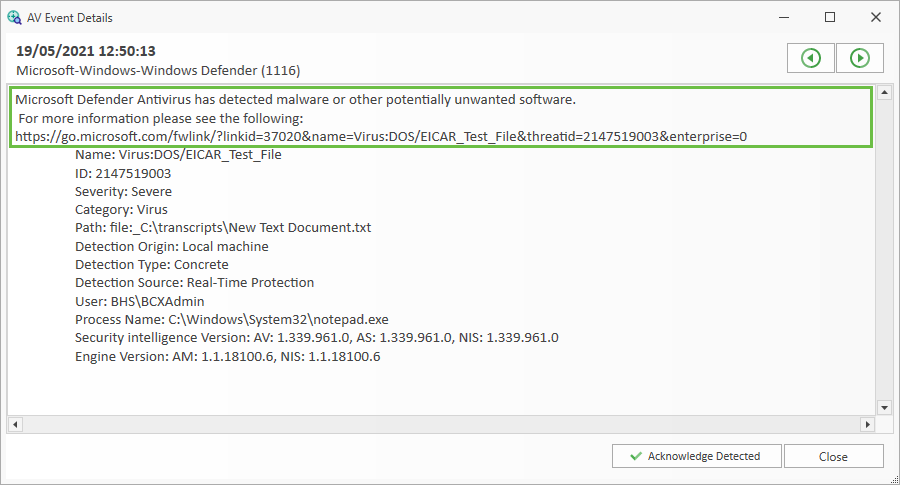
Click on each to review the information provided. First the threat.
Then the action taken.
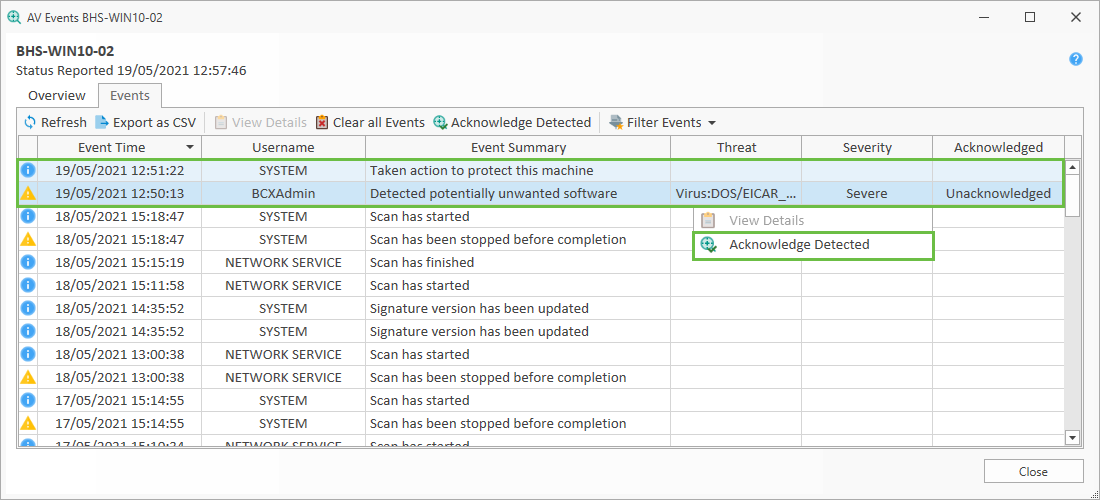
Once happy that the threat has been resolved, you would select both the threat and action taken events, and acknowledge them.
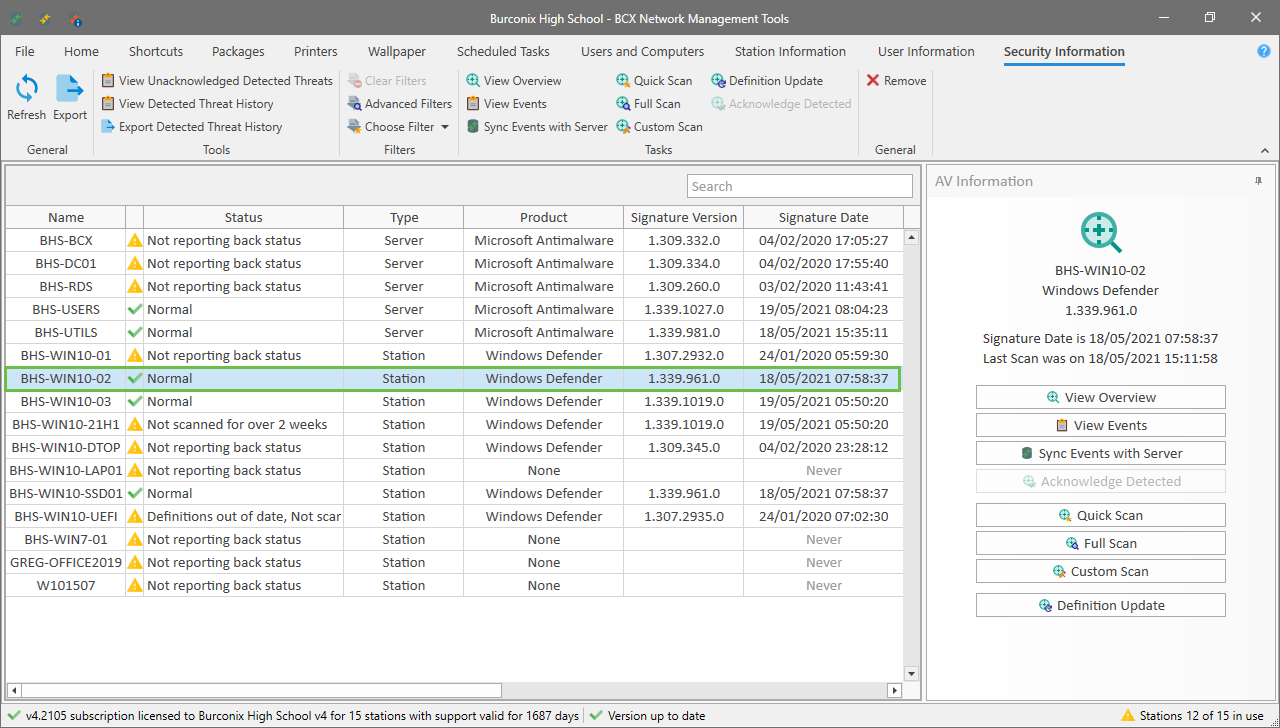
The status should then revert to normal.
Filtering Information
This section of the guide will take you through displaying the available data using various views/filters.
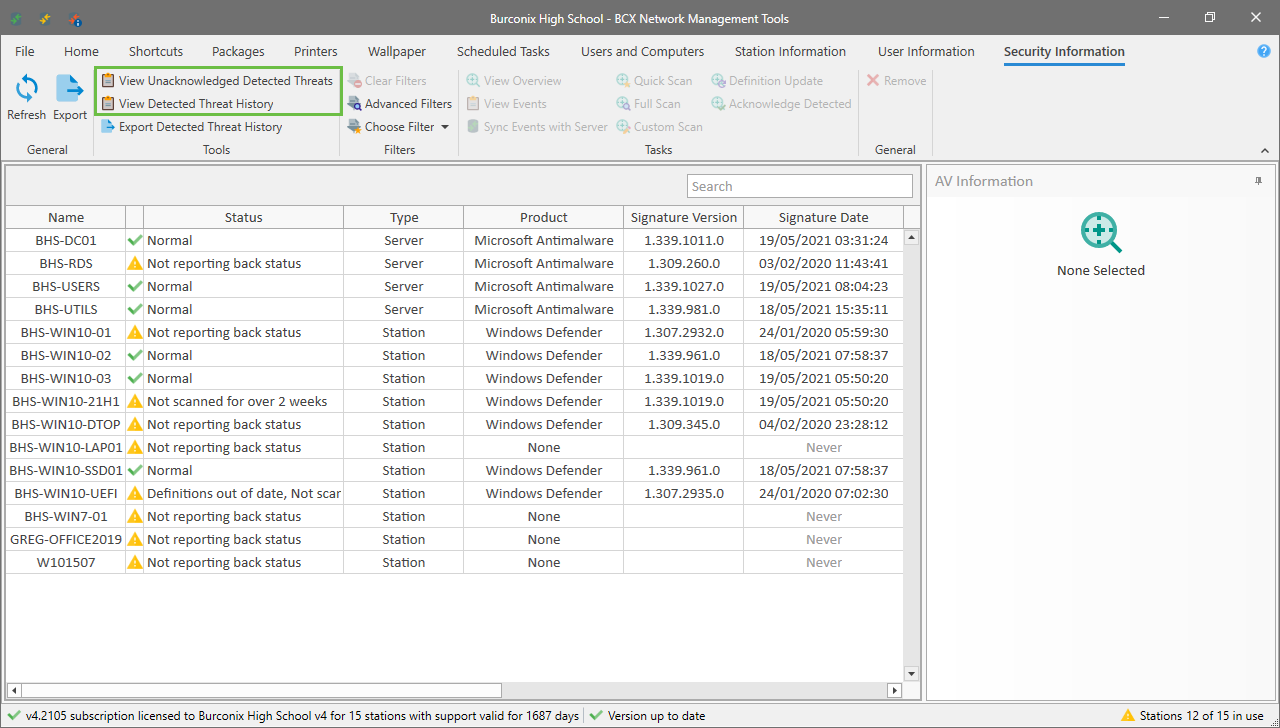
We will start by looking at the "Unacknowledged, and Detected Threat" reports Both options available here allow you to view detections in greater detail, and acknowledge threats.
Selecting "View All Unacknowledged Detected Threats" will display a listing of outstanding threats to follow up on.
The "View All Detected Threat History" will display all detected threats acknowledged or not.
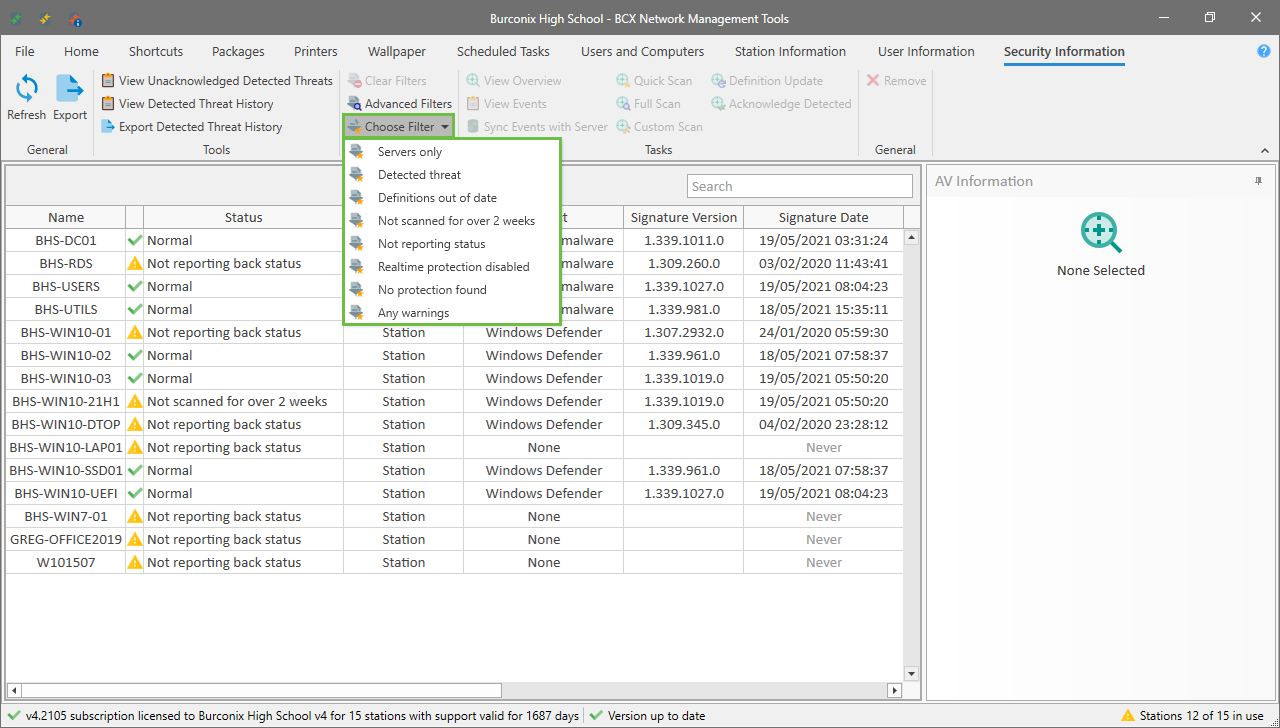
We will now look at the available "Filters".
The "Choose Filter" drop down provides access to a set of pre-defined set of filters you can apply to the collected data.
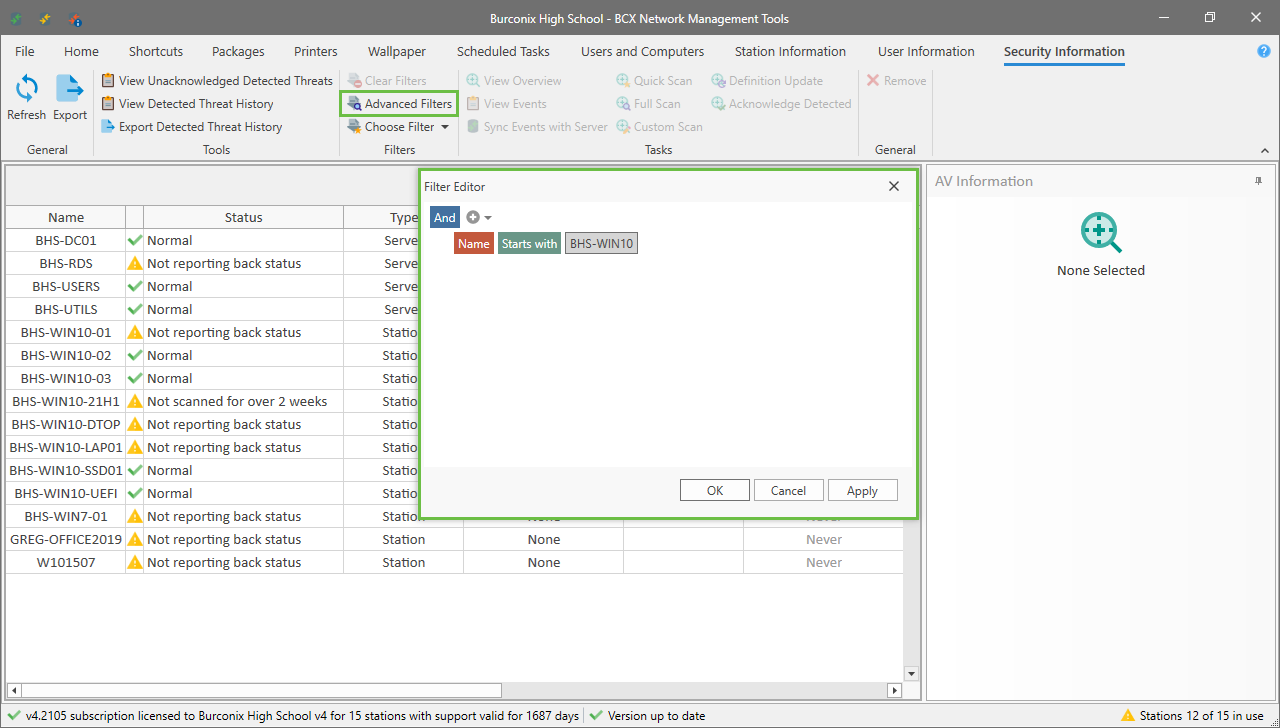
You can also select "Advanced Filters" to display the "Filter Editor" for defining your own filters.
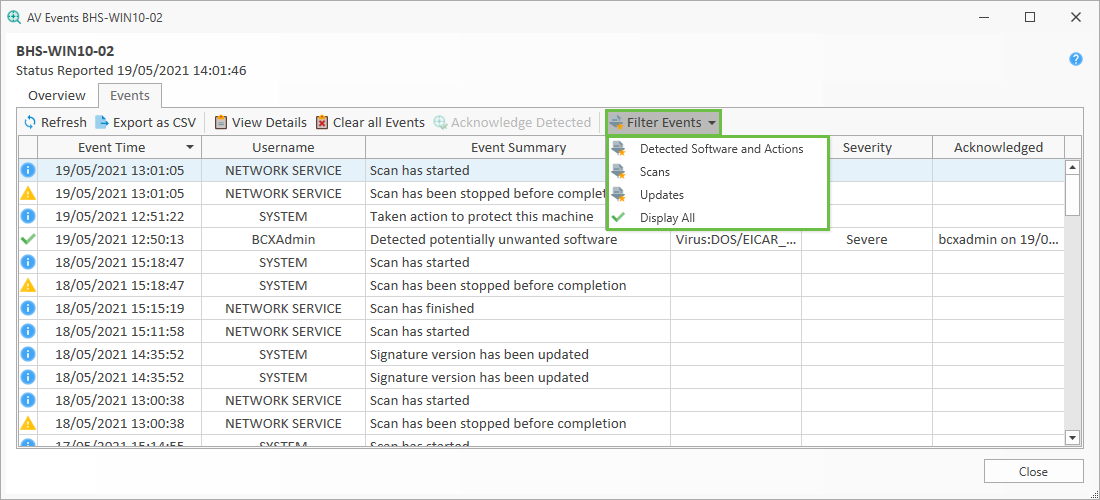
From within a stations Events tab, You can select from the Filter Events dropdown to specify the displayed data.
AV Tasks
From Security Information, choose a station and either right click to display available options, or choose one from the menus shown in the interface. Basically, the task you choose is run remotely on the selected station.
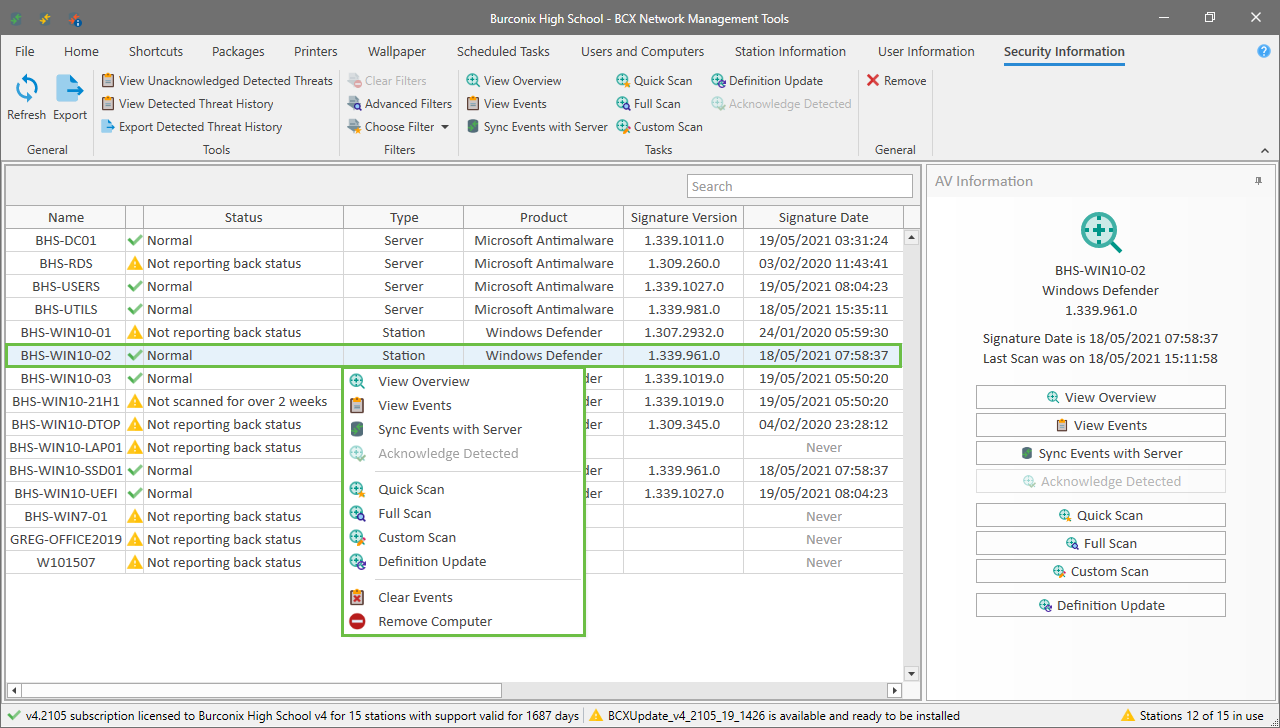 Image showing sec inf with tasks highlighted
The "Task Options" available are as follows:
Sync Events with Server - This collects and adds any new events from the selected client.
Acknowledge Detected - Becomes available when a detection event is selected, and allows you to acknowledge it.
Quick/Full/Custom Scan - Provides the facility to initiate the chosen scan type on the selected station.
Definition Update - Requests the station to perform an AV definition update.
Remove Computer - Removes the selected station from the AV Information interface.
Client Installation For Servers
Stations with BCX Client will automatically have AV Information collected.
For Servers etc. that don’t have the BCX Client, use the AV Reporting Services Tab to install the AV reporting client.
Click Push MSI to begin a client install. (The Target device will need .NET4.0 pre-installed).
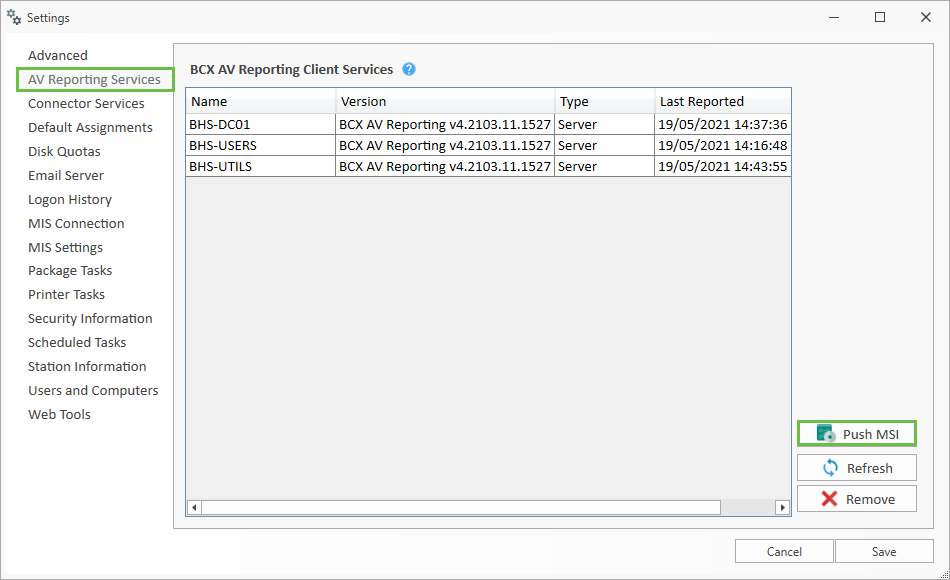 Image showing settings av reporting services
In the resulting interface, either enter the desired station name, or browse for the required server.
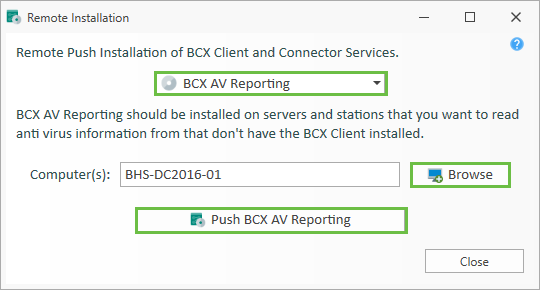 Image showing av install dialogue
Click Push BCX AV Reporting
File:bcx settings av reporting services install push.png Image showing av install dialogue highlight push
After confirming your choice, wait for the installation to complete and press Enter when prompted.
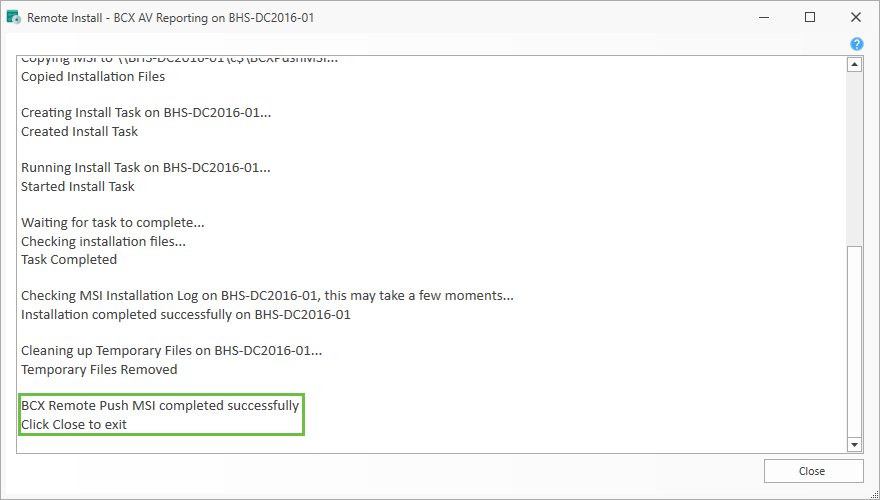 Image showing push complete window
The new deployment will appear in the AV Reporting Services tab, and will also be added to the Security Information Tab in BCX Manager.
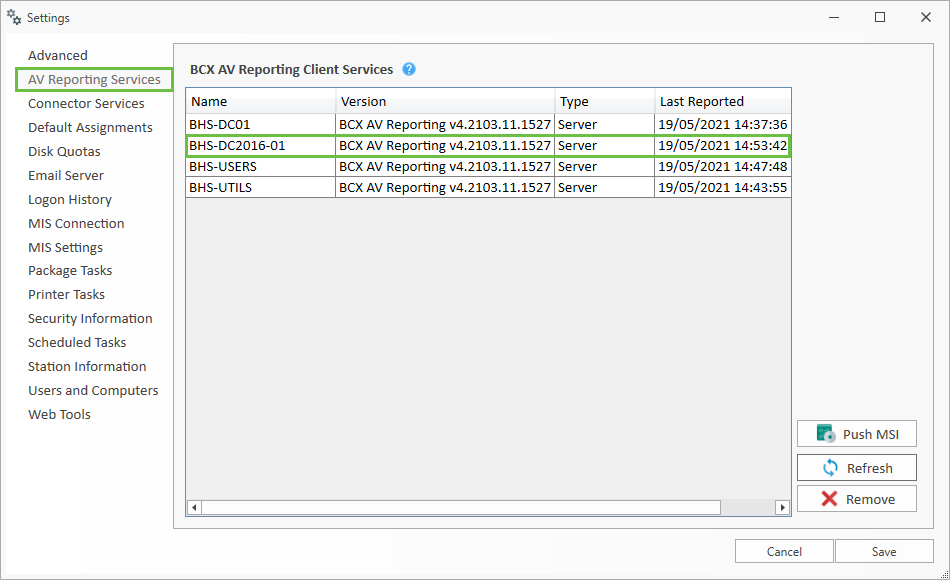 Image showing av rep services populated
AV Settings
To set up the AV feature in BCX go to File – Settings – AV Information Tab. From here select and adjust the settings as required.
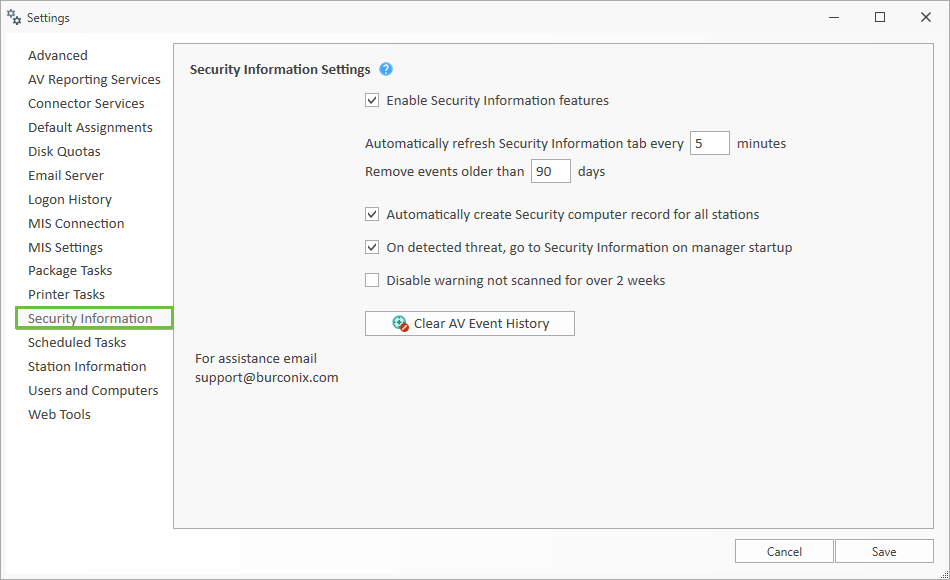 Image showing av settings
Enable AV information features – Tick to enable AV Information tab in BCX Manager (Default),
adjust refresh interval and retention period as required. Untick to disable.
Automatically create AV computer record for all stations - Tick to enable (Default), causes a record to be created for all stations existing in the Station Information tab, with or without an AV installation. Untick to disable.
On detected threat, go to AV Information on manager startup – Tick to enable (Default), forces the BCX Manager on startup, to open at the AV Information tab if a threat has been detected (or threats have not been acknowledged). Untick to disable.
Disable warning not scanned for over 2 weeks – Tick to enable, will not flag stations that have not been scanned for 2 weeks or more. Untick to disable (Default) and have stations not scanned present warnings.
Return to Contents page