Difference between revisions of "BCX Station Information"
(Created page with " This section of BCX Manager allows you simple access to automatic rebuilding of stations, a complete hardware audit of all stations running the BCX Client, remote management...") |
|||
| (21 intermediate revisions by the same user not shown) | |||
| Line 7: | Line 7: | ||
==How to configure build settings and Rebuild Stations== | ==How to configure build settings and Rebuild Stations== | ||
| + | |||
| + | |||
| + | |||
| + | From the Station Information tab you can configure the build settings to be used when a remote | ||
| + | rebuild request is sent to a station. | ||
| + | |||
| + | |||
| + | Click the Build Settings link in the right click menu, or | ||
| + | on the ribbon bar, to bring up the settings for the selected station. | ||
| + | |||
| + | If the NetBootUUID is blank you can click either the Set UUID or Set MAC button to write the required | ||
| + | data into Active Directory. This will enable the stations to automatically name themselves once built. | ||
| + | |||
| + | The WDS Build Group lists the currently configured automatic rebuild options. If you require an additional | ||
| + | option that is not listed please contact us. | ||
| + | |||
| + | |||
| + | [[File:bcx station information build.png|link=]] | ||
| + | |||
| + | |||
| + | Once you have the Build Settings correct you can simply select the stations you would like | ||
| + | to rebuild in the Station list and click Rebuild Station(s). | ||
| + | |||
| + | You will then be prompted to either run the task now or schedule a time for it to automatically take place. | ||
| + | |||
| + | The stations do not need to be turned on, if you have Wake on Lan enabled they will boot automatically | ||
| + | |||
| + | |||
| + | [[File:bcx station information rebuild.png|link=]] | ||
==Re running Logon and Syncing client with Server== | ==Re running Logon and Syncing client with Server== | ||
| + | |||
| + | |||
| + | When you change a shortcut assignment this is not sent immediately to the client but rather will take | ||
| + | place at the next logon. | ||
| + | |||
| + | Sometimes it can be useful to apply these changes without the user needed to log off | ||
| + | and back on again, such as when a whole class is already logged in. | ||
| + | |||
| + | You can select the stations you would like to send this command to in the Stations list and click | ||
| + | the Run User Logon button. This will apply any new Shortcuts, Printer task or Wallpaper Tasks to the | ||
| + | users on these stations. | ||
| + | |||
| + | Package Tasks similarly are applied in 30 minute intervals. | ||
| + | |||
| + | Should you need a package task to deploy immediately you can click the Sync Client button to request the station(s) to check in with the server and apply any | ||
| + | waiting package tasks. | ||
| + | |||
| + | |||
| + | [[File:bcx station information sync logon.png|link=]] | ||
==BCX Client Debug== | ==BCX Client Debug== | ||
| + | |||
| + | |||
| + | |||
| + | Sometimes to assist in troubleshooting BCX, it is required to put a BCX Client into Debug Mode. | ||
| + | |||
| + | The Debug status of a station is visible on the Station Information Tab in the Status and Client Debug columns. | ||
| + | |||
| + | A right click on a station provides the option to either enter or exit debug. | ||
| + | |||
| + | |||
| + | [[File:bcx station information debug.png|link=]] | ||
| + | |||
| + | |||
| + | When in debug, a BCX Client will write verbose logs to the client, which can be retrieved and forwarded to Burconix when requested. | ||
| + | |||
| + | This is best achieved by using the BCXLoghelper.exe from C:\Program Files\BCX\Client\. | ||
| + | |||
| + | |||
| + | [[File:bcx station information log helper location.png|link=]] | ||
| + | |||
| + | |||
| + | When using BCXLogHelper.exe we recommend option 1, and follow the wizard to completion. | ||
| + | |||
| + | |||
| + | [[File:bcx station information loghelper.png|link=]] | ||
==Asset Tags== | ==Asset Tags== | ||
| + | |||
| + | |||
| + | In station Information there is an editable Asset Tag field, allowing you to include further non-system generated information about your stations. | ||
| + | |||
| + | Clicking in the Field allows entry of data, and pressing enter moves to the next Asset Tag field below to allow for bulk entry. | ||
| + | |||
| + | |||
| + | [[File:bcx station information asset.png|link=]] | ||
| + | |||
| + | |||
| + | The contents of the Asset Tag field are also visible/editable on the Info Tab in station details. | ||
| + | |||
| + | |||
| + | [[File:bcx station information asset tab.png|link=]] | ||
==Custom Data Fields== | ==Custom Data Fields== | ||
| + | |||
| + | |||
| + | |||
| + | You can add up to 10 additional user definable data fields to display in Station Information. | ||
| + | |||
| + | These can consist of up to 6 text and 4 date fields, with tick boxes to enable their visibility. | ||
| + | |||
| + | Create and enable these in: File - Settings - Station Information - Show Additional Custom Station Information Tab. | ||
| + | |||
| + | |||
| + | [[File:bcx station information data settings.png|link=]] | ||
| + | |||
| + | |||
| + | The new fields will appear, and be available for data input in both the Station Information tab, and on a new tab in a station’s properties. | ||
| + | |||
| + | |||
| + | [[File:bcx station information data tab.png|link=]] | ||
| + | |||
| + | |||
| + | The data input is held in the BCX database and remains consistent whether the field is enabled or not. | ||
| + | |||
| + | Please be aware, deleting a data field will purge any data held in the database for that field. | ||
==Exporting Station information to CSV== | ==Exporting Station information to CSV== | ||
| + | |||
| + | |||
| + | The information in the Station Information tab can be exported to a CSV file in a single click, just select the | ||
| + | Export to CSV option in the ribbon bar. | ||
| + | |||
| + | This can then be imported into a 3rd party asset register or other system. | ||
| + | |||
| + | |||
| + | [[File:bcx station information export.png|link=]] | ||
==Configuring Remote Assistance and Remote Desktop Command== | ==Configuring Remote Assistance and Remote Desktop Command== | ||
| + | |||
| + | |||
| + | The Remote Desktop, Remote Assistance and Remote Management commands can all be customised from settings, accessed from the File menu or the ribbon bar. | ||
| + | |||
| + | By default these are set to use the integrated Microsoft utilities, but if you would prefer | ||
| + | to use different options simply set them here and they can be access in a single click from | ||
| + | the station information tab. | ||
| + | |||
| + | If you need any help configuring these options please contact support | ||
| + | |||
| + | |||
| + | [[File:bcx station information settings.png|link=]] | ||
==Filtering and Sorting Columns== | ==Filtering and Sorting Columns== | ||
| + | |||
| + | |||
| + | You can apply custom filters to the Station Information and User Information sections, simply hover over the column | ||
| + | heading and click on the filter icon that appears. | ||
| + | You can then select the option you would like to filter by and all the rows that contain values that don't match will be hidden. | ||
| + | You can then repeat this step on another column to create an even more specific filter. | ||
| + | |||
| + | You can also drag the columns to rearrange and it will be remembered the next time you load the manager | ||
| + | |||
| + | |||
| + | [[File:bcx station information filter.png|link=]] | ||
| + | |||
| + | |||
| + | Sorting the information can be achieved by either right clicking on the column heading and choosing the option from the list | ||
| + | or simply clicking the column heading you would like to sort by. | ||
| + | |||
| + | |||
| + | [[File:bcx station information sort.png|link=]] | ||
| + | |||
| + | |||
| + | You can use the advanced filters button to load the custom filter editor. | ||
| + | |||
| + | |||
| + | [[File:bcx station information adv filter.png|link=]] | ||
| + | |||
| + | |||
| + | Click on the + next to And to add another condition, or click on And to change the operator. | ||
| + | You can then quickly build up a filter based on multiple options. | ||
| + | Clicking on the blue text will allow you to choose other items to filter by, and clicking the green text will allow you to change the operator for this item. | ||
| + | |||
| + | |||
| + | |||
| + | |||
| + | Return to [[BCX_Network_Management_Tools|'''Contents page''']] | ||
Latest revision as of 10:55, 19 May 2021
This section of BCX Manager allows you simple access to automatic rebuilding of stations, a complete hardware audit of all stations running the BCX Client, remote management facilities and many more options Please click through the following guides to find out more.
Contents
How to configure build settings and Rebuild Stations
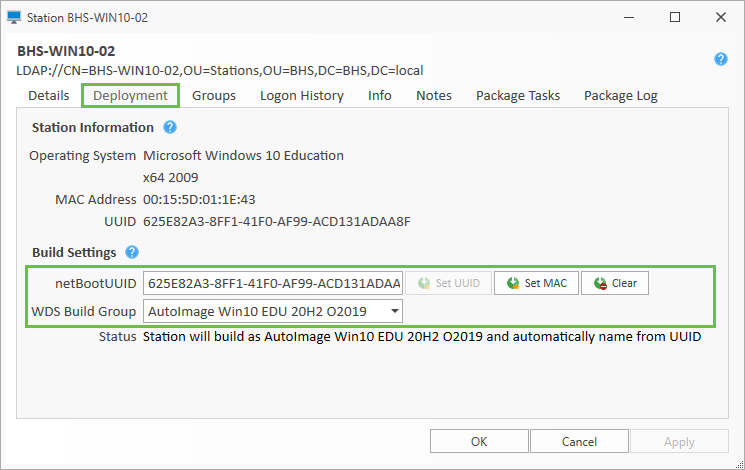
From the Station Information tab you can configure the build settings to be used when a remote rebuild request is sent to a station.
Click the Build Settings link in the right click menu, or
on the ribbon bar, to bring up the settings for the selected station.
If the NetBootUUID is blank you can click either the Set UUID or Set MAC button to write the required data into Active Directory. This will enable the stations to automatically name themselves once built.
The WDS Build Group lists the currently configured automatic rebuild options. If you require an additional option that is not listed please contact us.
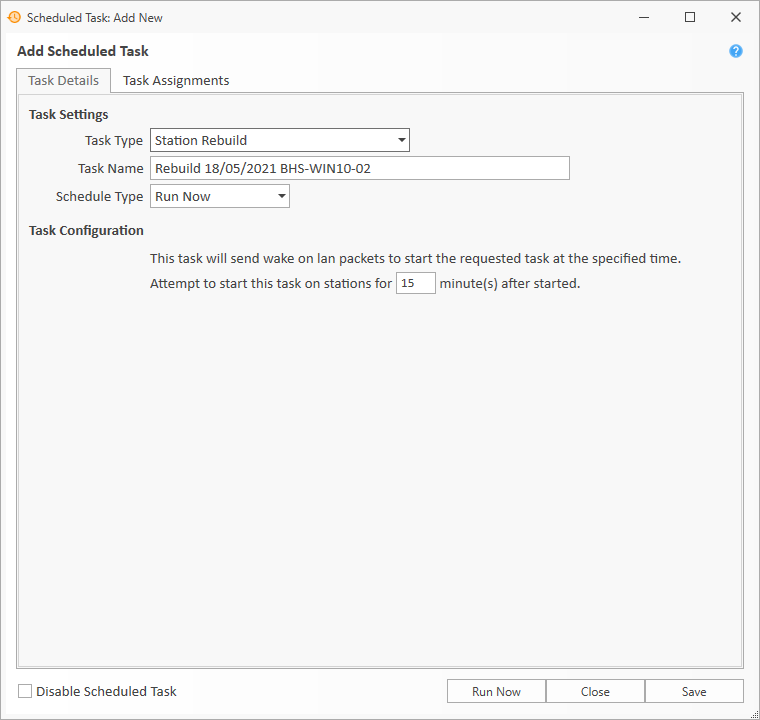
Once you have the Build Settings correct you can simply select the stations you would like
to rebuild in the Station list and click Rebuild Station(s).
You will then be prompted to either run the task now or schedule a time for it to automatically take place.
The stations do not need to be turned on, if you have Wake on Lan enabled they will boot automatically
Re running Logon and Syncing client with Server
When you change a shortcut assignment this is not sent immediately to the client but rather will take place at the next logon.
Sometimes it can be useful to apply these changes without the user needed to log off and back on again, such as when a whole class is already logged in.
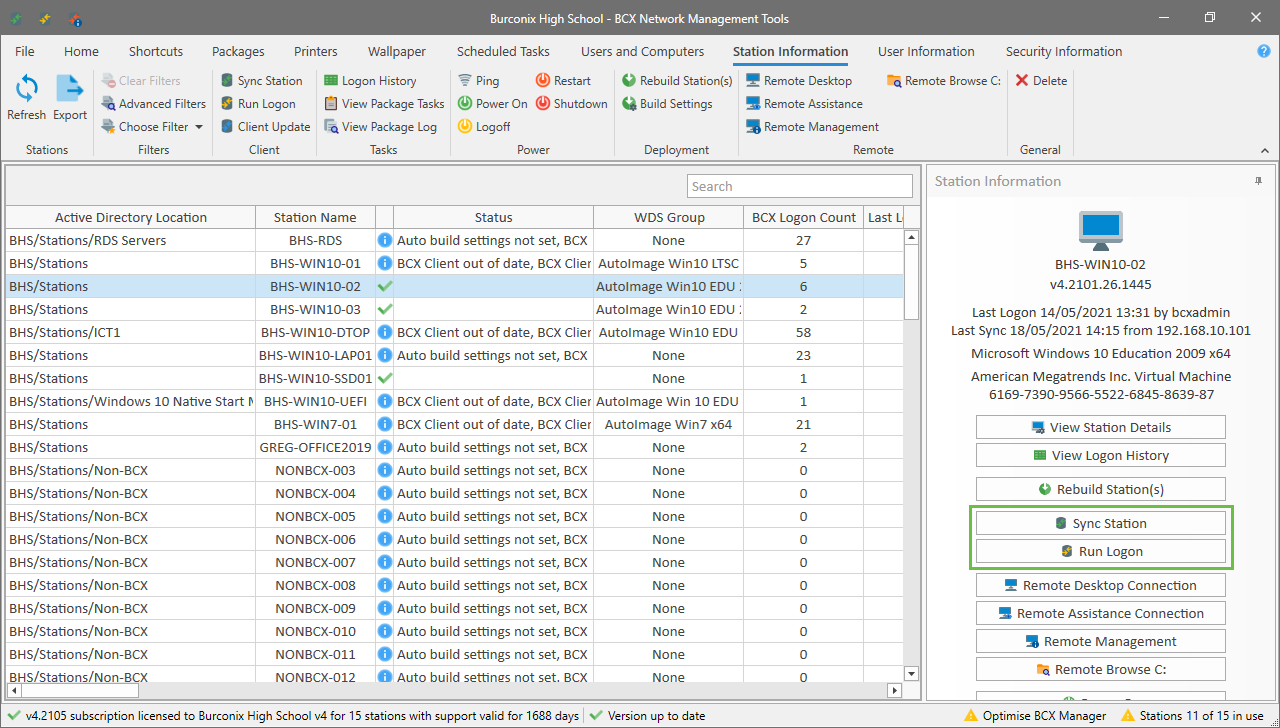
You can select the stations you would like to send this command to in the Stations list and click the Run User Logon button. This will apply any new Shortcuts, Printer task or Wallpaper Tasks to the users on these stations.
Package Tasks similarly are applied in 30 minute intervals.
Should you need a package task to deploy immediately you can click the Sync Client button to request the station(s) to check in with the server and apply any waiting package tasks.
BCX Client Debug
Sometimes to assist in troubleshooting BCX, it is required to put a BCX Client into Debug Mode.
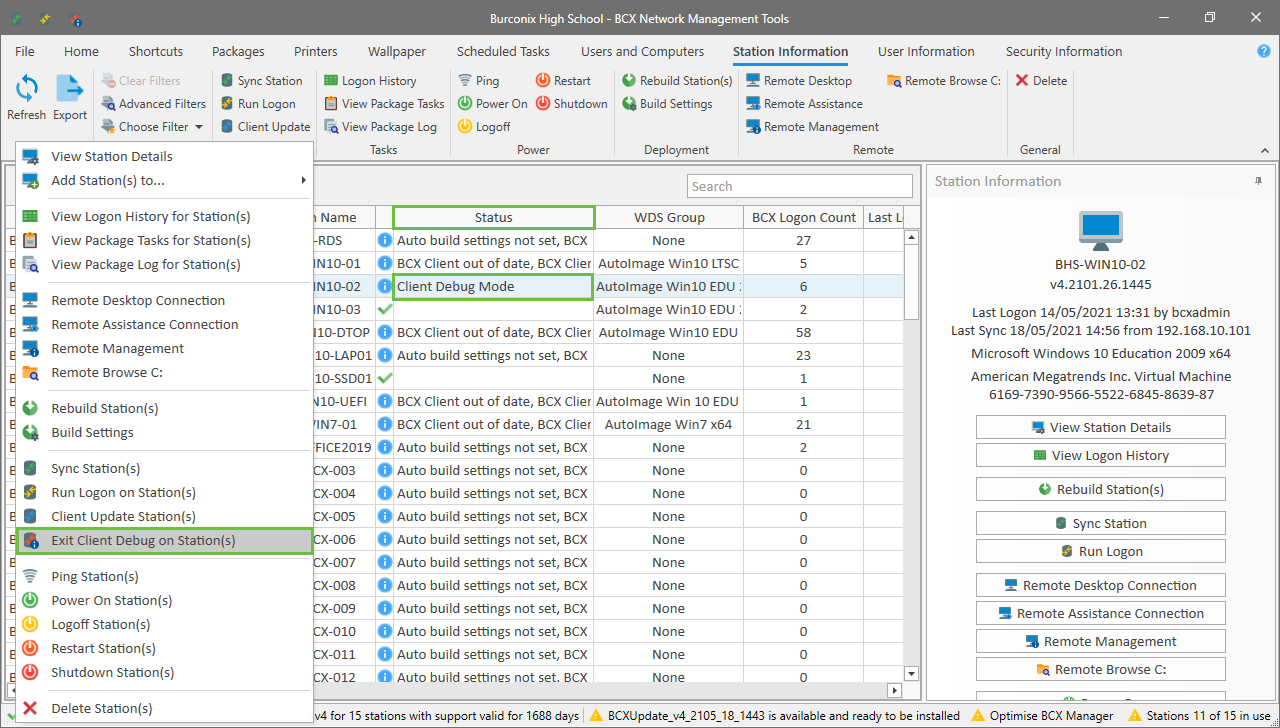
The Debug status of a station is visible on the Station Information Tab in the Status and Client Debug columns.
A right click on a station provides the option to either enter or exit debug.
When in debug, a BCX Client will write verbose logs to the client, which can be retrieved and forwarded to Burconix when requested.
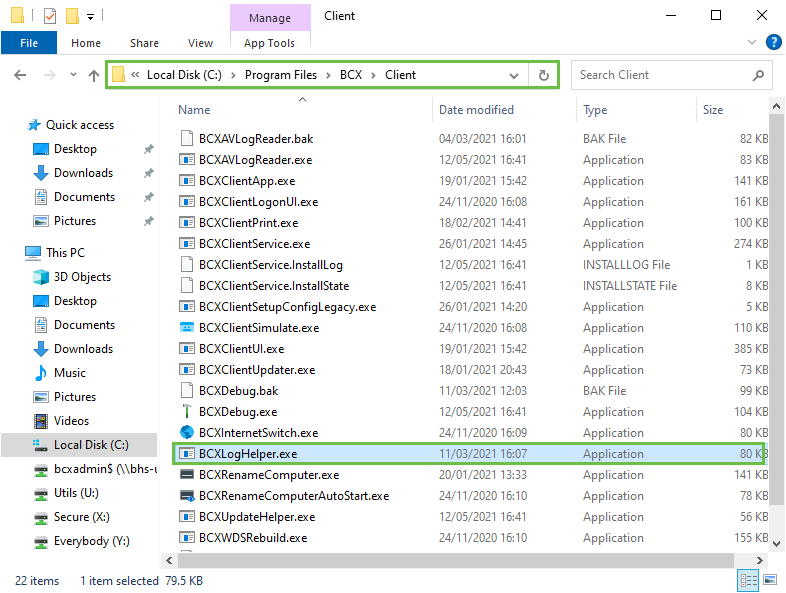
This is best achieved by using the BCXLoghelper.exe from C:\Program Files\BCX\Client\.
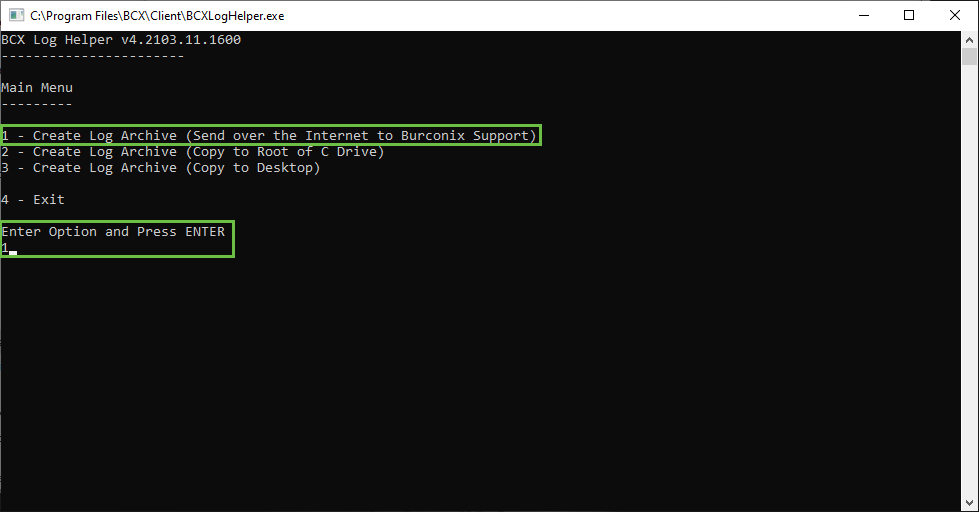
When using BCXLogHelper.exe we recommend option 1, and follow the wizard to completion.
Asset Tags
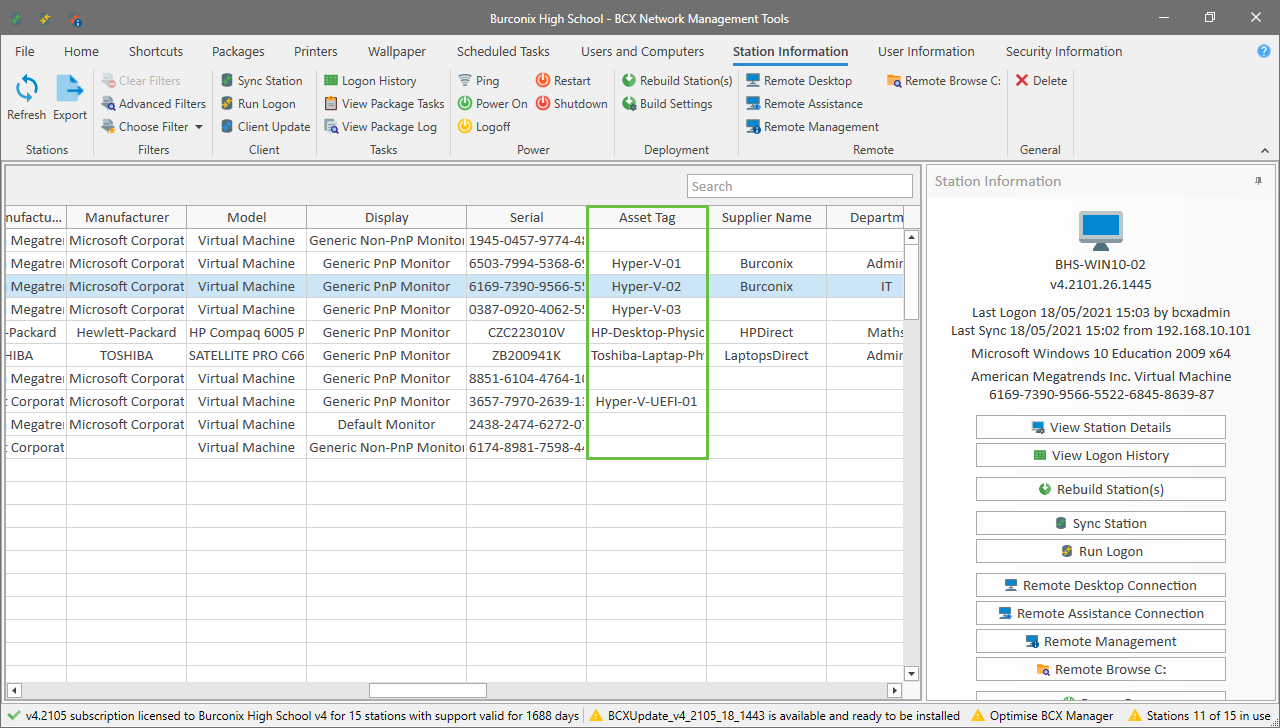
In station Information there is an editable Asset Tag field, allowing you to include further non-system generated information about your stations.
Clicking in the Field allows entry of data, and pressing enter moves to the next Asset Tag field below to allow for bulk entry.
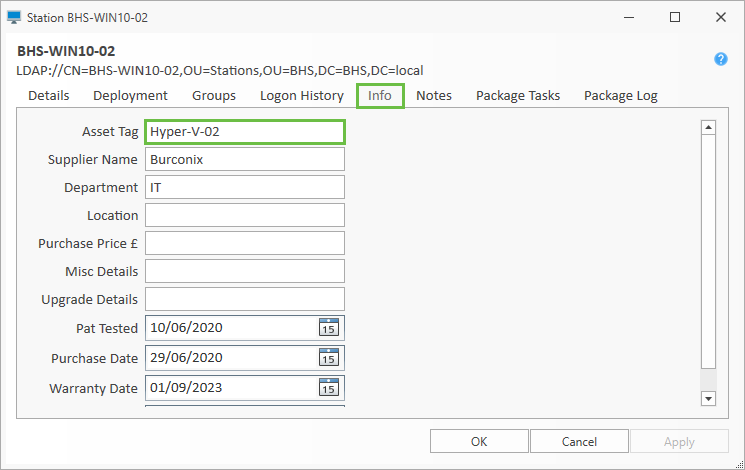
The contents of the Asset Tag field are also visible/editable on the Info Tab in station details.
Custom Data Fields
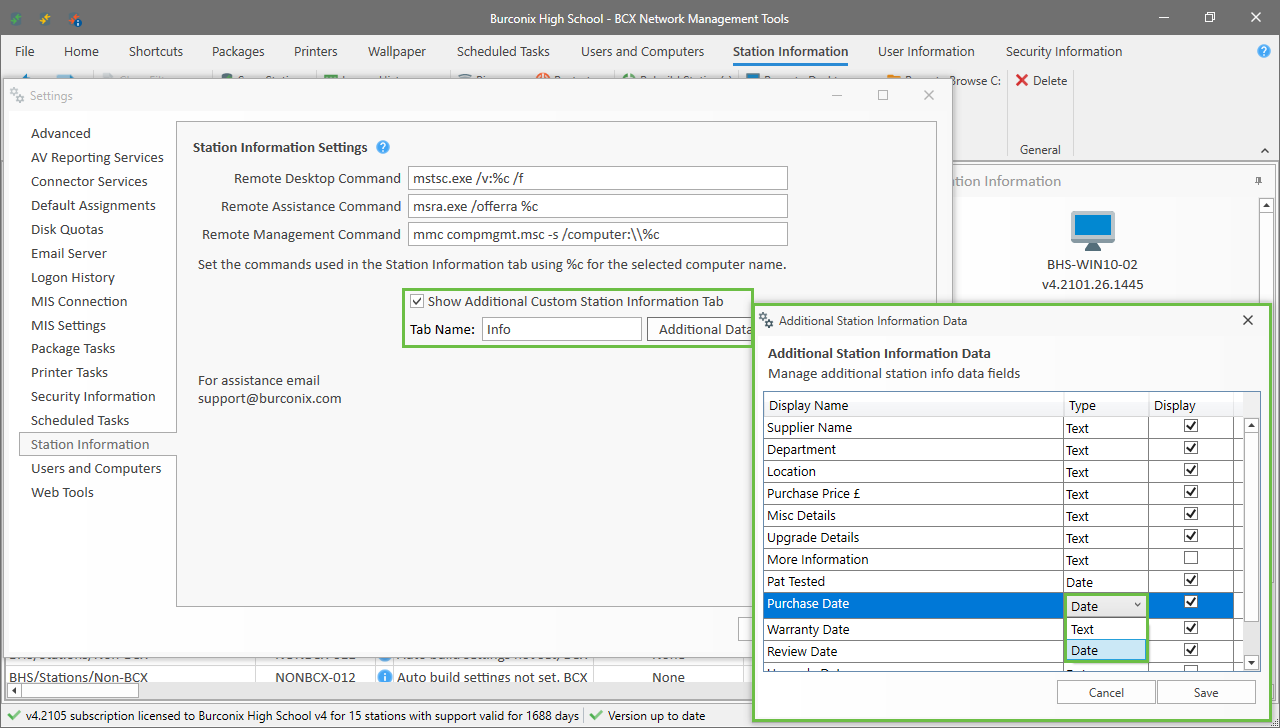
You can add up to 10 additional user definable data fields to display in Station Information.
These can consist of up to 6 text and 4 date fields, with tick boxes to enable their visibility.
Create and enable these in: File - Settings - Station Information - Show Additional Custom Station Information Tab.
The new fields will appear, and be available for data input in both the Station Information tab, and on a new tab in a station’s properties.
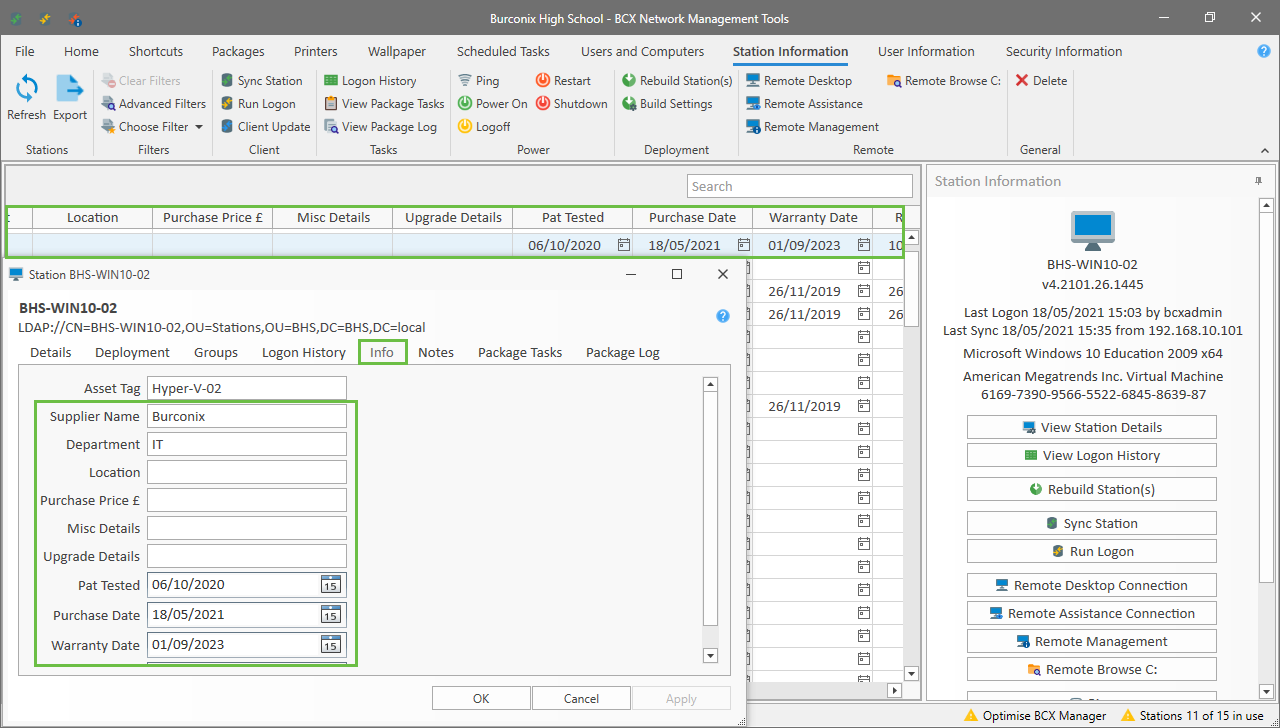
The data input is held in the BCX database and remains consistent whether the field is enabled or not.
Please be aware, deleting a data field will purge any data held in the database for that field.
Exporting Station information to CSV
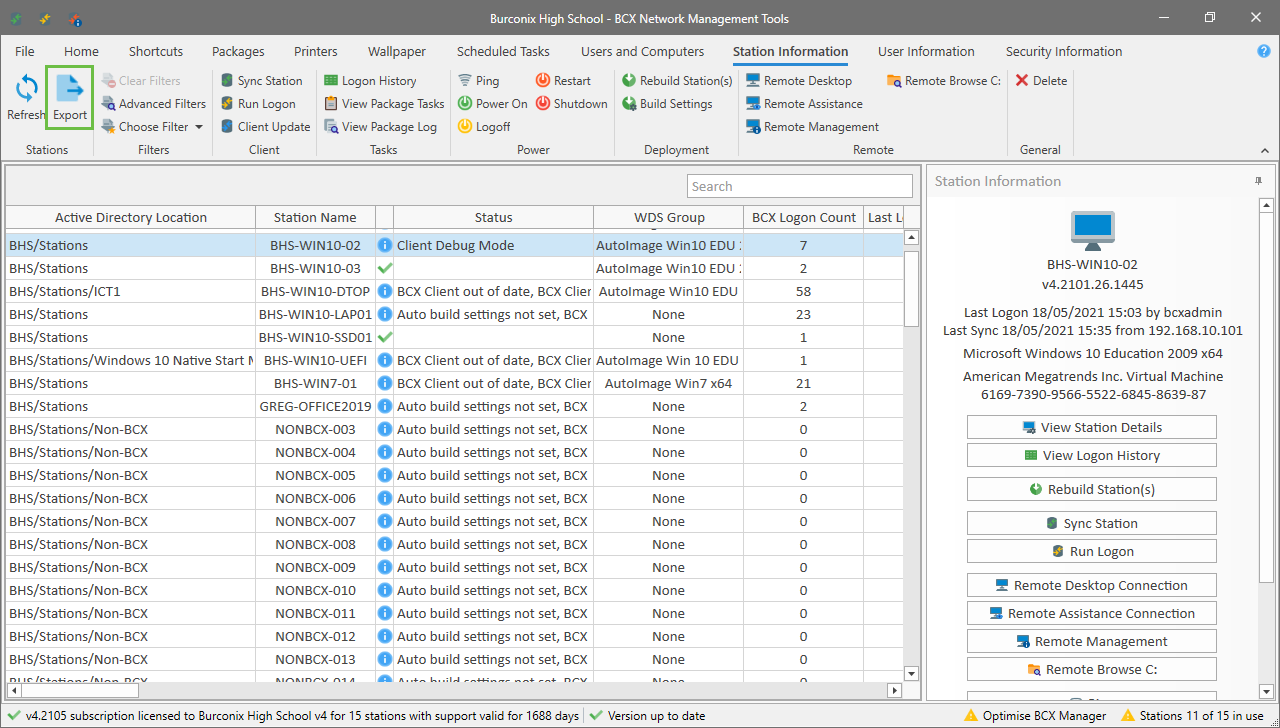
The information in the Station Information tab can be exported to a CSV file in a single click, just select the Export to CSV option in the ribbon bar.
This can then be imported into a 3rd party asset register or other system.
Configuring Remote Assistance and Remote Desktop Command
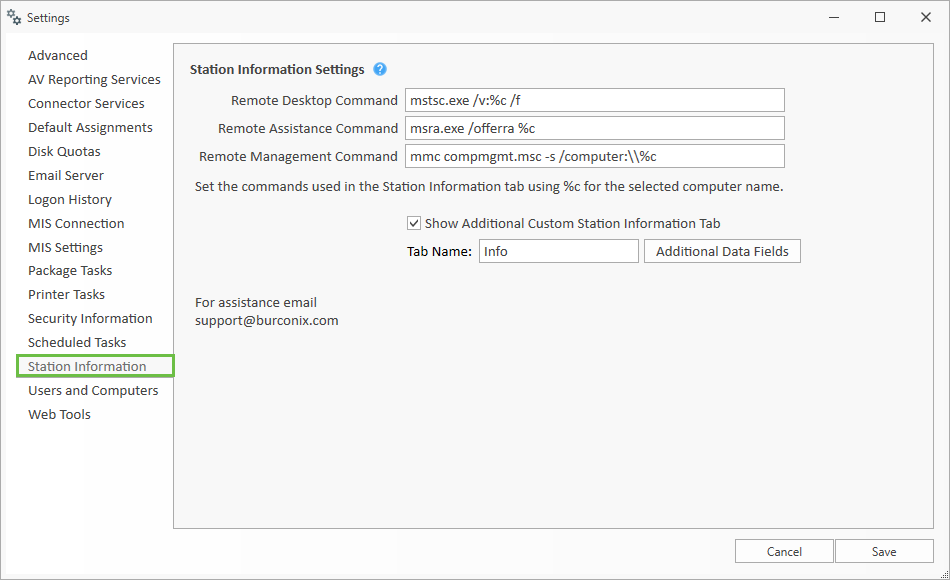
The Remote Desktop, Remote Assistance and Remote Management commands can all be customised from settings, accessed from the File menu or the ribbon bar.
By default these are set to use the integrated Microsoft utilities, but if you would prefer to use different options simply set them here and they can be access in a single click from the station information tab.
If you need any help configuring these options please contact support
Filtering and Sorting Columns
You can apply custom filters to the Station Information and User Information sections, simply hover over the column heading and click on the filter icon that appears. You can then select the option you would like to filter by and all the rows that contain values that don't match will be hidden. You can then repeat this step on another column to create an even more specific filter.
You can also drag the columns to rearrange and it will be remembered the next time you load the manager
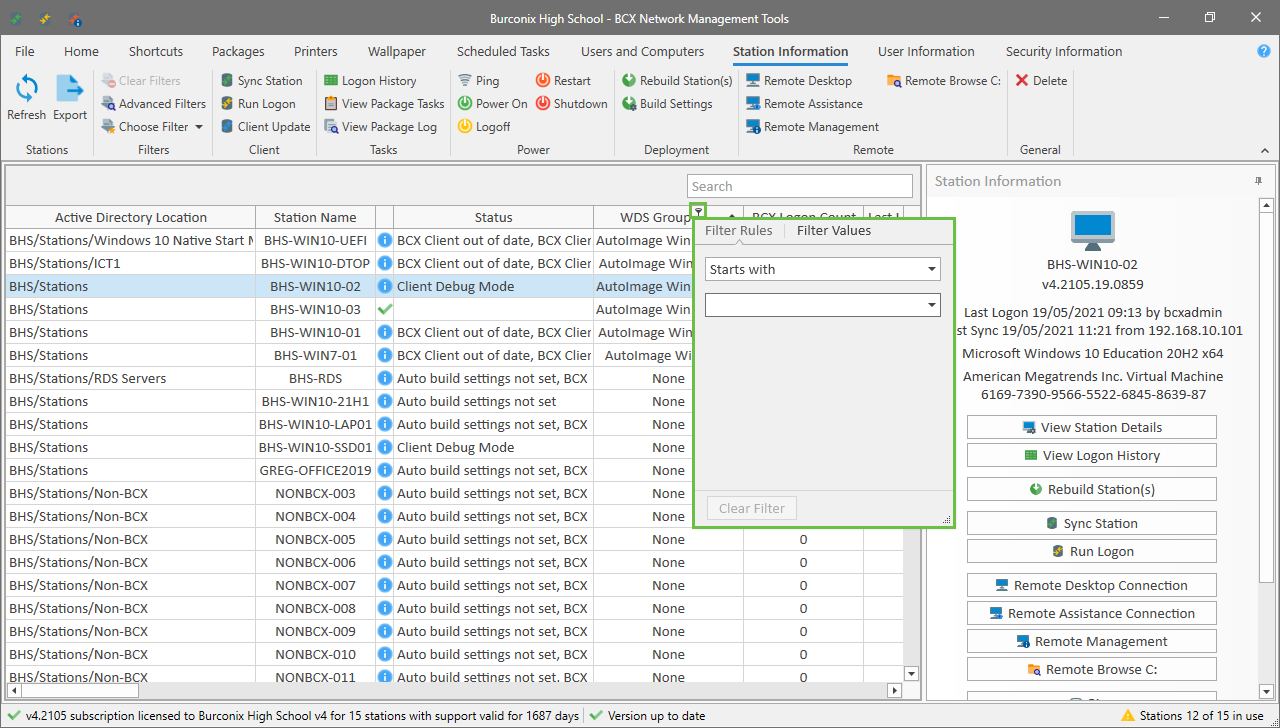
Sorting the information can be achieved by either right clicking on the column heading and choosing the option from the list
or simply clicking the column heading you would like to sort by.
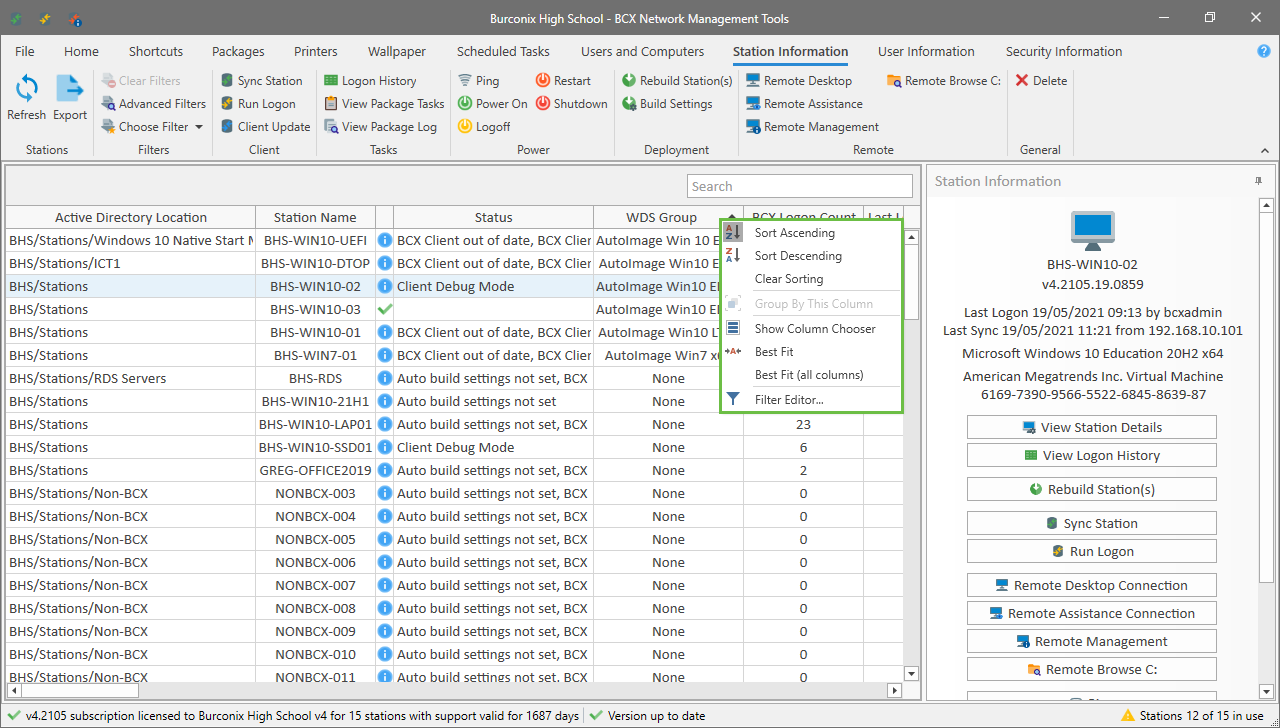
You can use the advanced filters button to load the custom filter editor.
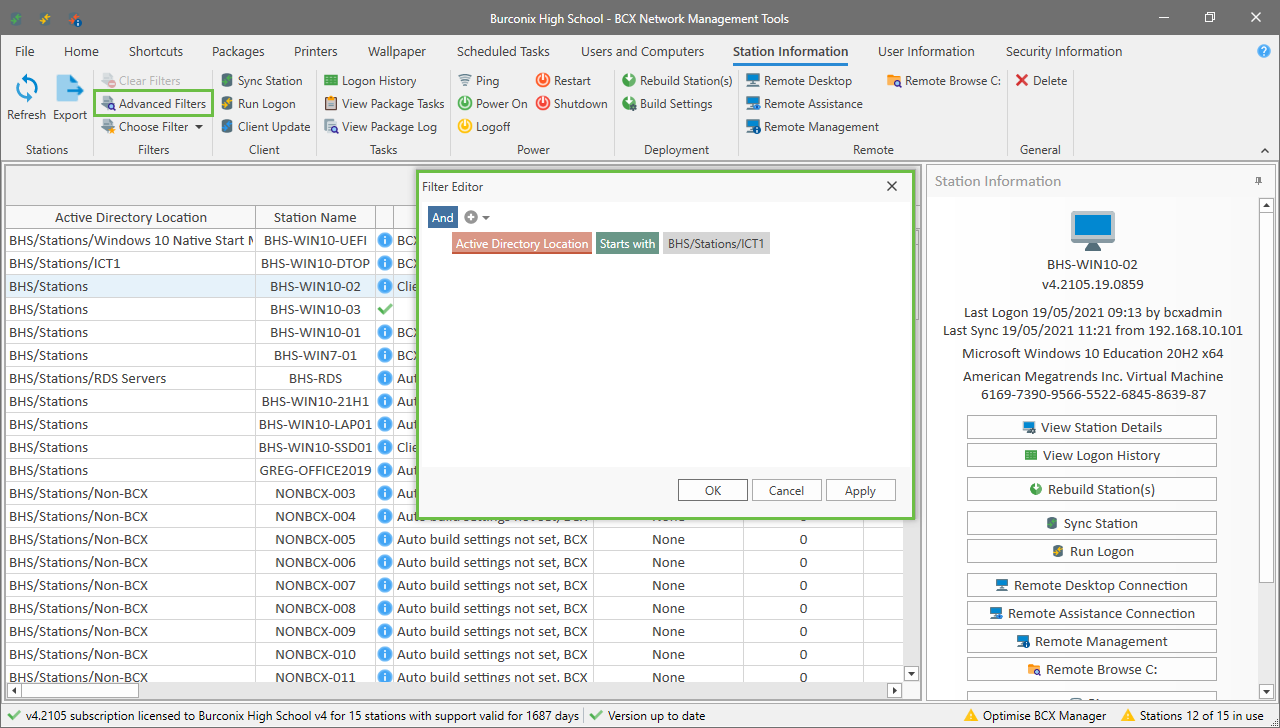
Click on the + next to And to add another condition, or click on And to change the operator.
You can then quickly build up a filter based on multiple options.
Clicking on the blue text will allow you to choose other items to filter by, and clicking the green text will allow you to change the operator for this item.
Return to Contents page