Difference between revisions of "BCX Printer Tasks"
(Created page with " Printer Tasks are used to install printers for a user on workstations. You can prioritise printers, set defaults and even let users select their own on logon. ==How deploy...") |
|||
| (9 intermediate revisions by the same user not shown) | |||
| Line 8: | Line 8: | ||
In BCX Manager, select the Printer Tasks tab. | In BCX Manager, select the Printer Tasks tab. | ||
| − | At the top click 'Add | + | At the top click 'Add' |
| − | [[File:bcx printer tasks add.png|link=]] | + | [[File:bcx printer tasks add.png|link=]] |
| − | Give the task a meaningful name to help you identify it, for example: 'Students - ICT Suite 1' | + | Give the task a meaningful name to help you identify it, for example: 'Students - ICT Suite 1' and click the 'Add Printer' button. |
| − | [[File:bcx printer tasks name.png|link=]] | + | [[File:bcx printer tasks name.png|link=]] |
| − | |||
| − | |||
| − | |||
| − | |||
| − | |||
| − | |||
| Line 37: | Line 31: | ||
| − | [[File:bcx printer tasks select printer.png|link=]] | + | [[File:bcx printer tasks select printer.png|link=]] |
| Line 51: | Line 45: | ||
| − | [[File:bcx printer tasks add manual printer.png|link=]] | + | [[File:bcx printer tasks add manual printer.png|link=]] |
| Line 57: | Line 51: | ||
| − | [[File:bcx printer tasks default printer.png|link=]] | + | [[File:bcx printer tasks default printer.png|link=]] |
| − | |||
| − | |||
| − | |||
| − | |||
| − | [[BCX_Printer_Tasks#Defaulting_to_a_Local_Printer]] | + | [[BCX_Printer_Tasks#Defaulting_to_a_Local_Printer|Custom/local printer defaults]] are described in another section of the manual. |
| Line 71: | Line 61: | ||
| − | [[File:bcx printer tasks edit printer.png|link=]] | + | [[File:bcx printer tasks edit printer.png|link=]] |
| Line 79: | Line 69: | ||
| − | [[File:bcx printer tasks edit details.png|link=]] | + | [[File:bcx printer tasks edit details.png|link=]] |
That concludes setting up a basic printer task, you would now [[BCX Assignments and Exceptions|assign it]] in the same way as other BCX Tasks. | That concludes setting up a basic printer task, you would now [[BCX Assignments and Exceptions|assign it]] in the same way as other BCX Tasks. | ||
| − | |||
==Allowing user to select printers on logon== | ==Allowing user to select printers on logon== | ||
| Line 93: | Line 82: | ||
| − | [[File:bcx printer tasks logon prompt.png|link=]] | + | [[File:bcx printer tasks logon prompt.png|link=]] |
| Line 99: | Line 88: | ||
| − | [[File:bcx printer tasks logon prompt selection.png|link=]] | + | [[File:bcx printer tasks logon prompt selection.png|link=]] |
| − | |||
| − | |||
| − | |||
| − | |||
| − | |||
| + | Manual Selection will give the user an icon in the notification area to prompt them that then can select printers at any time. This will also be available when you have finished the selection at logon. | ||
Printers can be selected by location in the drop down list, based on the location properties defined on the properties of the printer in the task. | Printers can be selected by location in the drop down list, based on the location properties defined on the properties of the printer in the task. | ||
| − | |||
==Defaulting to a Local Printer== | ==Defaulting to a Local Printer== | ||
| Line 123: | Line 107: | ||
| − | [[File:bcx printer tasks custom default.png|link=]] | + | [[File:bcx printer tasks custom default.png|link=]] |
A backup default can be specified to fallback on if there is an issue with the local printer. | A backup default can be specified to fallback on if there is an issue with the local printer. | ||
| − | |||
| − | |||
==Advanced Printer Options== | ==Advanced Printer Options== | ||
| Line 137: | Line 119: | ||
| − | [[File:bcx printer tasks advanced.png|link=]] | + | [[File:bcx printer tasks advanced.png|link=]] |
| Line 147: | Line 129: | ||
The task that is selected for this will go by the priority. 1 being the highest and 20 being the lowest. So if two tasks at priority 10 and priority 11, both have the override enabled, the task with priority 10 will be the only task to run. | The task that is selected for this will go by the priority. 1 being the highest and 20 being the lowest. So if two tasks at priority 10 and priority 11, both have the override enabled, the task with priority 10 will be the only task to run. | ||
The default printer will also be selected from the highest priority task, if more than 1 task runs to connect printers. | The default printer will also be selected from the highest priority task, if more than 1 task runs to connect printers. | ||
| − | |||
| − | |||
==Verifying Printer Connections== | ==Verifying Printer Connections== | ||
Latest revision as of 15:16, 29 April 2021
Printer Tasks are used to install printers for a user on workstations. You can prioritise printers, set defaults and even let users select their own on logon.
Contents
How deploy a new Network Printer
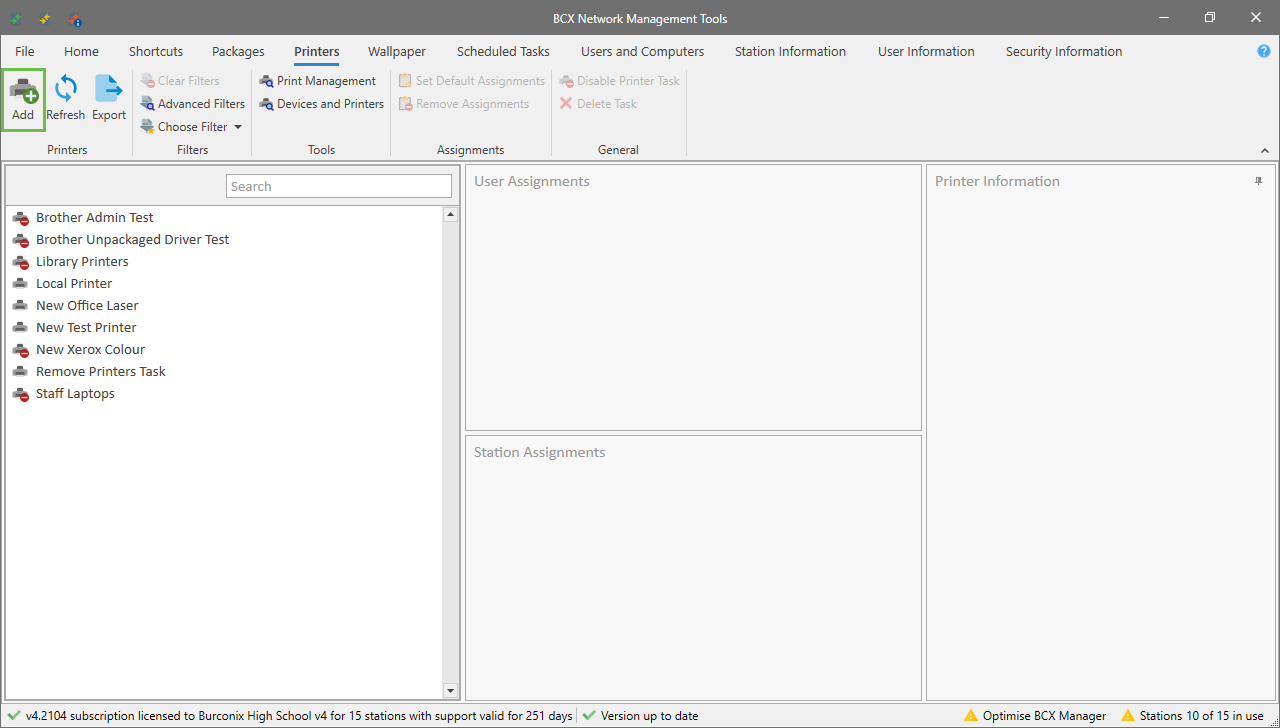
In BCX Manager, select the Printer Tasks tab.
At the top click 'Add'
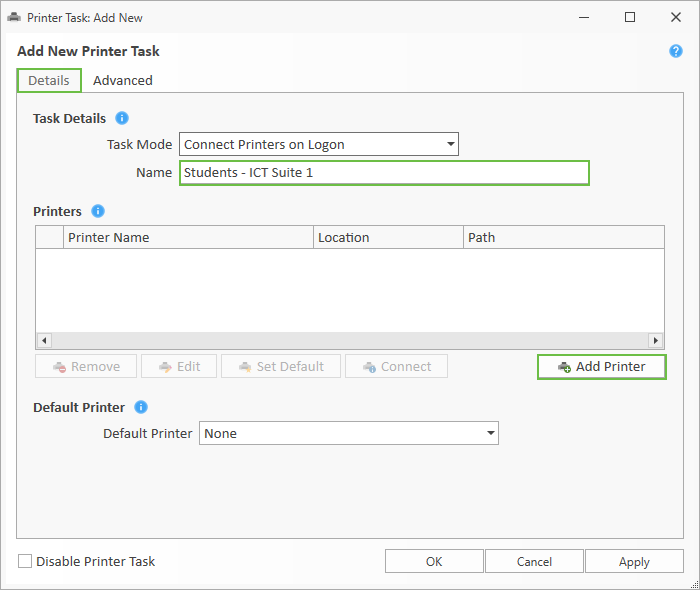
Give the task a meaningful name to help you identify it, for example: 'Students - ICT Suite 1' and click the 'Add Printer' button.
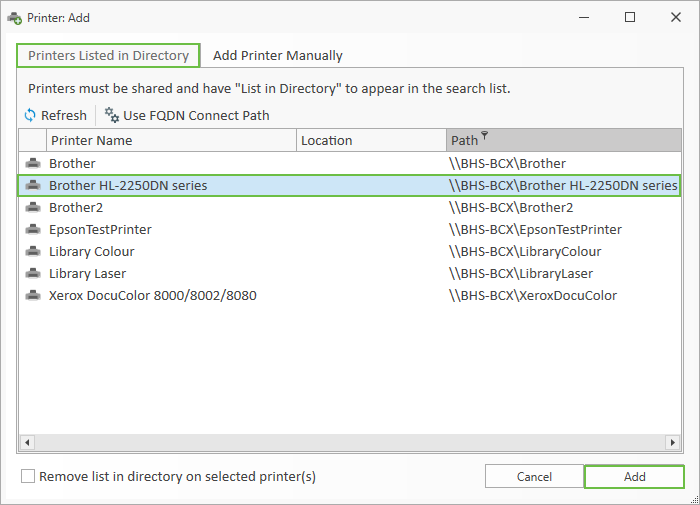
Select the printer(s) in the list you wish to deploy and click 'Add'
Only printers listed in the directory from the print server will be found and listed here.
You can select multiple printers at this point by holding the shift or control key.
You can tick the box at the bottom of the selection list to remove the printers from the directory once added to the task.
This prevents people finding them and adding them to computers in areas in which they are not intended to be used.
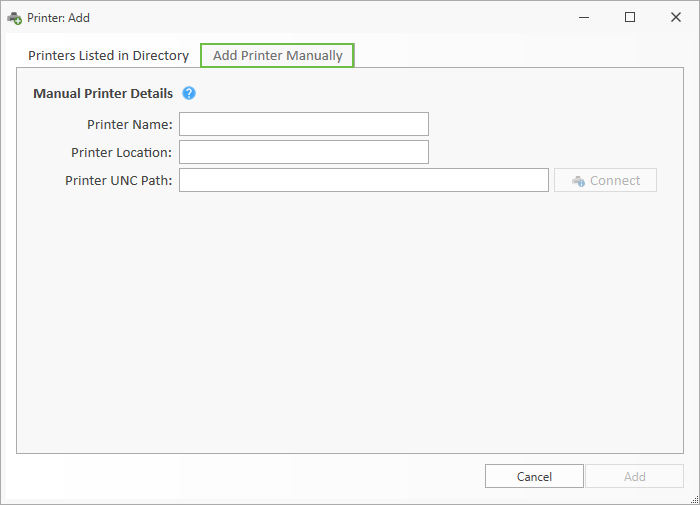
You can also add a printer manually. These might be printers shared from a workstation in a work area rather than a print server, or a printer that isn't listed in the directory.
Here you can type a name, location and the UNC path to connect to.
The printer name is how the printer will be displayed when connected, and also how the user will see the name in a list when connecting it manually.
Location will also effect how the end-user see's the printer when selecting manually. Choose something meaningful to aid selection.
The UNC path must match the UNC exactly. Click connect to confirm that the printer can be found.
You can select a default printer at the bottom of the dialog in the dropdown list.
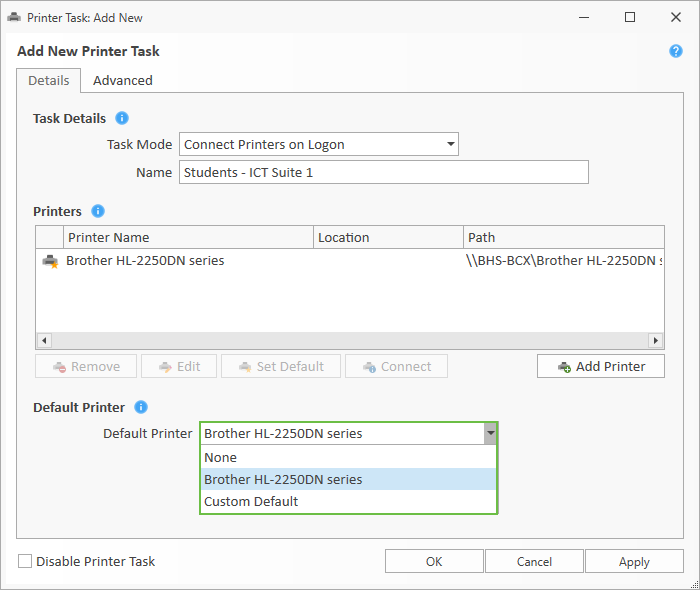
Custom/local printer defaults are described in another section of the manual.
You can edit printers before finishing the task to give meaningful names and locations to printers that have been selected from a print server.
Select the printer to edit and click 'Edit'
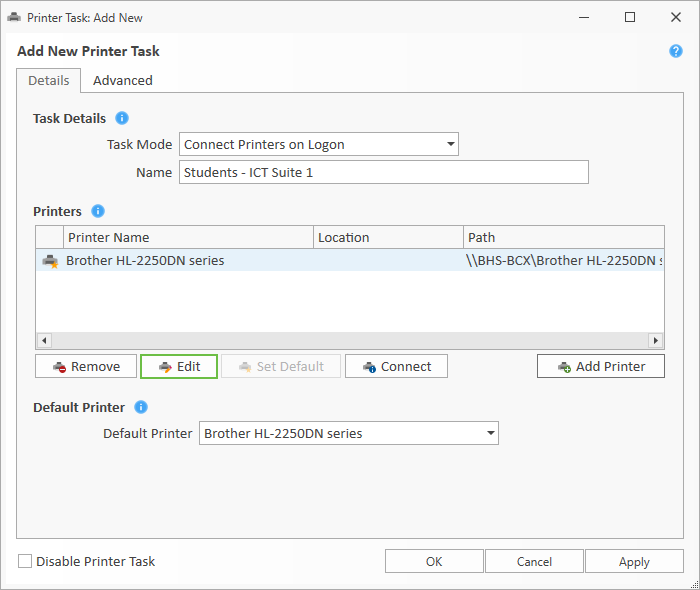
This will give you the window where you can enter custom details to make the printer appear in a meaningful way to the end-user.
At this point it is advised to click 'Connect' to ensure the UNC path is correct.
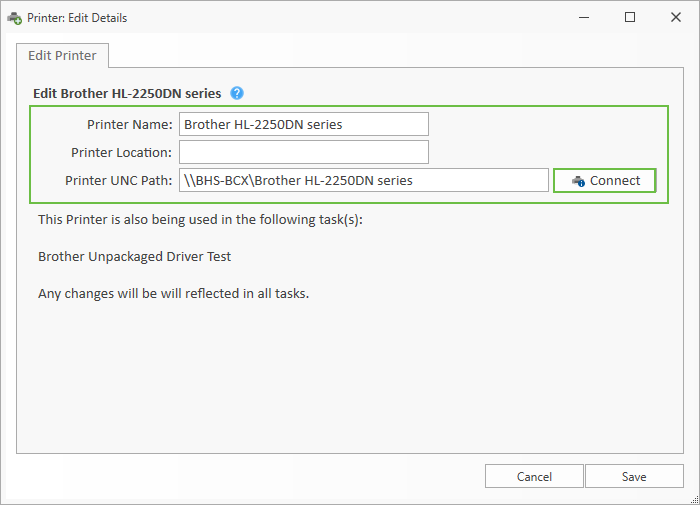
That concludes setting up a basic printer task, you would now assign it in the same way as other BCX Tasks.
Allowing user to select printers on logon
When setting up a printer task, you can give users the option to select their printers they want to connect to.
This is done from the first drop down box at the top. You can select to prompt the user on logon or pick them manually without prompting.
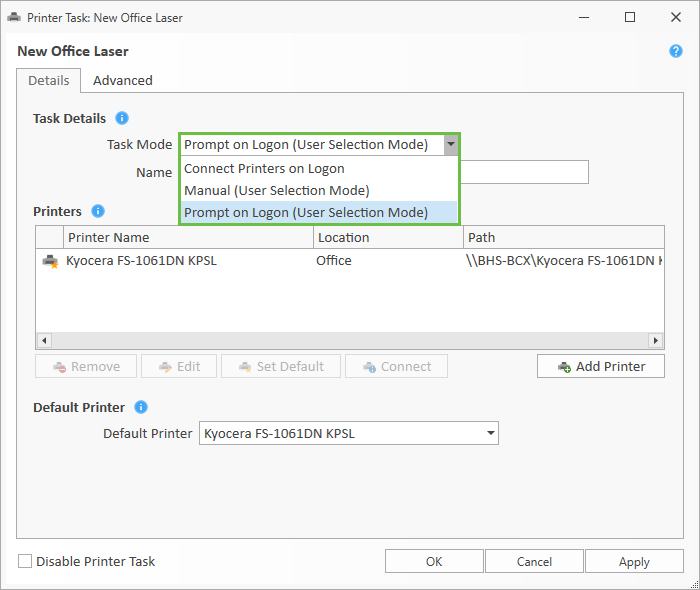
Prompt at Logon will give users this window when they login
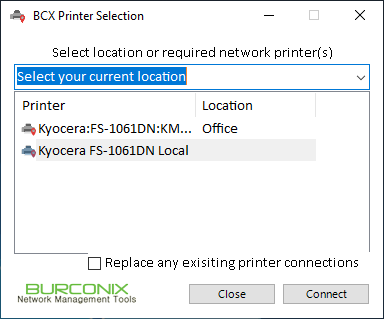
Manual Selection will give the user an icon in the notification area to prompt them that then can select printers at any time. This will also be available when you have finished the selection at logon.
Printers can be selected by location in the drop down list, based on the location properties defined on the properties of the printer in the task.
Defaulting to a Local Printer
You can set a default printer as a local printer on a workstation. This is useful in offices where a user may want to print to their local printer for security reasons.
To do this, select 'Custom Default' on the Default Printer selection drop down box.
If you are running the manager on the workstation that you wish to set the custom default, you can click Browse Local. This will let you select a local printer that already exists.
Otherwise you can just type in the name of the printer manually.
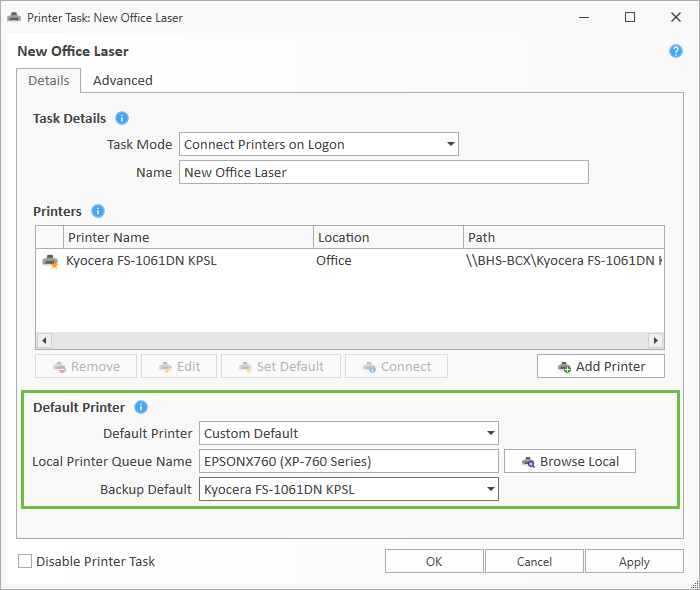
A backup default can be specified to fallback on if there is an issue with the local printer.
Advanced Printer Options
There are some advanced options you can set within printer tasks.
These can be useful when two or more printer tasks fulfil the same user and station criteria but you want to decide on a favoured option.
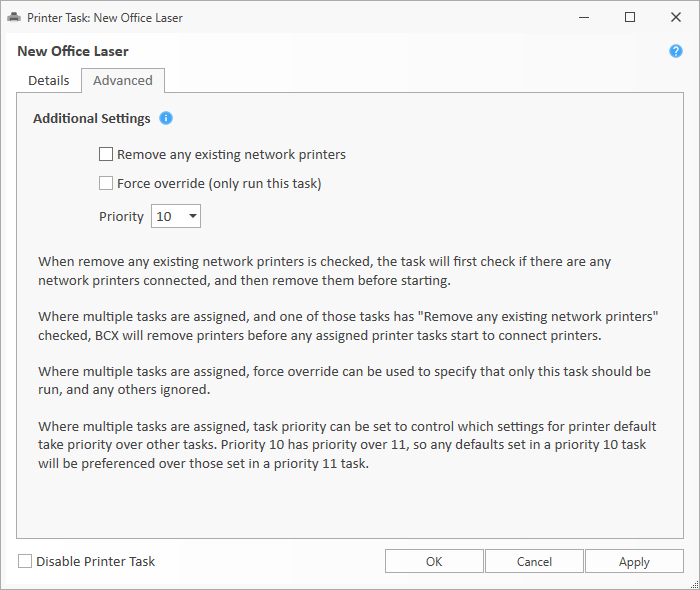
These can be useful when two or more printer tasks fulfil the same user and station criteria but you want to decide on a favoured option.
Remove any existing network printers will remove any network printers that exist before the task continues. Where multiple tasks are assigned and fulfil the user and station criteria, the client will check ALL the tasks for any that have this option enabled and remove them before assigning the printers from the assigned tasks if it is found enabled on any of the tasks.
Force override will allow only one task to run when the box is checked. The task that is selected for this will go by the priority. 1 being the highest and 20 being the lowest. So if two tasks at priority 10 and priority 11, both have the override enabled, the task with priority 10 will be the only task to run. The default printer will also be selected from the highest priority task, if more than 1 task runs to connect printers.
Verifying Printer Connections
The easiest way to verify printer connections is to assign all printers in a printer task to a manager account. Log in to a manager account on a workstation. A 32bit and a 64bit one if you have a mixed environment. Send a test page to each printer from both types and check that it prints. If this works its generally acceptable to believe that the end-user will get the same experience.
Return to Contents page